Tecny-Farma setup
The integration of the robot through system settings is specific to each brand of robot as they reflect the features of the robot system and interface.
Click here for CRx interface setup.
Click here for RoboPharma setup.
Click here for Rowa setup.
Click here for Willach Consis setup.
You cannot run the initial Tecny-Farma set-up without a System Administration Key Code. Telephone Service Desk for assistance.
Once a System Administration Key Code has been entered, on the server or standalone PC, proceed straight to Tools > Pharmacy Details > Setup.

-
Check
 the box Enable robot services
 -
There is now an additional tab - Robot - on the Pharmacy Details screen. This additional tab will remain present so long as the robot option is selected.
-
If not already selected, select Tecny-Farma as the Robot type.
Configuration tab > Connection Settings
-
Enter the IP Address for the computer that is loaded with the Rowa Speedcase interface program
-
Enter the port number - usually 1003
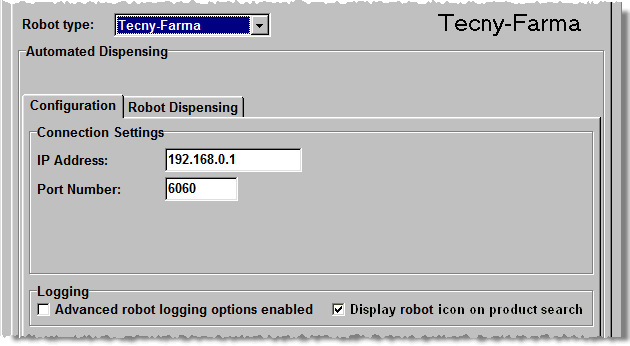
Advanced logging
An option exists to enable advanced logging functionality
in the Tecny-Farma Controller. Check ![]() this option to add messaging the Pharmacy Manager log file, which will
detail all sent and received messages to and from Tecny-Farma, and from
the client to the server.
this option to add messaging the Pharmacy Manager log file, which will
detail all sent and received messages to and from Tecny-Farma, and from
the client to the server.
You cannot alter the Advanced logging option without a System Administration Key Code. Telephone Service Desk for assistance.
Display robot icon
For convenience when selecting items, it is possible to distinguish robot stock by the adjacent R. However, this visual support may have an impact on performance in terms of thew time it takes to compile the list.
-
Uncheck
 this
Display robot icon option
in the event that you encounter performance issues.
this
Display robot icon option
in the event that you encounter performance issues.
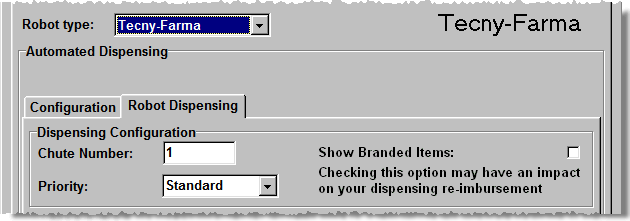
Robot dispensing tab > Dispensing configuration
-
Enter the chute number this PC will be controlling
If they exist, multiple chutes can be designated on a network system. This set-up operation will be repeated on each client workstation. Different chute numbers can be applied e.g. server linked to chute 1, first client linked to chute number 2, second client to chute number 3 etc etc.
-
Click OK to retain and confirm these settings.
-
Close Pharmacy Manager when prompted and restart the program so the new settings can take effect.
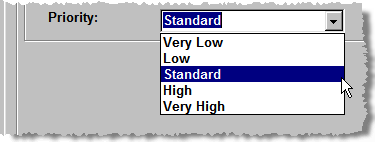
Priority
-
Enter the priority choosing from the range between very low and very high.
The priority determines how quickly prescriptions will move through the queue in the robot. A high priority prescription may leapfrog a lower priority prescription to be dispensed first. For this to become effective, you have to return to the Automated Settings and change this setting prior to dispensing a prescription that you would like to queue-jump.
-
Click OK to retain and confirm these settings.
-
Close Pharmacy Manager when prompted and restart the program so the new settings can take effect.
Show branded items
By default, Pharmacy Manager will only display generic items when the written as is a generic item. There are exceptions to this rule. However, if you always want to include branded options in the display:
-
Check
the box Show branded items
If you dispense a branded item against a prescribed generic, your reimbursement will not cover your costs.
Robot advanced features

This option, when selected will dispense an additional pack from the robot when a 'part pack' is required. For example, an item packed in 28s, for which 42 is being dispensed, will release 2 packs without further prompting. The unused balance is transferred to shelf stock.
Confirm stock
This option, when checked, will synchronise stock levels between the robot and Pharmacy Manager.
The stock synchronisation will be done at the point of finding the written product item and may take a few seconds. If the robot has several makes of a product in stock, the synchronisation time may take a little longer.
The benefit of synchronising the stock is that the stock figures shown on the robot selection window will all be up-to-date.
The synchronisation will also be triggered when you use
![]() &
&![]() to switch generic makes or
to switch generic makes or
![]() &
&![]() to change brands for any
robot items shown in the list.
to change brands for any
robot items shown in the list.
-
Click OK to acknowledge and close the message.
-
In the event that the connection is not successful, review your settings and make any necessary adjustments, then retry. Alternatively, telephone Service Desk for assistance.
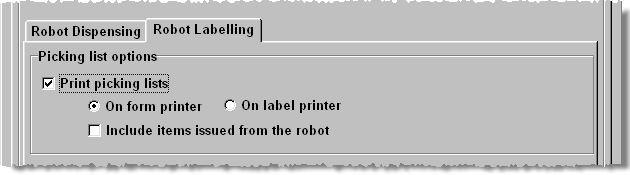
Picking list options
A picking list can be printed to assist in identifying stock locations for items that are held both in the robot and on the shelf.
Indicate whether a picking list is to be printed and, if so, on which printer.
-
Check
the
Print picking lists box to
enable -
Select
 either
Form printer or Label
printer
either
Form printer or Label
printer
-
Click OK to retain and confirm these settings.
-
Close Pharmacy Manager when prompted and restart the program so the new settings can take effect.