CRx interface setup
The integration of the robot through system settings is specific to each brand of robot as they reflect the features of the robot system and interface.
Click here for RoboPharma setup.
Click here for Rowa setup.
Click here for Tecny-Farma setup.
Click here for Willach Consis setup.
 You
cannot run the initial CRx interface set-up without a System
Administration Key Code. Telephone Service Desk for assistance.
You
cannot run the initial CRx interface set-up without a System
Administration Key Code. Telephone Service Desk for assistance.
Once a System Administration Key Code has been entered, on the server or standalone PC, proceed straight to Tools > Pharmacy Details > Setup.
There are two configuration options. The CRx packing robot may be the only robot on attached to a Pharmacy Manager system. Alternatively, there may be both a dispensing robot and the CRx interface packing robot.

-
Check
 the
box Enable robot services
the
box Enable robot services -
If another robot is already enabled, you will need to
 uncheck this setting and then recheck
.
uncheck this setting and then recheck
.

-
Check
the box Enable
CRx service for MDS -
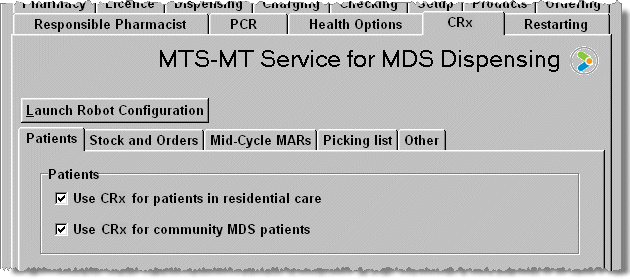
There is now an additional tab - CRx interface - on the Pharmacy Details screen. This additional tab will remain present so long as the CRx robot option is selected.
Activation wizard
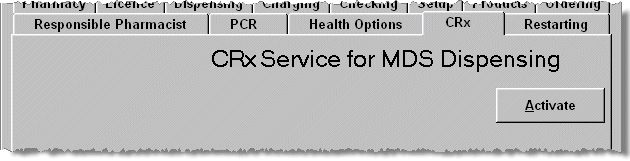
-
Click the Activate button
-
The Activation wizard starts
You will usually have any of these wizard steps correctly input as part of the robot set-up.

If your CRx interface robot is located in the same premises as this Pharmacy Manager system,
-
 Choose Local connection agency
If your are connected to a CRx system at another location, you are a satellite.
-
Choose Patient specific supply service
(satellite)
-
Click the Next button to move to the next stage of the wizard.
Patient settings
-
The next stage of the wizard appears.
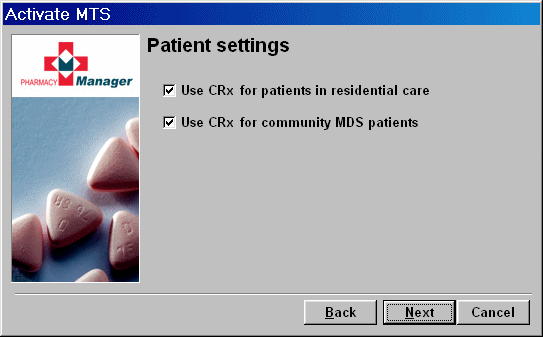
If you are going to provide CRx containers to patients in nursing homes,
-
Choose Use CRx for patients in residential
care
Additionally, if you are going to provide containers to MDSC patients,
-
Choose Use CRx for community MDS
patients
-
Click the Next button to move to the next stage of the wizard.
Stock & ordering
-
The next stage of the wizard appears.
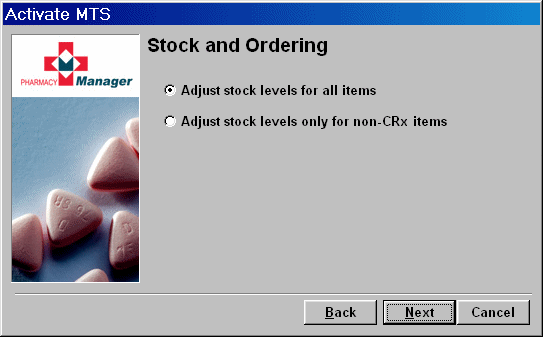
It would be more applicable if your CRx robot is located in the same premises as this Pharmacy Manager system to
-
Choose Adjust stock levels for all
items
If the robot is on the premises, the stock usage will trigger orders in the conventional manner.
If your are connected to a CRx system at another location as a satellite
-
Choose Adjust stock levels only for
non-CRx items
If the robot is not on the premises, the stock usage will not trigger orders in the conventional manner. CRx interface dispensing will not affect stock levels.
-
Click the Next button to move to the next stage of the wizard.
Mid-cycle MARs
-
The next stage of the wizard appears.
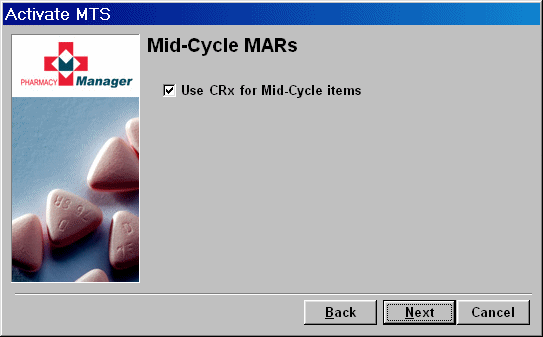
-
Choose Use CRx for mid-cycle items
-
to ignore this option
-
Click the Next button to move to the next stage of the wizard.
Picking list
-
The next stage of the wizard appears.
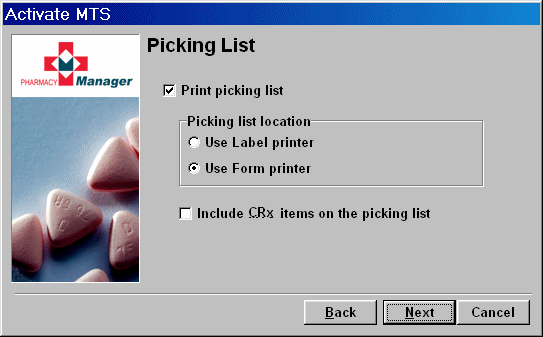
The picking list is useful if you are dispensing a prescription that includes CRx and non-CRx items. The picking list helps direct you to the items that will be on your own shelves.
-
Choose Print picking list
The picking list can be on labels or paper.
-
Choose Label printer or Form printer
This option gives you a breakdown of both shelf and CRx items.
-
Choose Include CRx items on the picking
list
-
Click the Next button to move to the next stage of the wizard.
Finished
-
The final stage of the wizard appears.
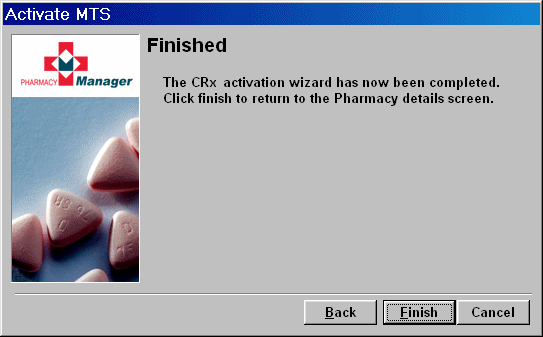
-
Click the Finish button to end the wizard.
Robot configuration
The robot configuration utility starts automatically.
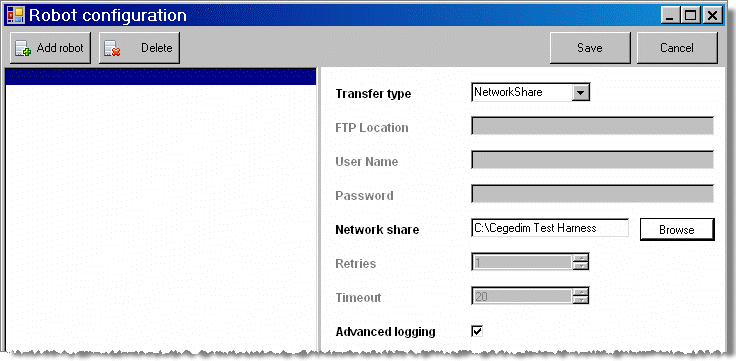
Set the Transfer type
Network share
This is the option to pick if your CRx robot is in the same building as the Pharmacy Manager system.
FTP
This is the option to pick if your CRx robot is not in the same building as the Pharmacy Manager system, for example, you are a satellite branch so far as the robot is concerned.
Whichever option you select, complete the available settings as directed.
-
Check
the box to activate
Advanced logging -
Click the Save button to save your settings.
-
Click the
 to close
and exit
to close
and exit
Advanced logging
A further option exists to enable the recording of communications between Pharmacy Manager and the robot.
Check ![]() this option to add messaging
the Pharmacy Manager log file, which will detail all sent and received
messages to and from the robot, and from the client to the server.
this option to add messaging
the Pharmacy Manager log file, which will detail all sent and received
messages to and from the robot, and from the client to the server.
By default these advanced logging options will be unchecked (switched off). You are only likely to need them if you encounter an unexplained problem operating your robot as the detail they provide will assist Service Desk.
You cannot alter either of the Advanced logging options without a System Administration Key Code. Telephone Service Desk for assistance.
Changes to configuration
![]() Subsequent changes can only
be completed when a System
Administration Key has been entered. Telephone Service Desk for
assistance in making this change.
Subsequent changes can only
be completed when a System
Administration Key has been entered. Telephone Service Desk for
assistance in making this change.
-
Click the CRx interface tab
-
Click the appropriate tab and make the adjustments you require as detailed in the wizard stages above.