Guidelines - Creating a Report
When you select a report, it goes straight to the printer.
This topic demonstrates how to create an example Report:
The example report has the following features:
- Medical History
- Repeat Therapy
- Last five Therapy issues
- last Smear result
- Contraception
- Test Results
-
A filter for age and sex to exclude the Smear and Contraception entries showing for males, or females under 13 years and over 55 years.
To design a report:
- From Consultation Manager, select Guidelines - Select Guideline.
- The Select Guideline by Mnemonic screen displays. Now, either:
- Select New, which we are doing in this example, or
- To copy or edit an existing report, display all Guidelines by removing the tick in Centrally Issued and pressing Enter on your key board to display a list of all Guidelines. Highlight the one required and select either Copy or Edit:

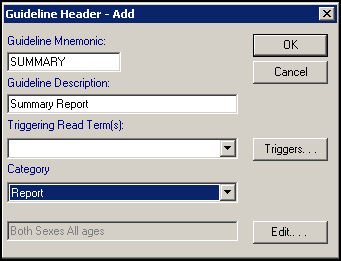
- The Guideline Header - Add screen displays and should be completed as follows:
- Guideline Mnemonic - Enter a shorthand title, up to 10 characters, to identify the report,for example, SUMMARY, the mnemonic must not contain spaces.
- Guideline Description - Enter a full title for this report, for example, Summary Report.
- Triggering Read Term - Not usually used for reports, a triggering clinical term is a one that prints this report whenever the relevant clinical term is added to the patient record. Leave blank.
- Category - Select Report. Selecting Report has two effects:(1) it lists when you select Reports from the Select Guideline screen, and (2) when you double click on this in an Index, it will go straight to printing without an on-screen view. If you want an on-screen view of the merged data before printing, then select instead Local Guideline.
- Sex Filter - Select Edit if required to set Age/Sex filters, in our example we are leaving it as Both Sexes All ages:
 See Guideline and Report Header for full details if required.
- Select OK.
- The report screen displays, ready to be populated. The Guideline Design floating toolbar displays and the title of the report is preceded by the Maintenance symbol
 , indicating you are in maintenance mode and a large letter R indicating this is a report. Use the floating toolbar to create your report using any of the following options in the order required:
 - Select Add Subheading
 and enter a subheading as required, for our example, 'Patient Details' and select OK
 - Select Patient Data
 and then Add, now double click Additional Patient Data to open it, highlight Address, select Add and then OK, see Patient Data for full details if required.Training Tip - Avoid selecting OK, until you are finished adding data. This is a common mistake, selecting OK closes the Patient Data screen.
 -
Select Add Subheading
again and enter the next subheading as required, for our example, 'Weight' and select OK -
Select Patient Data
and then Add, double click on the yellow All Other Clinical Data folder, then the yellow Examination Findings folder and finally the red Weight folder. Select OK. If you only want to display a specific number of records, for example, the last three records, highlight the line under Selected Items, in this case All Weight Records in Descending Order. Make sure Last is ticked in First / Last. In Records, hold the left mouse down and drag across All to highlight it and press Delete, enter 3. It now states Last 3 Weight Records under Selected Items. Select OK.or
Select Embed Guideline
 Training Tip - You should select Save
 at regular intervals when creating a Guideline.
 - There are two ways to set up clinical data.
- With the Significant Medical History line selected (ie, framed with a faint line), press the left cursor arrow key once to shift the heading left towards the margin. This adjusts the level or indent of this embedded report to the left margin, as before it looked as if it is a sub-heading of Weight. This is because Weight was level 1, but Last 3 Weight Records was level 2 and indented, so it assumed the next embedded report was Level two as well. See Line Levels and Text Indents.
- Secondly, right click on Significant Medical History and select Properties. Tick the box Embedded and Close (otherwise you will not be able to see the patient details on the report when viewing on-screen).

- Blood pressure line: This will consist of a sub-heading line, Blood Pressure, then lines of the patient's BP readings.
- Sub-heading line: Make sure the last line you entered - Significant Medical History - is framed as being currently selected. Click on the sub-heading icon
 . The Sub-Heading screen should appear. Type in Blood Pressure. Click OK.
 - If you find you have put the BP line above Significant Medical History, click on the BP line with the right mouse and select Delete. Repeat the previous paragraph.
Note - If you click on an icon on the floating toolbar, this item will be added after the currently highlighted line (the one bordered either with dashed lines above and below). You can also click on a floating toolbar icon and drag it across to the line in the report, in which case it will insert before that line that you released the mouse on.
- With the BP line framed, click on the Patient Data icon
 . Double click on the yellow folder of All Other Clinical Data, then Examination Findings, then single click on Blood Pressure and click on Add. With the line highlighted under Selected Items . (All Blood Pressure Records...) and with on Last selected, in Records, drag to block highlight All, then overtype 5. This will display only the last five BP entries (look under Selected Items). Click on OK.
- Sub-heading line: Make sure the last line you entered - Significant Medical History - is framed as being currently selected. Click on the sub-heading icon
- Therapy - Click on the sub-heading icon
 . The Sub-Heading screen should appear. Type in Therapy. Click on OK. Then add a Patient Data line double clicking on (yellow) Therapy, then (red) Acute and Repeat Issue Therapy. Click on Add. You could restrict this list to the Last so-many therapy items, if you require. Click OK.
 - Age/Sex Filter- Insert an Age/Sex filter line so that the subsequent lines are restricted for example, for children only, or for females between certain ages. This can later be cancelled by inserting another age/sex filter for Both sexes All ages at the end of the lines to be filtered.
- Click on the Age/Sex Filter Selection icon
 . Select the filter you want by clicking on it, then OK. If the list does not include the age and sex range you want, click on New. Enter Start/End age, and sex, eg for Females over 13 and under 55, click on Female, and put 13Y in Start Age, and 55Y in End Age. Don't forget the Y. Click OK.
- Click on the Age/Sex Filter Selection icon
- Cervical Cytology and Contraception - Add this as a sub-heading . Then add a Patient Data line selecting Well person data - Cervical Cytology, Add, then repeat for Contraception, Add.
- Remove Age/Sex Filter - Next, to cancel the previous age/sex filter, and remove the Age/Sex Filter for subsequent entries to display for both males and females of all ages, click on the Age/Sex Filter Selection icon . Select Both Sexes All Ages. Click OK.
- Test Results - With the last line selected, click on a sub-heading and call it Test Results. Then add a Patient Data line selecting Tests, Test Results - All, Add. You could restrict this list to the Last so-many test results, if you require. Click OK.
- Save - Finally, click on Save
 .
. - If you have made any obvious inaccuracies, such as headings at the wrong level, you will be reminded of these and told of any adjustments.
- Click on Close
 , or before doing that, uncheck the Design icon to view the Report. If you have forgotten to save, you will be reminded to do this if changes or additions have been made.
 - If you deselect any currently selected patient, then select Guidelines - Select Guideline, reselect this Summary report from the Reports Index by typing in its mnemonic, and View it without any patient data. Click on
 to expand the lines. Click on to close.
 - MergePatient details on the report - Select a patient and Guidelines - Select Guideline and type SUMMARY in the Mnemonic window and press Enter, then click on View. Click on to expand the lines. Point to a line and click with the right mouse if you want to add, edit, graph of blood pressure line etc. The whole report can be printed out using Go
 .
. - Add your new report to the local Reports Index screen. Once you have done this, just double clicking on it will print it straightaway without it displaying on-screen.:
- From the Select Guideline screen, type U_REPORTS and press Enter for the Local Report Index.
- With U_REPORTS: Local Report Index line highlighted, click on View for the Local Reports Index screen.
- Click on Design Mode
 .
. - Right mouse click on the text line that starts "This guideline should be edited to create your own practice specific index…" and select Delete.
- Click on Embed a Guideline
 on the floating toolbar.
 - Select the local report you want to include on the Reports Index. It is easiest if you can just type the mnemonic and press Enter.
- Repeat the last two steps until you have built up a list of local reports to create a Local Reports Index.
- You can drag and drop lines to sort the order in which they are listed.
- Click on Save then Exit.
- Select a patient. Then call up the Local Reports Index, click on
 , double click on Summary Report and it will print with merged details straightaway
The following options are also available to add to a Report:
-
 Go to New Line
-
 Patient Advice
-
 Drug Information
-
 Drug Regime
-
 Drug class
-
 READ term
-
Embed Guideline
-
 Age/Sex Filter
-
 Clinical Data Hotspot
-
 Patient Data Grid
-
 Launch an external Application
-
 Image
Image
-
 Delete
-
 Export a guideline