Frequently Asked Questions
 Using Vision+
Vision+ configuration is mainly user specific, however cervical recall date is the only configuration change that affects all users.
When Vision+ is first installed on your system, the QOF/QAIF reference date is set to <none>. This means that alert and report information is based on current data and not what will be required by QOF/QAIF by the end of the financial year.
A problem has been identified with future dated prescriptions not being picked up by Vision+. Currently, Vision+ only populates the database with the latest therapy record and if this is in the future, the therapy item is ignored until the date is reached. Consequently, you will still see Vision+ Alerts prompting you to record this information for a patient. This issue will be resolved in a future update:

Please be aware when opening multiple Consultation Managers, Vision+ functionality is only available in the most recently opened instance of Consultation Manager. As you close extra instances of Consultation Manager, Vision+ functionality becomes active in the most recent remaining Consultation Manager screens and alerts display for the relevant patient if they are selected.
You can use Exception codes when you want to exclude a patient from QOF/QAIF. To enter an Exception code:
- From the Vision+ Alerts screen in Consultation Manager, highlight the indicator line or the category heading you wish to exclude the patient from and either:
- Select Exception code from the toolbar
 , or
, or - Right click on the relevant line and select Exception
 .
.
- Select Exception code from the toolbar
- The Exception Codes screen displays:
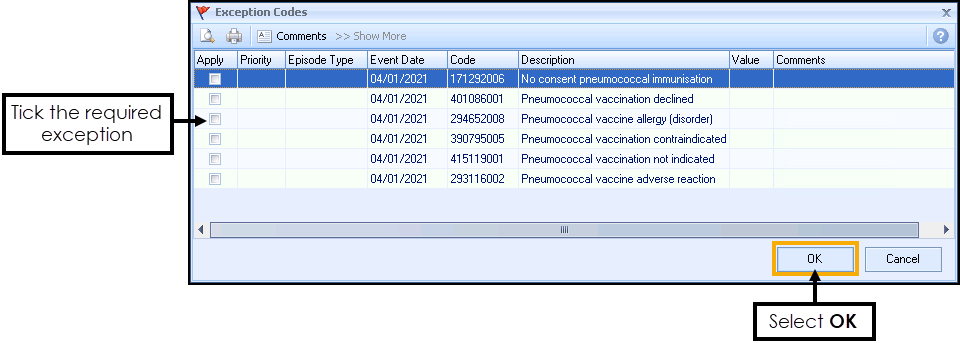
Tick the item in the Apply column for the required exception and select OK to save the changes.
Where a patient is exempt from a full clinical domain, the whole category title displays in red:
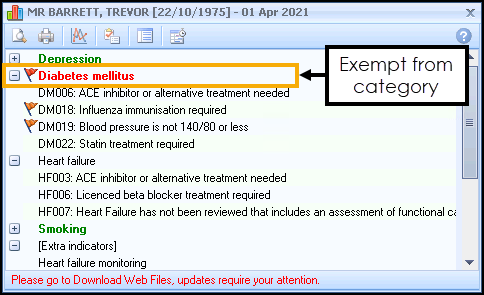
Vision+ functionality is enabled for all users automatically and cannot be disabled. However, you can disable alerts for certain staff see How do I disable alerts for certain staff?
There may be some practices that cannot support the operation of Vision+ without it significantly affecting their Vision 3 performance due to network or server inadequacies. Such practices can contact the helpline who can disable all Vision+ functionality. It can be re-enabled once your technical issues are resolved.
Using Problems with Vision+ is easy. Simply open your problem before recording information when you enter the patient record as usual.
 Vision+ Alerts
You can modify existing or create new templates in the Template Designer module from the Vision+ menu in the Windows Notification Area (you must not have a patient selected to access the practice mode menu).
You can easily customise the Vision+ Alerts from the Vision+ Settings screen:
- Login to Vision 3.
-
From the Windows Notification Area, right click Vision+
 and select Settings:
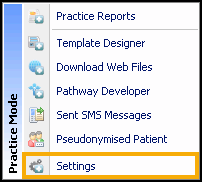 Note - To access the Vision+ Setting screen, you must not have a patient selected in Consultation Manager else the patient-specific menu displays.
 - The Vision+ setting screen displays.
- Select Options:
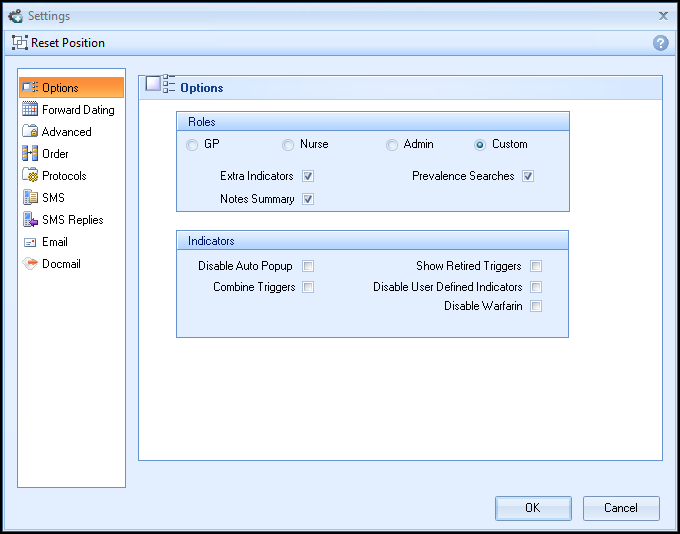
- The Alert Indicators settings can be changed in the Indicator section of the Options page. There are four different options:
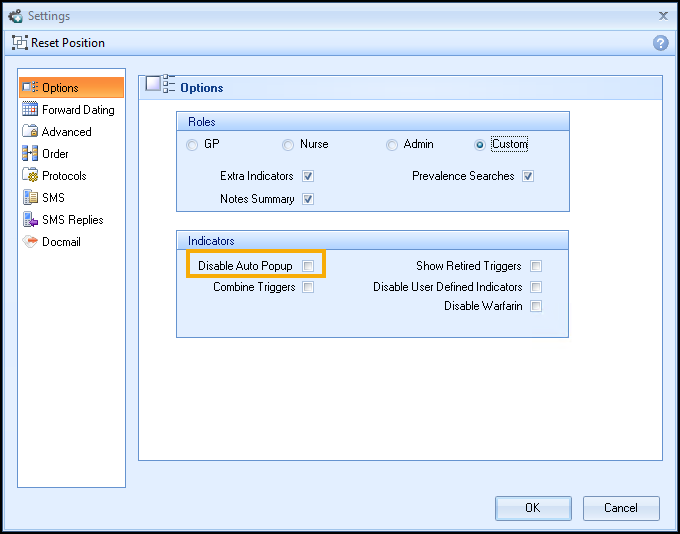
- Disable Auto Pop-up – Select this checkbox to stop the indicator pop-up from automatically displaying on screen when opening a patients notes during the consultation. When this option is checked the indicators can still be accessed from Show QOF Indicators
 .
. - Combine Triggers - Select this checkbox to combine the QOF/QAIF and all the other buttons into one. This can help reduce the on screen presence of the toolbar.
- Show Retired Triggers - Select this box if you want to display retired QOF/QAIF indicators in Vision+ Alerts and Reports. QOF/QAIF Templates always display retired indicators regardless of the settings. This is to allow for easier exception coding.
- Disable User Defined Indicators - Select this box to disable the use of user defined rules created using the Rule Designer.
- Disable Warfarin - If your practice has purchased the warfarin monitoring tool, you can remove the tick to disable access for the current user.
- Disable Auto Pop-up – Select this checkbox to stop the indicator pop-up from automatically displaying on screen when opening a patients notes during the consultation. When this option is checked the indicators can still be accessed from Show QOF Indicators
- Select OK to save. The settings are applied on a per user basis only.
The following colour-coding conventions are used to show alert information:
|
Colour |
Type of Indicator |
|---|---|
|
|
Bold green text represents a category where there are no current outstanding indicators or within a template where an indicator has been completed. |
|
|
Black text represents information that requires completion now. Following the QOF/QAIF business rule set, these are either outside the time constraints or have never been recorded. |
|
|
Indicators in bold blue text mean you have recorded the information, however you need to do it again as it falls outside the time frame. |
|
|
Light blue text is information that cannot be recorded until specific criteria is met, for example within a set period for the year, or a specific age is reached within the year. These indicators are for information purposes and are not removed if data is recorded when outside the criteria. |
|
|
A red flag indicates a category has been exception coded in the current QOF/QAIF year. |
|
|
An orange flag category or indicator signifies that there is a previous exception code that has expired. |
|
|
Information in bold grey text means that the category does not currently apply to the patient, for example where a patient is not part of a register. |
To disable Vision+ alerts from automatically displaying when a patient is selected:
- Login to Vision 3.
-
From the Windows Notification Area, right click Vision+
 and select Settings:
 Note - To access the Vision+ Setting screen, you must not have a patient selected in Consultation Manager else the patient-specific menu displays.
 - Select Options and tick Disable Auto Pop-up to stop the indicator pop-up from automatically displaying on screen when opening a patients notes during the consultation. When this option is checked the indicators can still be accessed from Show QOF Indicators
 on the Consultation Manager toolbar:
- Select OK to save the changes.
Vision+ displays alerts for indicators that the patient has been excluded from at high level. This is because, even though they are excepted from the group, the patient is still eligible for data recording against the individual indicators.
Vision+ displays overdue indicator alerts within the specific indicator category, rather than listing all overdue alerts at the top of the alerts list. This is so that indicator information stays with the rest of the specific QOF/QAIF category details. Whilst you cannot change this setting, you can customise the order the QOF/QAIF categories display in the alerts screen via the Settings - Order in your settings screen.
 Templates
You can access contract and other templates from the Vision+ alert indicator screen, see Using Templates, or from the Vision+ menu in Consultation Manager.
You can modify existing or create new templates in the Template Designer module from the Vision+ menu in the Windows Notification Area (you must not have a patient selected to access the practice mode menu).
You cannot forward completed templates to Docman at the moment. However, you can print it and scan it through Docman manually. You can also save questionnaires directly into the patient's record, see Saving Calculators and Questionnaires.
 QOF/QAIF
Whilst Vision+ should be regarded as your principle QOF/QAIF tool in Vision 3, Clinical Audit is still used to submit your QOF/QAIF figures, it can also provide powerful practice and local health board protocol templates. Templates available to you may vary across different health boards.
Whilst all previous QOF/QAIF functionality remains unchanged and is still available to you, we strongly advise you use Vision+ as your primary QOF/QAIF management tool. The benefits for using Vision+ include:
- Real-time alerts for missing or incorrect QOF/QAIF information in Consultation Manager.
- Easy to use QOF/QAIF data entry templates.
- Up to the minute QOF/QAIF reports at the touch of a button including high value patient reports and prevalence reports. QOF/QAIF reports continue to be sent via the Clinical Audit module.
- Easy recall system which allows you to mail merge and update the recall status on the patient record with the ability to merge patients on multiple disease registers.
- Vision+ also has multiple assessment forms, questionnaires and risk calculators.
You will receive updates to QOF/QAIF and Vision+ via DLM and SIS updates as usual.
Exceptions from indicators (excluding high level exceptions) are removed from the alerts screen. However when you look at the QOF/QAIF Templates these indicators display in green. These display for information only and you do not need to do anything.
You can view your practices QOF/QAIF performance results from Clinical Audit and your country's QOF/QAIF report management website. However Vision+ also has a powerful monitoring and performance tool called Contract Manager which allows you to track aspirations, help plan monthly workloads, compare year-on-year performance, show your practice prevalence and provide you with financial information. See Contract Manager for details.
 SMS Messaging
There is a limit of 160 characters per SMS message. A warning displays if the number of characters exceed 160:

If you chose to continue the patient will receive more than one SMS message.
Once Vision+ receives confirmation from the SMS handling service that the message is sent, a clinical term automatically records to the patient's record:

 Important Information about Influenza Recalls
To recall patients solely for flu clinic, we advise practices to download our seasonal flu vaccinations template as detailed below.
- Log into Vision 3 in the usual way.
- From the Windows Notification Area, right click Vision+
 and select Download Web Files:
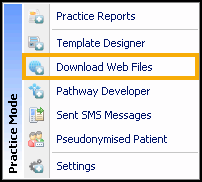 Note - To access Download Web Files, you must not have a patient selected in Consultation Manager else the patient-specific menu displays.
 - Find the Seasonal Flu Vaccination Program file and select Download:
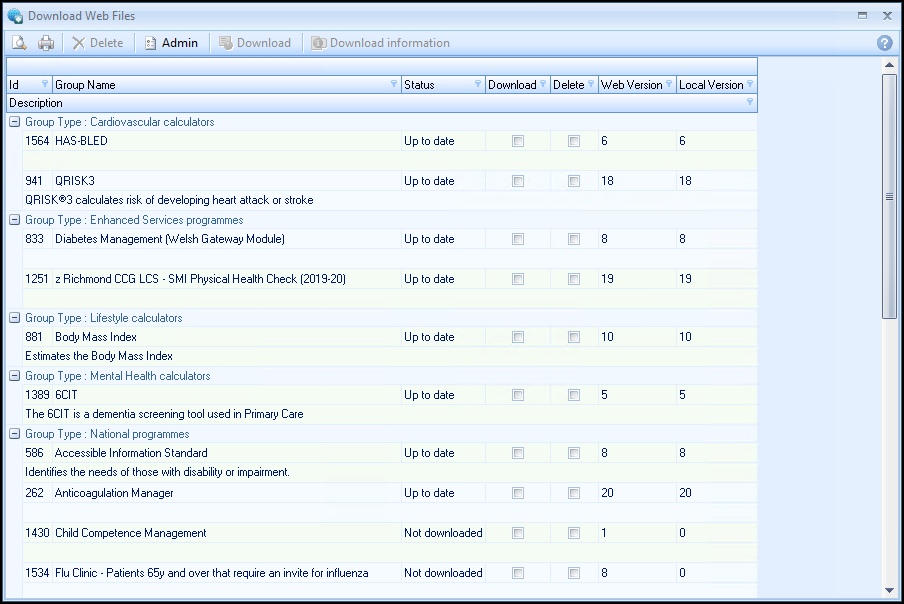
- Next select Download. You do not need to log out of Vision 3 whilst the template is downloading.
- A screen displays showing the progress of the download.
- Once the download has finished, the template and reporting for this are available. All users can access the Seasonal Flu Vaccination Program file as long as the "Disable user defined indicators" is not selected in the user's settings screen.
Before doing the Mail Merge you must create your flu template letter. As the letter is purely for Flu season it is setup slightly differently to the other QOF/QAIF Recall letters.
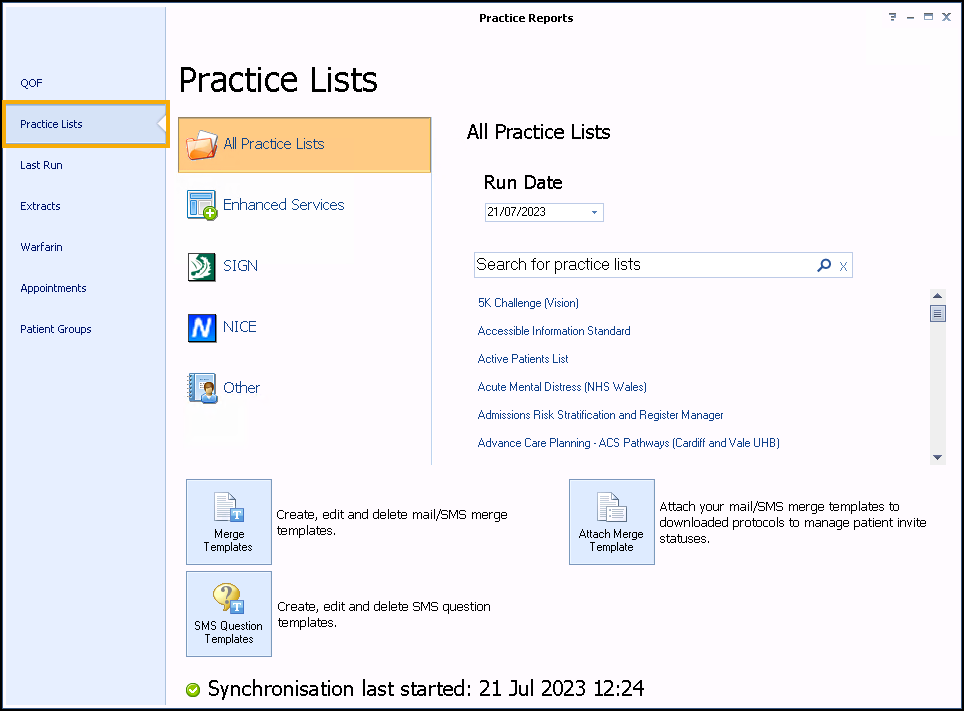
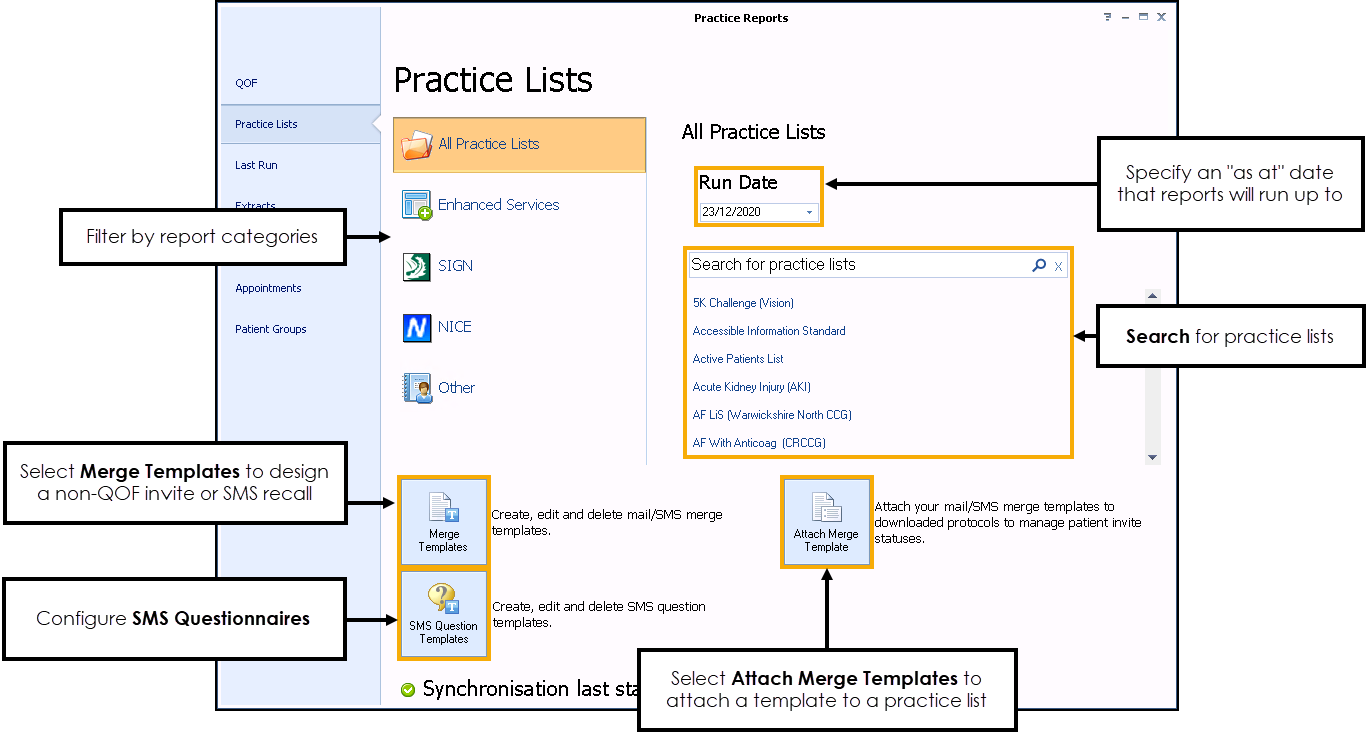
- From Practice Reports, select Practice Lists:
-
Select Merge Templates
 .
. - Select the word processing application you are using and create your letter, see Creating a New Recall Letter Template for more details:

- Close the Letter Templates screen.
- Next, select Attach Merge Template
 .
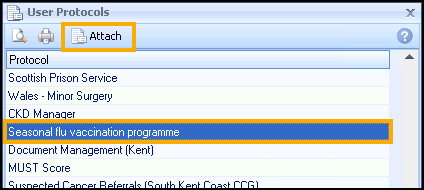
. - Highlight the Seasonal Flu Vaccination Programme and select Attach
 :
:
-
From Letter Templates select Letter
 :
:
- Select your letter by highlighting it. To select the letter either double click or select Open:
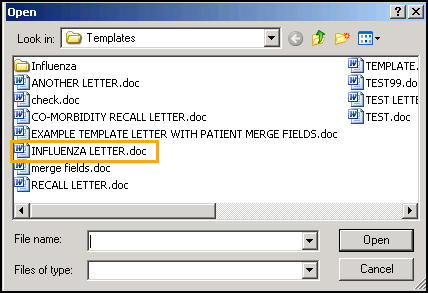
- The influenza letter is listed in the Letter Templates screen:

- To recall patients on multiple disease registers using the Seasonal Flu Vaccination Program template, go to Reporting - Practice Reports.
- From the Home menu, select Practice Lists and select Other:
-
Enter Flu in the search box and select Search
 .
. - Select the appropriate flu clinic report and it automatically runs.
-
On completion, a list of reporting categories and lines display:
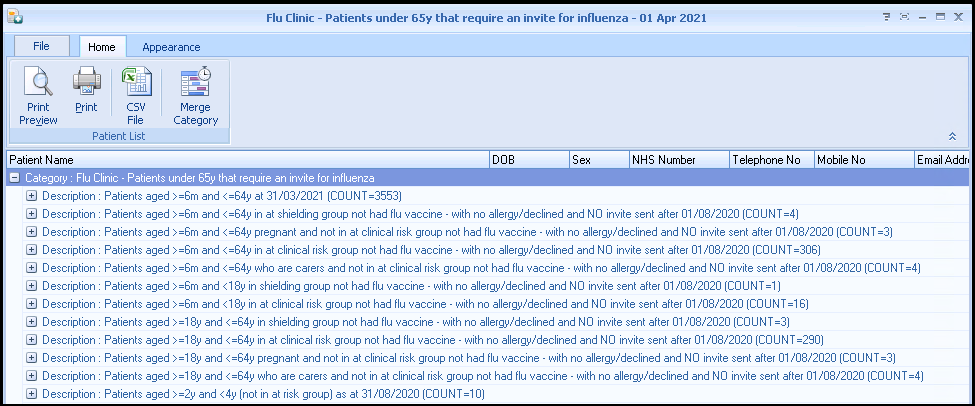
- Select Expand
 to expand the report line you want to view.
 - You can select the letter/SMS template to merge with from the Home menu:
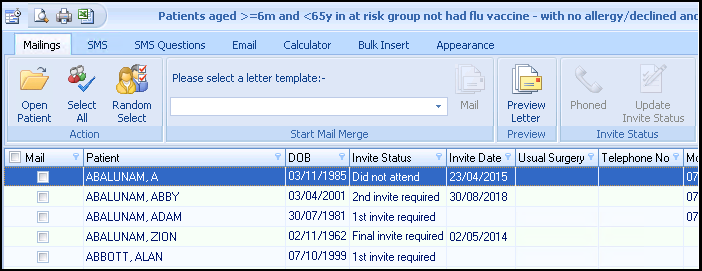
- The invite clinical terms will relate solely to influenza.Note - The figures for QOF, DES, public health immunisations etc are taken from Clinical Audit so please remember to review figures from there.
 Troubleshooting
The patient may not be on any QOF/QAIF disease registers. Try a patient who is known to be on a QOF/QAIF register.
Vision+ auto pop-up may have been disabled. To reset the position do the following. From the Windows Notification Area, right click Vision+ ![]() and select Settings (make sure you do not have a patient selected in Consultation Manager). From the options screen, deselect disable auto pop-up and select OK:
and select Settings (make sure you do not have a patient selected in Consultation Manager). From the options screen, deselect disable auto pop-up and select OK:

Vision+ may have accidentally been moved off the screen. To reset the position, try to drag the window back into full view.
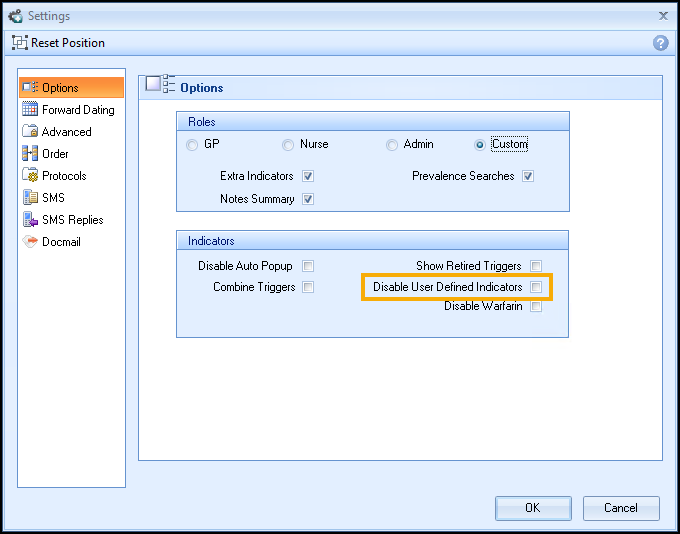
Download Web Files will not be available when User Defined Indicators are disabled. From the Windows Notification Area, right click Vision+ ![]() and select Settings (make sure you do not have a patient selected in Consultation Manager).
and select Settings (make sure you do not have a patient selected in Consultation Manager).
On the Options tab deselect Disable User Defined Indicators box, and select OK:
Check the Indicator settings on the Advanced tab within the Settings screen. Select the button labelled Indicators, expand the Categories and make sure that the indicators in question have a tick placed alongside them.
 Warfarin Monitor FAQs
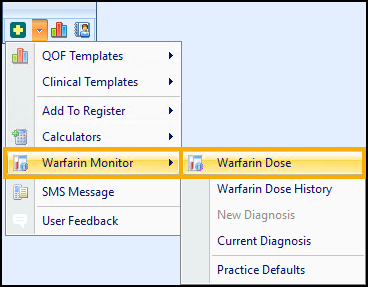
With the patient open in Consultation Manager, select Warfarin Monitor - Warfarin Dose from the Vision+ floating toolbar  :
:
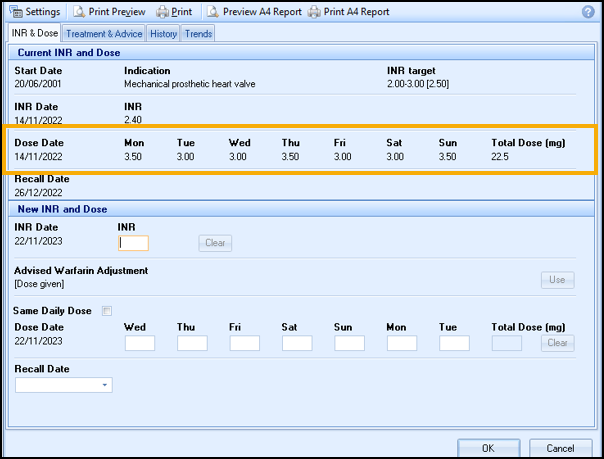
The Warfarin dose screen displays, from the Current INR and Dose section you can view the patient's last dosage:
We suggest that you use a Reminder (Yellow pop-up/post-its) or a Patient Warning to note the patient specific protocol.
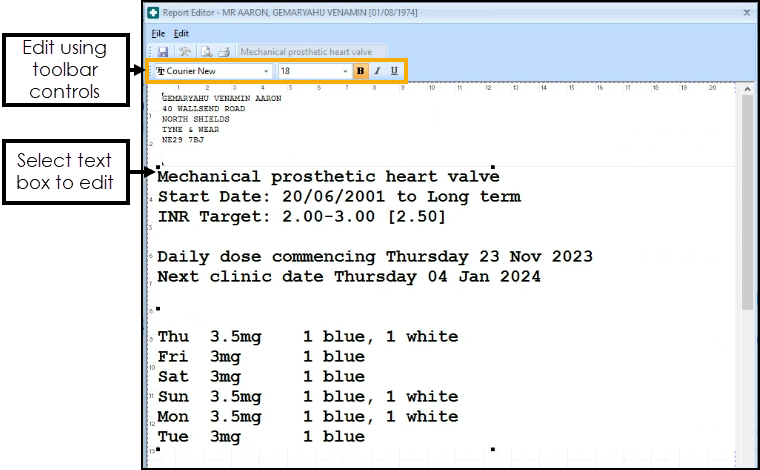
To edit the size of the text on the report, select the text box and edit using the controls on the toolbar:
If a patient comes into the practice a day early they are still adhering to the weekly and daily dose. If the patient has a new INR reading that may increase or decrease the weekly dose the Warfarin Dosing Tool takes this into account and allows the changes to the weekly dose to be made.
Please note the only time Vision+ does not allow a dose change is if the patient's INR is outside the normal range. At this point manual dosing is required until the patient is controlled again.
We recommend a minimum of three to five INR and dosing history before using the Warfarin Monitor.
If the patient's INR levels are out of the patient's expected range you are not presented with a dosage. The clinician is required to make that decision manually.
We recommend a minimum of three to five INR and dosing history before using the Warfarin Monitor.
For doses not achieved with the tablet strength available, the Warfarin Dosing Tool suggests to round up or round down with the recommended option selected. Check that the available tablet strengths on the Dosing screen are correct, see Dosing Tab for details.
The data recorded in the patient's record is transferred over, however you need to set up the patient with a diagnosis indication, see Adding a Warfarin Diagnosis Indication for details.
If you leave the patient's record and then re-select the patient the changes show.
The value recorded is the weekly dose, and it stands until a new weekly dose is recorded. A weekly dose on Monday could be superseded by a new weekly dose on the Wednesday, it does not need to be a whole week.


