Adding or Editing Users
If new users are added from Management Tools - Control Panel - File Maintenance - Staff, then you are prompted to set up a user profile in Security.
To add or edit a staff members security settings:
- From Management Tools, select Control Panel
 - Security:
- To add a user, select User
 from the toolbar, or right click anywhere in Current Users and select Add User.
 - To edit an existing user, select the user in Current Users, right click and select Edit User.
- To add a user, select User
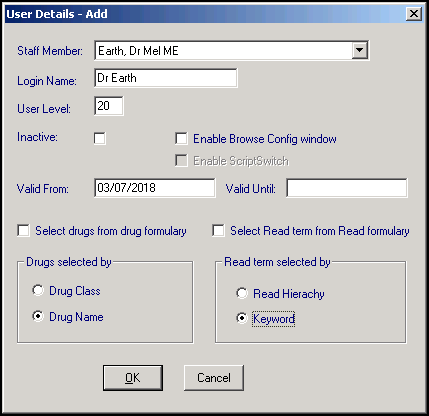
- The User Details - Add or - Update screen displays:

Complete or update as required:
- Staff Member - If this is a new user, select the staff member from the available list, if you are updating a user, the correct name displays.
- Login Name - Add or update a log in name for your user, up to 20 characters. This is usually a reflection of their name, for example, Dr A Brown, Jane S, Nurse Amanda.
- User Level - This is not currently in use.
- Inactive - Tick if the staff member is no longer active, see Inactivating a User for full details.
- Enable Browse Config window - Tick to allow the user to add or remove columns on the Select Patient screen, recommended for system managers only.
- Enable ScriptSwitch - Tick to enable ScriptSwitch on an individual basis, as long as it is already switched on for the practice as a whole. Training Tip - Scriptswitch offers specific prescribing recommendations. If a match is found, based on drug formulation, strength, dosage and therapy type, ScriptSwitch alerts the clinician at the point of prescribing. This enables clinicians to benefit from local prescribing advice at every consultation.
- Valid From and Valid Until - Valid From populates with today's date, leave Valid Until blank, but once a person has left the practice, enter the date they leave.
- Select drugs from drug formulary - Tick to display the drug formulary by default when selecting a drug in Consultation Manager. You can switch away from the formulary at the time of selection in Therapy:
- Drug selected by - Select the way the drug dictionary displays, either by Drug Class, or alphabetically by Drug Name. Whichever is chosen becomes the default display for the user when selecting therapy items. However, it is possible to switch between the two at the time of selection.
- Select Read term from Read formulary - Tick to display the Read formulary by default when selecting a Read code in Consultation Manager. You can switch away from the formulary at the time of selection.
- Read term selected by - Select either Read Hierarchy, the codes themselves, or Keyword as the default way this user selects items from the Read Dictionary. You can switch between the two at the time of selection.
- Select OK to save.
-
For a new user, the Change Password screen displays:

Complete as follows:
- New Password - Enter a password, between 6 and 12 characters long. At least one character must be non-alphabetic. For security purposes, nothing displays on screen as you type, not even asterisks. Press the Tab key on your keyboard to move on.Important - There is no warning if you enter more than 12 characters, but additional characters are not retained.
- Confirm New Password - Re-enter the password in exactly the same way. A warning message displays if you have not included at least one number, or the Confirm New Password entry does not match the New Password entry.
Note - Every user needs a password to sign on to Vision 3, this initial password must be changed the first time the user logs on.Important - When changing passwords, a password cannot be repeated until five other dissimilar passwords have been used. - New Password - Enter a password, between 6 and 12 characters long. At least one character must be non-alphabetic. For security purposes, nothing displays on screen as you type, not even asterisks. Press the Tab key on your keyboard to move on.
- Select OK to save.
Further options with regards passwords are explained in Security Settings, including the expiry interval, minimum length, a global expiry date, and number of login retries.
Note – To print this topic select Print  in the top right corner and follow the on-screen prompts.