Adding Non-Medical Staff Members
Any non-medical staff involved with your practice, for example, your Practice Manager, receptionists, summarisers, must be set up in Vision 3.
To set up non-medical staff:
- From the Vision 3 front screen, select Management Tools - Control Panel - File Maintenance - Staff
 or the Staff tab.
 - Either:
- Select Add
 .
. - Right click the Active folder
 and select Add Staff.
 - Right click the Active folder and select Display by Role, now right click on the staff role you want to add a member of staff for and select Add Staff.
- Select Add
-
The New Staff - Personal screen displays, complete as required:
-
Mandatory information:
- Surname, up to 30 characters.
- Forename1, up to 30 characters.
- Title.
- Sex.
- Short Name- This is a mandatory entry, up to 5 characters, and is a short way to identify this staff member.Note - The Short Name should only contain letters.
-
Optional information:
- Preferred Name.
- Forename 2.
- DoB.
- Previous Surname.
- Vaild From/Valid To - Enter dates if relevant.
- Inactive - Tick to indicate the doctor is no longer active, and no longer appears on selection lists of active users. Any historical records still bear the initials of a former GP for audit purposes. For example, a GP registrar leaving the practice should be made Inactive, see Inactivating a User for details.
- Miles from practice- For travel expenses, to record the number of miles the staff member is from the practice. Leave blank rather than entering zero.
-
- Select the Professional tab and complete as required:
- Role - Select from the available list.
- Responsible Partner - For clinical staff only, see Adding Staff - A Quick Reference Guide.
- Prescribing No - For clinical staff only, see Adding Staff - A Quick Reference Guide.
- Formulary - For clinical staff only, see Adding Staff - A Quick Reference Guide.
- Type of Employee - Optional, select as appropriate.
- Main Speciality - For clinical staff only, see Adding Staff - A Quick Reference Guide.
- Interest Speciality - For clinical staff only, see Adding Staff - A Quick Reference Guide.
- Date Qualified - For clinical staff only, see Adding Staff - A Quick Reference Guide.
- Date Registered - For clinical staff only, see Adding Staff - A Quick Reference Guide.
- Date Became Principal - For clinical staff only, see Adding Staff - A Quick Reference Guide.
- Date of 24 hour retirement - For clinical staff only, see Adding Staff - A Quick Reference Guide.
- Dates Joined Practice - Defaults to todays date, update if required.
- Date Left Practice -When a member of staff leaves the practice, enter a date, leave blank until then.
- Job Sharer - Optional, if the member of staff is job sharing, select the member of staff they are sharing with.
- Insurance Company - Optional, select from insurance companies set up in Organisation, see Organisations.
- Insurance Expiry Date - Optional, enter a date if required.
- Insurance Number - Optional, enter a policy number if required.
- CHS - For clinical staff only, see Adding Staff - A Quick Reference Guide.
- Maternity - For clinical staff only, see Adding Staff - A Quick Reference Guide.
- Minor Surgery - For clinical staff only, see Adding Staff - A Quick Reference Guide.
- Contraception - For clinical staff only, see Adding Staff - A Quick Reference Guide.
- Supplementary Prescriber - For clinical staff only, see Adding Staff - A Quick Reference Guide.
- Independent Presc - For clinical staff only, see Adding Staff - A Quick Reference Guide.
- If you want to add any reference numbers, such as the National Insurance number, select the Identifiers tab. Select Add, choose an Identifier Type, an Orgainisation and then enter the reference number required in Identifier Value. Select OK to save.
- The recording of main address details for your staff is optional, however a valid NHS email address must be recorded, see Staff Address and Email for details.
- You can optionally enter Language spoken, written and read. Select the Language tab, under the option required, select Add and choose the language required and select OK to save.
- Finally, select OK to save.
- The Add User message displays:
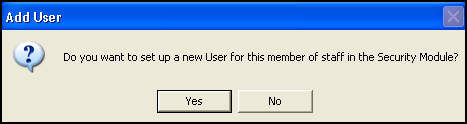
Select Yes to continue.
- The User Details - Add screen displays:
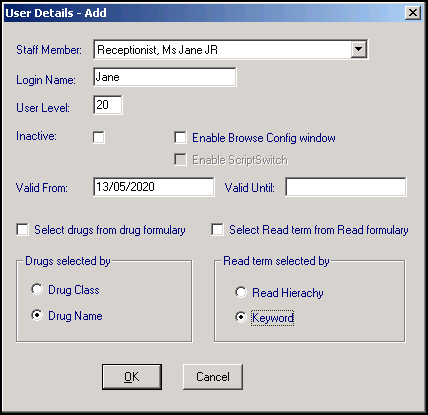
Complete as required:
- Staff Member - Completes automatically.
- Login Name - Enter a name for the user, a maximum of 20 characters.
- User Level - This is not currently in use.
- Inactive -Tick to inactivate a staff member.
- Enable Browse config window - Tick to enable the configuration of browse lists on Select Patient.
- Enable ScriptSwitch - Tick to enable ScriptSwitch for this member of staff.
- Valid From - Defaults to today's date, update if required.
- Valid Until - Leave blank until the member of staff leaves and then complete the date.
- Select drugs from drug formulary - Tick to initially display the practice drug formulary when adding medication. You can switch between the two at the time of medication selection. Many prefer a locum or GP Registrar to select from the Formulary by default.
- Select Read from Read formulary - Tick to initially display the practice clinical formulary when adding data. You can switch between the two at the time of data entry. Many prefer a locum or GP Registrar to select from the formulary by default.
- Drug selected by - Select from:
- Drug Class - To select medication by class.
- Drug Name - To select medication by name.
It is possible to switch between the two at the time of selection. - Read term selected by - Select from:
- Read Hierarchy, by code - To select clinical terms by code.
- Keyword - To select clinical terms by Keyword.
It is possible to switch between the two at the time of selection.
- Select OK to save.
- The Change Password screen displays:Note - The first time the member of staff logs in, they are prompted to update their password.
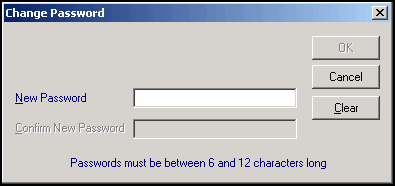
Type in a password, between six and twelve characters long and containing at least one number. Press the Tab key to move on a field.
Important - There is no warning if you enter more than 12 characters, but additional characters are not retained.Complete as follows:
- New Password - Enter a password, between six and twelve characters long and containing at least one number.
- Confirm New Password - Retype the password.
- Select OK to save. Note - When changing passwords, a password cannot be repeated until five other dissimilar passwords have been used.
See Security Settings, including the expiry interval, minimum length, a global expiry date, and number of login retries.
See Staff Roles and NHS Specialities for details
Note – To print this topic select Print  in the top right corner and follow the on-screen prompts.