Installing Printers
Your printers are usually set up for you when Pharmacy Manager is installed, however, should you need to make changes:
Ensure each Printer Port has a printer associated with it in Windows. The usual configuration for a Pharmacy Manager system is:
- Your label printer on USB001 or LPT1.
- Leaflets or endorsing printer on LPT2.
- If you have three printers, the endorsing printer is normally on LPT3.
- Nursing Home printers are normally the same as the labelling printer.
To check the configuration,
- From Windows, select Menu - Tools - Printer Configuration - Windows.
- Add Printer and any printers connected to the system display.
- Right-click any of the printer icons and select the Details tab to check which printer and driver is installed.
To install a printer in Pharmacy Manager:
- From Pharmacy Manager, select Tools - System Settings - Printer Configuration - Pharmacy Manager.
- Select the Printers tab.
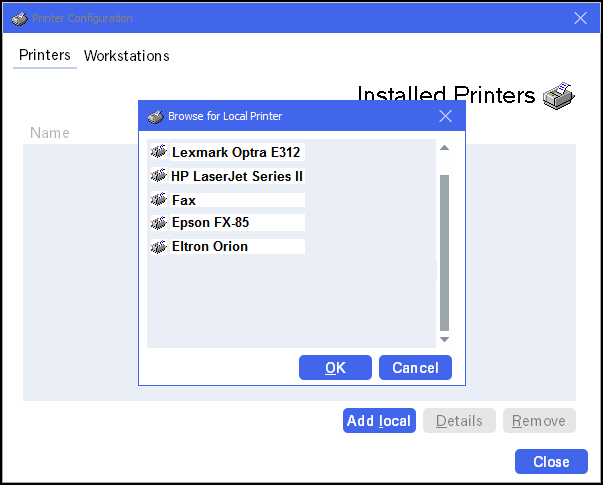
- Select the printer you wish to configure, if it is not listed, select Add Local, highlight the printer required and select OK.
A local printer may also be a network printer not physically attached to the terminal in question, but configured in order that it is available, typically as shared printer for one or more terminals.
-
If you are going to use the Windows driver (Eltron Orion, Star SCP700, OKI laser printer, Lexmark Optra) then select the name of the printer.
-
If using one of the dot matrix printers (OKI 320, Star SCP700, Panasonic Quiet KXP 2023) then select the port listed in the Printers tab.

-
To use an OKI laser printer, or other printer using a Windows driver, select the name of the printer from the list.
-
To select a Dot Matrix printer, choose a the port name LPT1: LPT2: COM1: etc.
-
Once you have selected the printer name or port, click on OK.
The system will show the printer details.
-
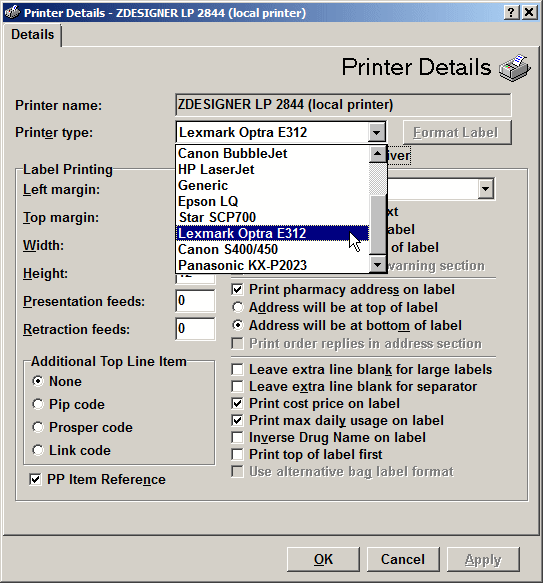
You must now select in Pharmacy Manager the type of printer from the drop down list:

The printer names shown in the list are not necessarily the same name as the printer you are using - e.g. the Panasonic Quiet is set here as an Epson LQ because that is the print mode it uses. If in any doubt, please contact the Service Desk for advice.
If you are using a printer for which you have installed the Windows driver:
-
Check
 the Print
using Windows printer driver option.
This will allow you to access the Format Label option for a label printer.
The system will complete the printer settings (left margin, height etc.) to suit the printer you have chosen.
You should not need to change these settings.
![]() If you are using
a Star SCP700 printer, you may
need to manually adjust the width
setting if you change from the generic driver to the Windows driver (or
back). The width setting for the generic driver should be set as 47, whilst
for the Windows driver, it should be set at 40.
If you are using
a Star SCP700 printer, you may
need to manually adjust the width
setting if you change from the generic driver to the Windows driver (or
back). The width setting for the generic driver should be set as 47, whilst
for the Windows driver, it should be set at 40.
To make the width change for
the Windows driver, uncheck ![]() the Windows
driver option, adjust the width setting to 40, and then reapply the
the Windows
driver option, adjust the width setting to 40, and then reapply the ![]() .
.
If you are in any doubt about applying these settings, please contact the Service Desk for advice.
-
Un-check
 the Print
using Windows printer driver option if you are using a printer
for which you have not installed the Windows driver.
The system will complete the printer settings (left margin, height etc.) to suit the printer you have chosen.
You should not need to change these settings.
If you are in any doubt about applying these settings, please contact the Service Desk for advice.
Select the correct options for label printing on the right hand side of the screen:
- If your labels are pre-printed with Keep out of reach and sight of children warning, remove the tick. You will still need to tell the system where to put this warning, however, at the top or bottom of the label. This also applies for the Print pharmacy address option.
You can select whether you would like the price of your items printed on the label, and the maximum daily usage figure. Some printers will also let you inverse the drug name on the labels to draw attention to them.
Once you have selected all the options you need, choose OK to finish installing the printer.
You will then see the name of the printer set up in the Printers tab.
For ease of reference, you can print the item order code in small (super script) print.
- Select
 PIP, Link or
Prosper
 - Once you have selected all the options you need, choose OK to finish installing the printer.
If you have opted for a Private Prescription Register, Pharmacy Manager applies a reference number for each item you dispense.
- The item price for each prescribed medication
item on the prescription.

The reference number is created from yyyymmdd-nnn where:
- yyyymmdd is the dispense date.
- nnn is the number of the instance during
that day.
For example, the first two prescription items on 22nd September 2019 as 20190922-001, 20190922-002.
Tick PP Item reference - To print the reference on the private prescription's item label.
Once you have selected all the options you need, choose OK to finish installing the printer.