EPS Technical Settings
![]()
These settings apply to sites in England only.
![]() In normal operating mode,
the EPS Technical Settings on
the Comms tab are not for end-user
adjustment.
In normal operating mode,
the EPS Technical Settings on
the Comms tab are not for end-user
adjustment.
In most instances, the correct settings for your configuration, with the correct personal controls, will have been implemented on installation/set-up by an engineer or trainer. For the large part they remain visible but with access disabled (they are greyed out) and could only be changed when a system administration key has been entered.
To access the configuration screen, start Pharmacy Manager and from the Welcome Screen, click Tools then Pharmacy Details.
The Pharmacy Details screen will appear.
-
From the Pharmacy Details screen, click the EPS tab
The EPS Configuration options will appear. Once activated, the top part of the display is greyed out and can only be modified if a System administration key.
Comms tab
Activation/De-activation
The EPS functionality will have been activated as part of the system set up.
![]() Subsequent de-activation
can only be achieved when a System
administration key has been entered. Telephone Service Deskfor
assistance in making this change.
Subsequent de-activation
can only be achieved when a System
administration key has been entered. Telephone Service Deskfor
assistance in making this change.
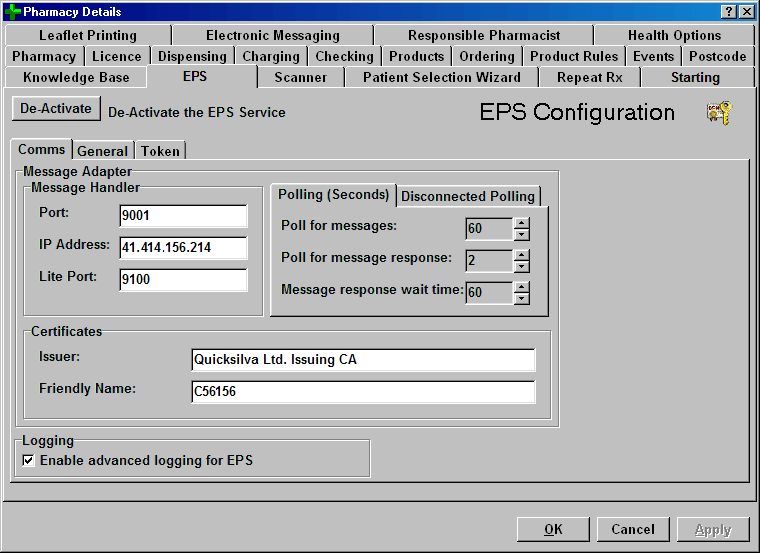
Message Handler
The Message Handler settings are for connecting to the central message broker which handles communication to and from the CRS for your system.
Polling
The Polling settings determine the frequency in seconds at which the CRS and this system connect.
Disconnected Polling
The polling settings determine the reconnection frequency in seconds. This will take place in the background without interfering with system usage.
By default, should the communications be disconnected, Pharmacy Manager will try to reconnect every 15 seconds for the first 300 seconds (5 minutes) before entering the sleep mode period. If the communications do not reconnect after that period of time, Pharmacy Manager will then only poll once every 600 seconds (10 minutes) whilst it is sleep mode.
Certificates
The Certificate settings govern EPS security and identification.
Logging
This option enables detailed logging to take place. Typically, it will only be activated by Service Desk to aid resolution of problems.
![]() Changes can only be made
to any of the settings listed above when a System
administration key has been entered.
Changes can only be made
to any of the settings listed above when a System
administration key has been entered.
-
Click the General tab
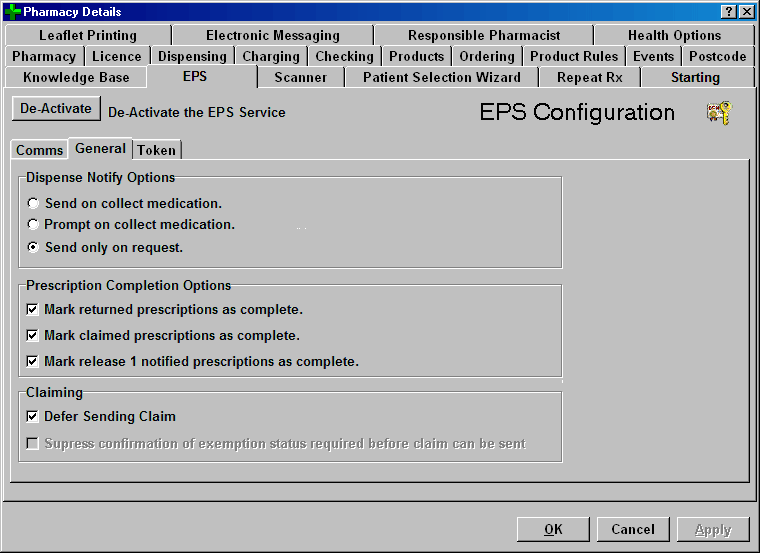
These settings allow the pharmacist to determine when, after dispensing a prescription, the dispense notification is sent to the CRS.
With Send on collect medication in force, when the Collect button is clicked, the dispense notification is sent to the CRS without further user input.
With Prompt on collect medication in force, when the Collect button is clicked, a confirmation prompt appears. It is controlled by a timer and appears for five seconds before disappearing.
With Send only on request in force, when the patient collects their medication, click the Collect button - the status changes from In progress - Not collected to Ready to notify.
![]() The impact on the dispense notification
stage is explained in context in the Notification
topic.
The impact on the dispense notification
stage is explained in context in the Notification
topic.
![]() Initially, the recommended option for
this setting is Send only on request.
The advantage being that the pharmacist can verify what has been dispensed
before submitting the notification.
Initially, the recommended option for
this setting is Send only on request.
The advantage being that the pharmacist can verify what has been dispensed
before submitting the notification.
![]() Once the system has been
initially set-up, any change to these options requires the System
administration key code for the day. Telephone Service Deskfor assistance in making this change.
Once the system has been
initially set-up, any change to these options requires the System
administration key code for the day. Telephone Service Deskfor assistance in making this change.
Prescription completion options
These options, when enabled, will automatically update the status of completed electronic messages on the eMessages tab.
Claiming
Defer claim
You can defer sending a claim. Check ![]() this box to enable this feature.
this box to enable this feature.
Confirmation of exemption status
This option ensures, by default, that you are prompted to confirm the patient status before submitting a claim.
Suppressing the exemption status prompt can save an extra key press. However, if your claims are incorrectly submitted with a patient status Paid, you can easily end up out of pocket.
Consequently, this option is hidden behind the System administration key in order that it cannot be inadvertently switched to your potential detriment.
![]() It is strongly recommended that you do
not suppress the prompt. Please leave the box
It is strongly recommended that you do
not suppress the prompt. Please leave the box ![]() unchecked.
unchecked.
See also Electronic messaging
The right hand side of the dispensing token reflects the prescription token in that it may contain additional prescriber information as well as the patient's details
A dispensing token may be required in the following situations, often when a prescription token was not issued as you are the patient's nominated pharmacy:
-
where a prescription charge exemption declaration is required, this could be captured on either a dispensing token or the prescription token (if printed by the GP practice).
-
when a patient needs to go to a different dispensing contractor to collect their medication, their nominated dispensing contractor can return the prescription to the EPS and provide the patient with a dispensing token to hand in at the other dispensing contractor
-
when clinical information needs to be communicated to the patient that would have traditionally been placed on the right hand side of the prescription (this information will form part of the electronic prescription message from prescriber to dispenser)
-
at the patient’s request.
Invariably, when dispensing tokens are printed when a patient signature is required i.e. to confirm non-age based exemption status, the additional information/right hand side is not required.
You can choose a policy for printing any duplicated right hand side of a multiple selection of dispensing tokens.
-
Click the Token tab
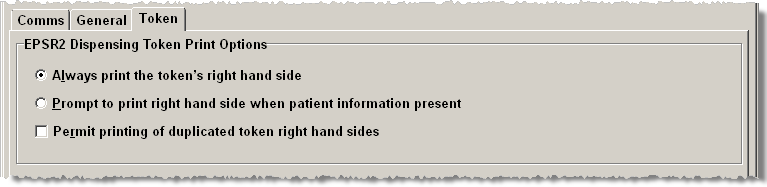
Select ![]() one of the two options:
one of the two options:
The first option is the default policy that will be in operation if you make no change i.e. the right hand side is always printed even when there is no additional information.
-
Select
 Always print the token's right hand side
When additional information is present, the second option will prompt you and will ask if you want to print the right hand side. You may answer No when, for example, you are printing the token for an exemption declaration signature, but Yes for any other requirement.
-
Select
Prompt to print right hand side of token
when patient information present
The final option is to confirm whether or not you wish to product any duplicated token right hand sides as a regular policy.
Duplicated right hand sides could be produced for a patient who requires dispensing token copies for several prescriptions and you have chosen to multi-select a patient's prescriptions on the eMessages tab.
![]() The
default options for a new installation are to Always
print the token's right hand side but to not print any duplicates
that are encountered by unchecking
The
default options for a new installation are to Always
print the token's right hand side but to not print any duplicates
that are encountered by unchecking ![]() Permit printing of duplicated token right
hand sides.
Permit printing of duplicated token right
hand sides.
Updated 25th September 2014