Configuring Online Appointments
To enable online appointments:
- From Vision 3 - Management Tools select:
Control Panel - File Maintenance - Online .
. -
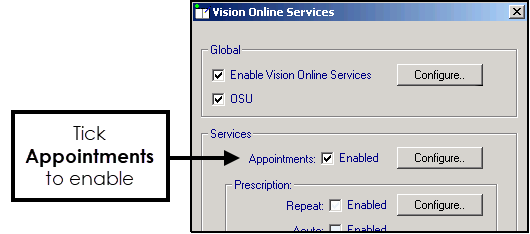
The Vision Online Services screen displays, tick Appointments to enable online appointments:
-
Now select Configure to customise how appointments works for your practice.
You need to determine which staff and sessions you want to be available from the Patient Services website and set up how you want online appointments to work for you. There are seven tabs that should be considered:
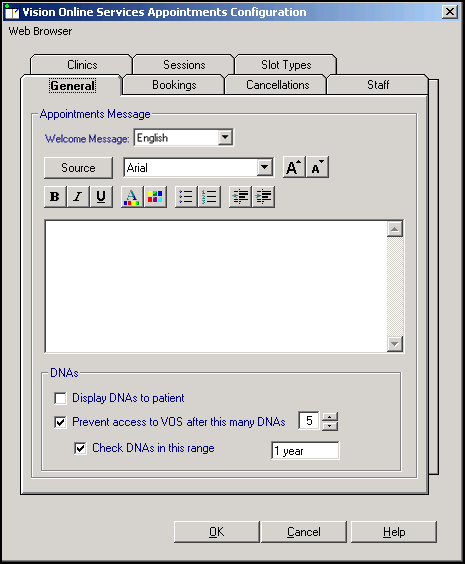
The General tab enables you to setup the following:
-
Welcome Message (Wales only) - Select a language for this version, remember you should be adding both an English version and a Welsh version.
- Appointments Message, see Add Appointment Message.
- Did Not Attend (DNA), see Did Not Attends (DNAs).
The Appointments Message is a practice specific message that displays on the Appointments page of the website.
To add an Appointment Message:
- From Online Services Appointments Configuration select the General tab.
- Enter your message in the Appointments Message window using the formatting editor provided. If you prefer, you can customise your message source using HTML formatting tags, see Formatting HTML Messages:
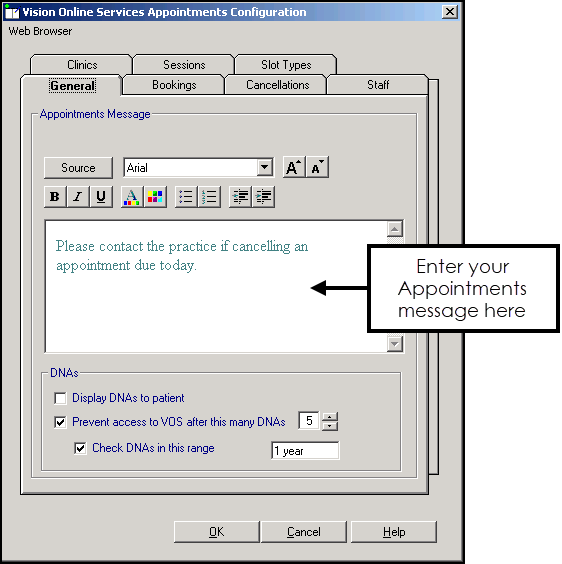
3. Select OK to save.
You can manage DNAs within online appointments, from Online Services Appointments Configuration, select General - DNAs and then select from:
- Display DNAs to patient - Tick to enable patients to view their DNA appointments.
- Prevent access to Online Services after this many DNAs - Tick to limit patient access after a set amount of DNAs (removing the tick disables this function) and enter a number of DNAs permitted before the user account is disabled.
- Check DNAs in this range - Tick to specify a date range for the DNA's if required and set the date range:
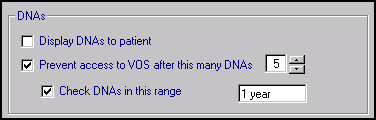
Should a patient exceed the number of DNA's you have set here, the next time they log into their Patient Online Services account, there are no links to Appointments and they have to contact the surgery direct to arrange an appointment.
The Bookings tab allows you to configure existing and new online appointment bookings:
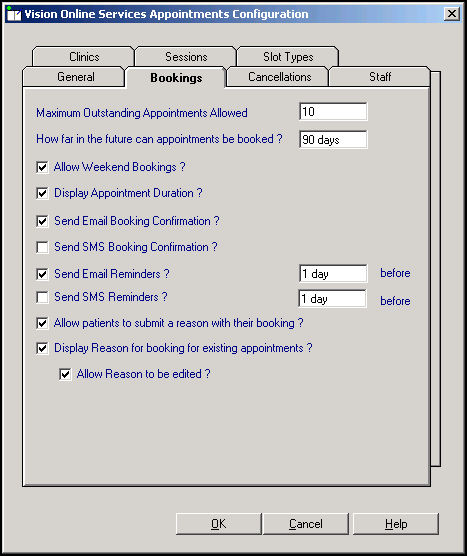
Complete as required:
- Maximum Outstanding Appointments Allowed - You must decide how many outstanding appointments a patient can have booked at any one time. Enter the number of appointments you want to allow. The default is 0 which enables your patients to book unlimited appointments. If the patient reaches the limit (by either online or practice booked appointments), the patient receives the following message 'You have reached the maximum number of bookings allowed. No further bookings can be made at this time.'.
- How far in the future can appointments be booked - You must decide how far in advance your patients can book an online appointment. Enter the number required, followed by D (days), W (weeks), M (months), or Y (years)), for example, 3W allows the patient to book online appointments up to three weeks in the future.
- Allow Weekend Bookings? - If you provide weekend appointments, tick to enable weekend appointments to be available online.
- Display Appointment Duration? - Tick to display the duration of the appointment being booked to the patient.
- Send Email Booking Confirmation? - Tick to email active online registered patients confirmation of their appointments booked online or in the practice.
- Send SMS Booking Confirmation? - SMS Messaging is no longer a free option via NHS.net, therefore this option is disabled.
- Send Email Reminders? - Tick and then specify how long before the appointment time the patient is to be reminded by email.
- Send SMS Reminders? - SMS Messaging is no longer a free option via NHS.net, therefore the option is disabled.
- Allow patients to submit a reason with their booking? - Tick to allow your patient to add a comment when booking appointments.
- Display Reason for booking for existing appointments? - Tick to enable your patients to view the booking reasons for existing appointments booked at the practice.
- Allow Reason to be edited? - Tick to allow patients to edit the reason for booking.
From the Cancellations tab you can:
- Set a time period for cancelling appointments.
- Determine if cancellation email confirmation messages are sent.
- Set cancellation reasons, see Cancellation Reasons:
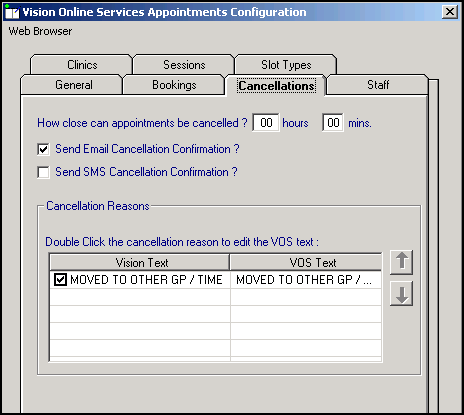
Complete as required:
- How close can appointments be cancelled? - To set the cancellation time frame, enter a number of hours and minutes as required. If your patient attempts to cancel an appointment during the cancellation cut-off period they are advised 'This appointment cannot be cancelled online. Please contact your GP Practice'.
Enable Cancellation Confirmation if you want the patient to receive email confirmation when an appointment is cancelled:
- Send Email Cancellation Confirmation? - Tick to send an email if an appointment is cancelled either at the practice or online.
- SMS Cancellation Confirmation? - SMS Messaging is no longer a free option via NHS.net, therefore this option is disabled.
- How close can appointments be cancelled? - To set the cancellation time frame, enter a number of hours and minutes as required. If your patient attempts to cancel an appointment during the cancellation cut-off period they are advised 'This appointment cannot be cancelled online. Please contact your GP Practice'.
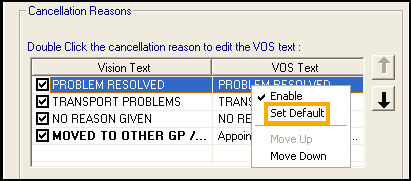
To manage the Cancellation Reasons:
- From Vision Online Services Appointments Configuration select the Cancellations tab:
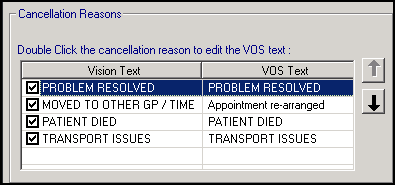
- Double click the cancellation reason to edit and the Vision Online Services change VOS Text screen displays:
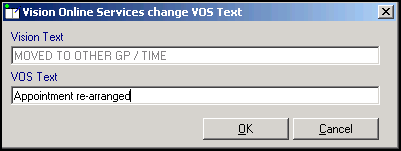
- Enter the text you require and select OK.
- Change the order the cancellation reasons display in by using the up and down arrows. Highlight the reason you wish to move and use the arrows to move it to the required position in the list. To hide a cancellation reason from your patients, remove the tick that precedes it.Important - If all cancellation reasons are deselected (hidden) patients are unable to cancel appointments online.
- To set one of the cancellation reasons as a default, highlight the required reason, right click and select Set Default. The default displays in bold:
The Staff tab allows you to decide which clinical staff display in online appointments and are available for your patients to book.
To set up your staff:
- From the Vision Online Services Appointments Configuration screen, select the Staff tab.
- The following options are available however we recommend you do not use them as they do not allow the correct mix of staff:
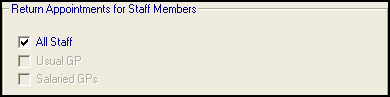
- All Staff - Displays all active clinical staff listed in File Maintenance (including admin staff with a clinical role).Note - This can lead to a very long list of clinicians being offered to your patients.
- Usual GP - Displays only the patient's Usual GP.
- Salaried GP - Displays only those GPs set as Salaried GPs in File Maintenance.
- All Staff - Displays all active clinical staff listed in File Maintenance (including admin staff with a clinical role).
To setup staff individually (Recommended):
- From the Vision Online Services Appointments Configuration screen, remove the tick from All Staff.
- Select Add and a list of all clinical staff from the File Maintenance list displays.
- Select the required clinician’s name from the list and select OK:
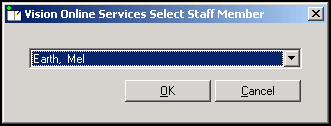
- Repeat steps 2 - 3 until you have added all the staff required.
- Select Cancel to finish.
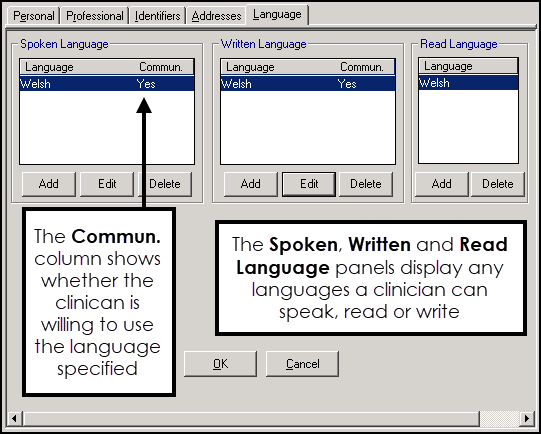
Gender, Role, Special Clinical Interests, Written and Spoken Languages of any clinician providing online appointments displays online. For each clinician selected for online appointments the following should be completed:
- From Vision 3 - Control Panel
 - File Maintenance - Staff select the staff member, right click and select Edit Staff.
 - Complete each tab as follows:
- Personal - Select Sex and then select the correct gender.
- Professional:
- Check the Role selected is correct.
- Set the Main and Interest Specialty from the available lists.
- Language - Check the Spoken, Written and Read languages options are complete and correct where added:
- To add a language if required, select Add under the correct section (Spoken, Written or Read), select from the available list and select OK.
- Select OK to save.
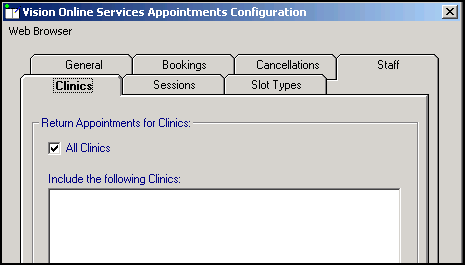
The Clinics tab enables you to determine which clinics (ad-hoc sessions that are not linked to a specific clinician) are available to your patients online.
To add clinics:
- From the Vision Online Services Appointments Configuration screen, select the Clinics tab.
- All Clinics is ticked by default, to change this to specific clinics, remove the tick:
- Select Add and the Vision Online Services Select Clinic screen displays:
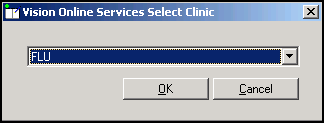
- Select the required clinic from the list and select OK.
- Repeat step 3 and 4 until you have added all the clinics you require.
- If you have selected all the clinics in the list you are prompted 'All available clinics have been added to the list.', select OK to continue.
To remove a clinic from the list:
- From Vision Online Services Appointments Configuration screen, select the Clinics tab.
- Highlight the clinic to remove.
- Select Remove.
- You are prompted 'Are you sure that you want to remove (name of clinic) from the list?', select Yes to remove.
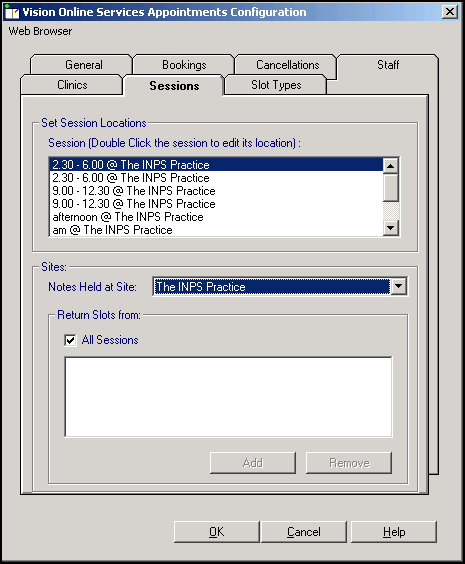
The Sessions tab allows you to configure site access and locations for sessions available within online appointments:
 ) or Available for web (Appointments
  /
/ ).
).To set session locations and sites:
- From Online Services Appointments Configuration screen, select the Sessions tab.
- Complete as required:
- Set Session Locations:
- Session - Lists all sessions added or created in Appointments. Double click on a session to display the list of available locations, select the location you require and select OK.
- Sites - Specifies which sessions should be included for each location. This enables you to limit which sessions are included online:
- Notes Held at Site - Select the site required and then either leave the tick in All Sessions or remove the tick and select Add to select the specific sessions required and repeat as necessary. Select Cancel to finish. If you have branch surgery(s) change Notes Held at Site to the alternative location and add sessions in the same way.
- Set Session Locations:
- Highlight the required session and then select Remove.
- You are prompted 'Are you sure that you want to remove (name of session) from the list?', select Yes to remove.
The slot type displays when your patients are booking appointments online. Text used on slot types by staff should be changed to something appropriate for patients, for example 'MS' should be changed to 'Minor Surgery'.
To change the slot type text that displays:
- From Vision Online Services Appointments Configuration select the Slot Types tab:
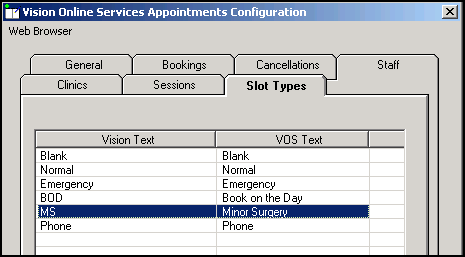
- Double click the slot type to update and the Vision Online Services change VOS Text screen displays:
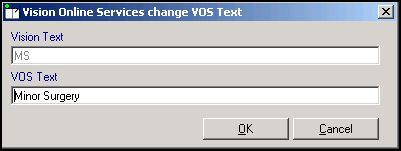
- In VOS Text, enter the text you want to display and select OK to save.
- Repeat steps 2 - 3 until all the slot types have VOS text listed.
Once you have considered and completed all seven tabs as required, select OK to save and close the Vision Online Services Appointments Configuration screen.
You must now configure online appointments from Appointments:
-
If you are using Appointments
/, see Enabling Web Bookings in the Appointments Help Centre for details. -
If you are using Appointments
, see Creating Online Appointment Slots for details.