Creating Online Appointment Slots
Once you have enabled and configured online Appointments from Control Panel you must decide how much of your appointment book you want your patients to have access to online. You need to consider:
Vision 3 Appointments 
You can turn on a prompt to remind you to register a patient for online services.
To turn on the prompt:
- From Appointments - Maintenance - System Constants - Bookings, tick Prompt to register patient for online booking.
- Select OK to save and close.
Once selected, each time you select a patient in Appointments who is not registered for online booking, you are prompted 'Do you wish this patient to use Online Appointments':

Select either:
- Yes - The patient’s Registration Details screen opens in the background. Complete the appointment booking then select their registration and register the patient for Online Appointments. See Creating a Patient Online Account.
- No - Results in no further action. You are prompted to register the patient for online services the next time you select this patient.
Appointments automatically refreshes to show appointments booked at other sites and via online services.
To set the refresh rate:
- From Appointments - Maintenance - System Constants select the Practice tab.
- Check Refresh after and update the number of minutes if required:
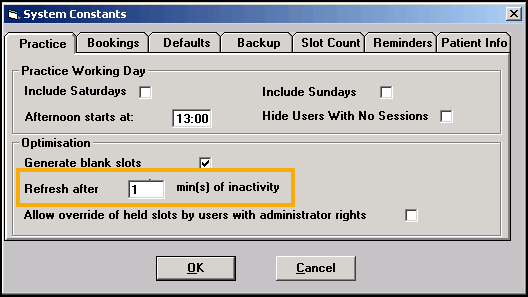
- Select OK to save and close.
Session Headers and location display in online services for the patient, so it is useful to keep them to a minimum, for example AM Surgery, PM Surgery. These session headers can then be used to setup numerous individual sessions for the clinicians. To create and maintain Session Types:
- From Appointments, select Plan - Session Type:
If you are, or have, a branch surgery, it is recommended that you have session headers for each site. For example, AM Surgery - Main Site, AM Surgery - Branch Site. To help identify site locations for your patients consider replacing Main or Branch with the actual name.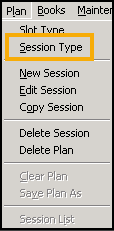
- To add a new session, select Add, type your description in the description window and select OK. To add further sessions select Add and repeat this process until you have added all the required sessions.
To edit an existing session
- Highlight the session in the Session Types screen and select Edit:
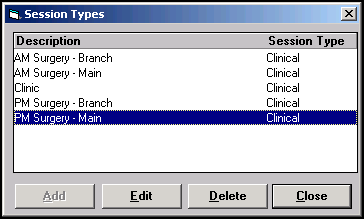
- Change the text in Description as required, select OK to save and close:

To delete a session
- Highlight the session you want to remove on the Session Types screen and select Delete.
- You are prompted 'Are you sure you want to delete the selected session types', select Yes to confirm deletion, or select No to cancel the deletion.
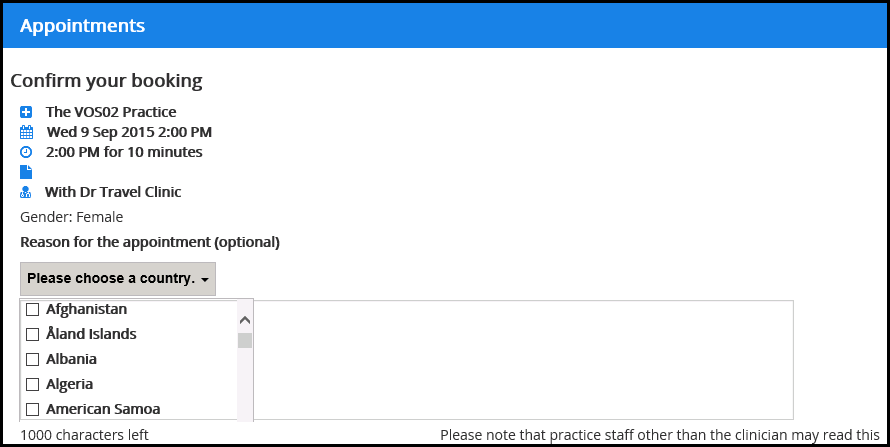
Sessions can be defined as travel clinics. This enables the patient to select a country from a list, which is then added to the appointments comments and can be viewed in Consultation Manager and Appointments:
To create a Travel Clinic session:
- From Vision 3 Appointments select Plan - New Session to create a new session, or Edit Session to change an existing session.
- Check the existing details or add new details as required.
- Tick Travel Clinic:
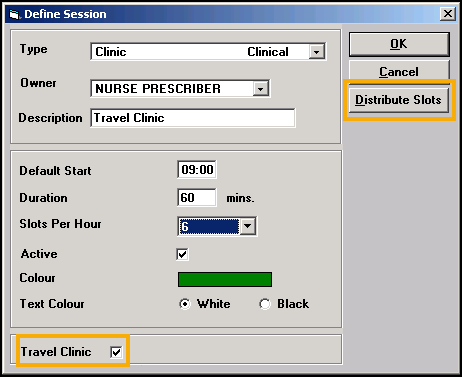
- Select Distribute Slots and change the slots to a Web Default travel clinic slot type.
- Select OK.
- Select OK to save and close the session.
The session is now a travel clinic and can be added to the appointment books as required.
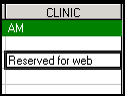
Appointments booked by your patient online must be reserved by being marked Reserved for Web. You can do this either manually or automatically.
When creating or editing Slot Types the following options are available:
-
Non-Bookable Slots - Non-Bookable Slots are a slot type which cannot be booked. Non-bookable slots cannot be viewed or booked from Vision 3 or online:
-
From Appointments, select Plan - Slot Type.
- Select an existing slot type and select Edit, or Add to create a new slot type.
- Tick Non-Bookable:

-
- Non-Viewable Slots can be viewed from Appointments , Consultation Manager, Mail Manager, and 3rd party applications. These slots do not display online for patients to book, however when booked at the practice, confirmation emails are sent to patients registered for online services.Important - If appointments are used for messages or tasks about a patient, for example, ‘Home Visit, message from patient, and the patient is registered with Patient Services, an appointment reminder email is sent to the patient even if the slot type is non-viewable.Training Tip - For internal messaging or tasks, practices should consider using Daybook/Tasks which is specifically designed to create, track and complete administrative tasks.
- From Appointments, select Plan - Slot Type.
- Select an existing slot type and select Edit, or Add to create a new slot type.
- Create a Slot Type as usual adding a description, warning message and colour as per practice protocol.
- Select Non - viewable.
- Select OK.
- Web Default/Bookings - Defining a slot as Web Default/booking automatically reserves the slot(s) for web use when added to a session. Each time a session is extended that contains Web Default/bookings slots, they are automatically created and marked Reserve for Web. You can also book Web Default/bookings slots from within Appointments:
- From Appointments, select Plan - Slot Type.
- Select an existing slot type and select either Edit or Add to create a new slot type.
- Create Slot Type as usual adding in description, warning message and colour as per practice protocol.
- Select Web Default.
- Finally, select OK.
For slots to be available online they must first be reserved in Appointments. Only slots marked Reserved for Web are available for patients to book online.
You can define slots for web booking:
- Automatically when adding/editing sessions. See Reserve for Web - Automatic.
- Manually each time the appointment books are extended or modified. See Reserve for Web - Manual
Reserved for Web slots can be automatically created in the following ways:
- From Appointments, select Plan - New Session or edit an existing session and select Distribute Slots.
- Select a slot that has Web Default ticked for distribution in the session, Yes displays in the web column.
- Select OK.
- Select OK again:

Reserving Slots manually can be done for:
- Individual appointments
- Multiple appointments
- Recurrent appointments
From Appointments, to reserve individual appointments for use by online appointments:
- Open a view and highlight the required slot.
- Right click and select Reserve for Web.
- The selected slot now displays as Reserved for web:
From Appointments, to reserve multiple appointments for use by online appointments:
- Open a view and find the slots required.
- Highlight the required slots by holding the Ctrl key on the keyboard, then selecting each slot required.
- Right click and select Reserve for Web.
- The selected slots now display as Reserved for web.
From Appointments, to reserve recurrent appointments for use by online appointments, for example, 11:00 appointment slot and all future matching 11:00 slots with matching session type and book owner, within a specified time frame:
- Open a view and find the slot(s) to reserve, highlight the required slot(s).
- Right click and select Reserve for Web - All Sessions.
- The Reserve For Web - all sessions screen displays. Enter a Start and End date (double click to access the calendar) to specify when the slots are to be reserved.
- You are prompted to 'Reserve the selected slots for all instances of their session in the selected time range'. Select either:
- Irrespective of the owner of the session instance
- Only if the owner of the session instance is the same as the owner of the selected slot:

- Each current slot that matches the selection is now reserved for use for online appointments. When extending appointment books, slots are reserved for the time period specified. The selected slots display as Reserved for Web.
- To release the reserved slots, right click on one of the affected slots and select Reclaim from Web - All Sessions.
Appointments  and Appointments Setup
Configuring Slot Types for Web Use
Appointments booked by your patient online must be reserved by being marked Available for Web. You can do this either manually or automatically.
Defining a slot as Web Default automatically allocates the slot(s) for use with online services. Each time your appointment books are extended the slots are automatically created and marked Reserve for Web. These slots can also be booked as normal in the practice.
Manually Defining a Slot as Available Online
To manually set a slot as Reserved for Web:
-
From Vision 3 - Appointments
 , from either the Session or Day view, right click on the appointment(s) required.
 - nn items selected
 displays at the bottom of the screen confirming the number of items selected and the toolbar activates at the top of the screen.
 - Select Enable web booking
 and the selected slot(s) update to Available for Web.
Automatically Creating Slots Available Online
To automatically create Web booking slots:
- From Vision 3 - Appointments Setup
 , select Slot types
  .
. - Select either Add slot type
 or select the slot to edit and select Edit
  .
. - Complete the Slot Type details in the usual way.
- Tick Web bookings.
- Select Apply.