Data Entry in Vision+
The Codeset Codes data entry screen is the most used tool in Vision+. From this screen you can list and select individual or multiple clinical terms. To access the Codeset Codes data entry screen:
- From Consultation Manager, select a patient and open a Consultation.
- If your practice uses Problems, open or create the relevant Problem.
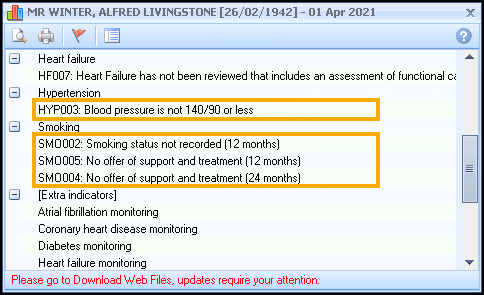
- The alerts screen displays showing data that is missing from the patient record, see Vision+ Alert Indicator:

- From the alerts screen you can either:
- Double click on the indicator line,
- Highlight the Indicator line and select Contract
 on the toolbar,
 - Right click and select Contract
 .
.
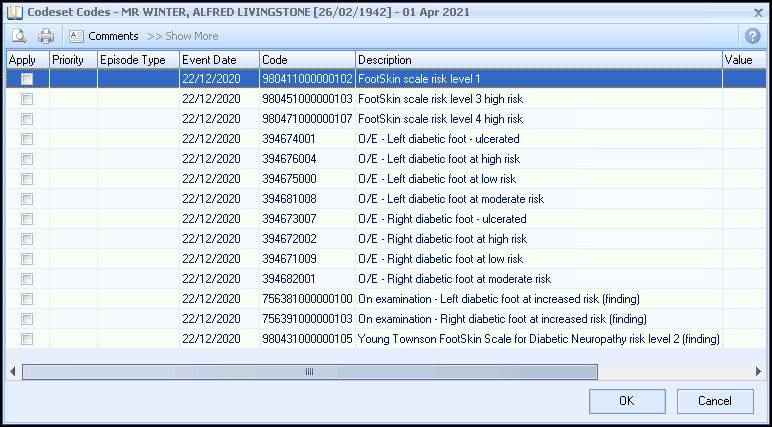
- The Codeset Codes screen displays:

- In the Apply column, select the code you wish to use. You can also make selections from the other columns:
- Priority - Select from the drop-down list. If left blank the Priority is the same as your default setting. Note - Where the entry does not require a Priority, for example tests, any selection is ignored and is not written back to the patient's record.
- Episode Type - Select the Episode Type from the drop-down list. If not selected the Episode defaults to blank.Note - Where the entry does not require an Episode Type, for example tests, any selection is ignored and not written back to the journal.
- Date Recorded - Enter a date or select the drop-down list to display a calendar.
- Code - This is the clinical term and is for information only.
- Description - This is for information only and cannot be changed.
- Value - Use for recording data requiring numeric values.
- Comments - Optional free text comments can be accessed from a pre-defined list. Alternatively, you can enter free text comments.
- Comments
 - Select to setup a pre-defined list of items. To enter a new comment start typing. If you press return you move to a new line as if you are creating a new comment. Select OK to save the changes.
 - Show More
 - Some clinical term lists are quite exhaustive which is why the list displays the most commonly used codes. Select Show More to expand the selection.
Note - The Apply column is automatically ticked if you change any of the other columns. - Priority - Select from the drop-down list. If left blank the Priority is the same as your default setting.
- Select OK to record the data to the patient record.
The alert for the missing data is now removed from the alert screen.
Note - To print this topic select Print  in the top right corner and follow the on-screen prompts.