Multiple flavours
> Dispensary tab
A similar process outlined in Multiple items is also used to handle prescriptions for multiple flavours, ensuring stock depletes correctly for each flavour.
-
Start to dispense the item as you would normally e.g. select the patient and number of items.
-
Select the Written As generic, choosing a Dispensed as item for which you have stock.
-
Entering the full prescribed quantity and press Enter on your keyboard to confirm.
-
Type in the appropriate dosage and direction codes/text.
-
Before printing the labels, and whilst the cursor is still within the Directions box, press Ctrl + Alt + U on your keyboard.
-
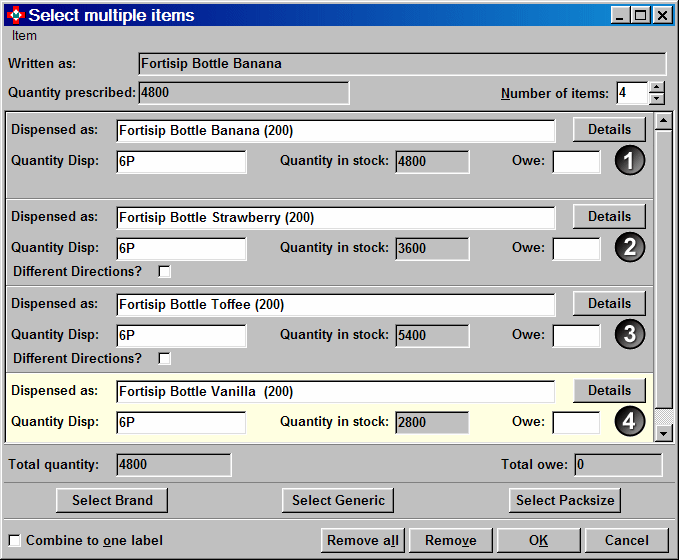
The Select multiple items window appears.
-
Click the up pointing arrow
 to increase the number of items
from one to four.
 -
Three additional levels open.
![]() Each level is distinctly numbered
Each level is distinctly numbered ![]() ,
, ![]() etc. The
system can accommodate what would be considered as an unrealistic maximum
of 15 levels.
etc. The
system can accommodate what would be considered as an unrealistic maximum
of 15 levels.
-
The initial selection populates the first level Dispensed as, for example, Banana
-
Adjust the dispensed quantity to reflect the amount of this flavour, for example, 6P (packs) of Banana.
-
Press Enter on your keyboard and the highlight moves to the next level.

Alternative brand choice
-
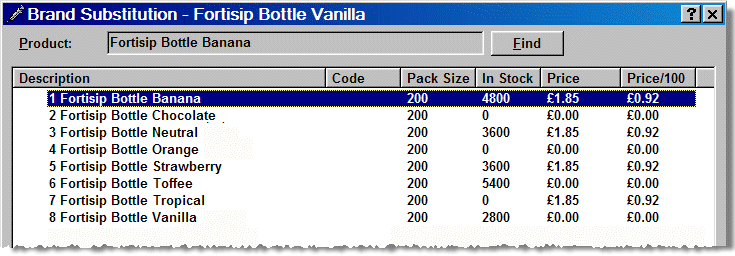
Click the Select brand button. Alternatively, press Ctrl + B on your keyboard to list the alternatives by flavour/brand.
-
Select from the list e.g. Fortisip Strawberry

-
Enter the second part of the quantity, for example, 6P
-
Repeat the process for the remaining flavours.
-
Click the OK button to confirm your selections to print the label(s) as specified.
![]() Labels will print according to the way
you input the dispensed quantity. If you input 2P
& 1P for two quantities, a
total of three labels display, whereas if you input 3600 & 1800,
two labels display reflecting those quantities.
Labels will print according to the way
you input the dispensed quantity. If you input 2P
& 1P for two quantities, a
total of three labels display, whereas if you input 3600 & 1800,
two labels display reflecting those quantities.
-
Check
 Combine to one label if you do not
want separate labels for each make.
![]() If you are applying the labels to two
separate original packs, you would not want to combine to one label. However,
if you were putting all the tablets or capsules into a single bottle,
or all blister strips into a single carton, you would want to combine
the two quantities to a single label.
If you are applying the labels to two
separate original packs, you would not want to combine to one label. However,
if you were putting all the tablets or capsules into a single bottle,
or all blister strips into a single carton, you would want to combine
the two quantities to a single label.
![]() The Select
generic and Select pack size
buttons exist as part of the general functionality of multiple item dispensing.
In practice, it is unlikely they would be used in a typical multiple flavours
scenario. However, they can be used if the situation arises. If required,
an explanation of their application can be found in Multiple
items.
The Select
generic and Select pack size
buttons exist as part of the general functionality of multiple item dispensing.
In practice, it is unlikely they would be used in a typical multiple flavours
scenario. However, they can be used if the situation arises. If required,
an explanation of their application can be found in Multiple
items.
Other options
-
Check
 Different
directions if you want to append the different dosage and directions
at this point (as opposed to reverting back to the Dispensary
tab).
 -
Owing balances can be entered for one or both makes if applicable. These balances display automatically if you are keeping stock whilst labelling.
-
Click the Remove all button to remove all work to date in order to restart.
-
Click the Remove button to clear the highlighted entry, for example, the second level in the above illustration.
![]() If you enter different directions but
then subsequently select Combine to one
label, the different directions will be ignored in favour of those
entered on the Dispensary tab.
If you enter different directions but
then subsequently select Combine to one
label, the different directions will be ignored in favour of those
entered on the Dispensary tab.
Owing balances
In the event that one or more of the additional flavours being dispensed is out of stock, the balance to be owed displays in the Owe box.

If automatic stock control is not activated, it is up to you to enter the amount owed.
-
Click the OK button to confirm your selections to print the label(s) as specified. An owings label is produced.
Updated 16th March 2010