|
|
|
|
|
Populate Problems
The Problems screen in Consultation Manager only has a Problem entry for Currently Relevant until new data is added and new problems created.
You can populate problems from existing data on to patient's Problem screens (even from a previous medical system).
First create the group of patients for whom you want to add the problem, one way is from a Clinical Audit group, finding the appropriate $AUD group in Patient Groups under the most recent date, make it in to a work group and save it with a specific name.
Alternatively, run a search for a category of patients - for example, Asthma Register patients. Decide what to include in Report Details and save the group.
From Populate Problems, you can then create a problem for each of these patients, and every entry on Report Details becomes an entry on the Problem View for that Problem screen.
For an example, see also Problems versus Disease Registers for GMS Contract.
Note - Enhancements for Consultation Manager Problems introduced in DLM 310 (automatic Mnemonic and new date fields) are not available in the Problem Populate module.
Example creating Asthma problem
- From Searches, first run a search:
- In Search Details, select Asthma Register in Add Entity - Clinical Data, either Asthma Data or Chronic Disease Registers.
- Add any other specific entity, such as such as Acute and Repeat Issue Therapy. In Selections, eg, specify Asthma-related therapies either by drug name, or by BNF code, eg 0301 bronchodilators.
- If you select Match Any, this finds patients either on the Asthma Register, or on asthma-related therapy.
- Choose other entities as required, eg peak flow etc.
- In Report Output, select Count, View or another option.
- In Group Output, enter a suitable search name such as Asthma.
- In Report Details, include the entities of, eg, peak flow, asthma-related repeat masters therapy, etc. The Report Details are the entries that appear on the patient's Problem View screen, in this example, of Asthma.
- Click on Run.
- Once the search has been processed, save the criteria (optional), and exit from Searches.
- From the Vision Start-Up menu, click on Modules - Populate Problems.
- Select the search group you have just created, eg Asthma (you can view the patients too).
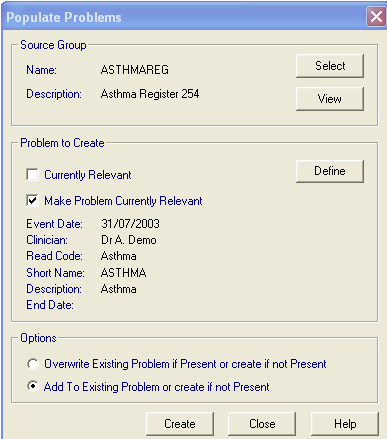
- Click off Currently Relevant. Tick and select Make Problem Currently Relevant, if you want the problem of Asthma to show on the Currently Relevant screen under Problems.
- Click on Define, to display the Problem-Add screen. Define the new problem, eg Asthma. by entering a READ Code/description and a short name, eg #H33, Asthma. It is very important to use the SAME READ code if you are running Populate Problems regularly and you want to update the patients grouped under Problems, eg, ASTHMA, or DIABETES.
- Finally, in Options, you can:
- Either Overwrite Existing Problem if Presentor Create if not present. If you were unhappy about the contents of an existing problem in terms of the Report Details included, use this option.
- or Add to Existing Problem or create if not present. If you want to add extra data to an existing problem, use this option. For example, you might have already created Asthma but forgotten to include peak flow in the Search Details. Run the search again including this, this time with peak flow in Report Details and follow steps 2-6 above. Then select this option Add to Existing Problem or create if not present.
- Click on Create.
- The message Problem [Asthma] has been updated successfully displays once processed - click on OK.
- Click on Close to exit from Populate Problems.
- If you now look at any of the patients who now have this new problem, you can see that the data contained within the problem is the Report Details you specified in the original search, eg repeat masters, peak flow etc.
Note - Once there is a problem, and it has the same mnemonic as a guideline with the same triggering READ term, the guideline is minimised at the bottom of the MRO column whenever you select this patient.