Line Levels and Text Indents
You can set up line levels and text indents for your Guidelines and Reports. This allows you to affect the way the data is laid out.
To set up the line Levels and Text Indents in a Guideline or Report:
-
From Consultation Manager - Guidelines, with the appropriate Guideline or Report selected, select Design Mode
 .
. -
Right click on any line and select Properties, the appropriate Line Properties screen displays:

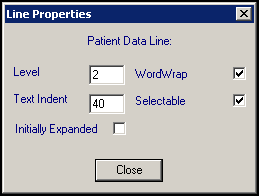
Complete as required:
-
Level - The first Sub-heading is always at level one. Any item inserted after a sub-heading is put at the next level in sequence, enter:
-
One for sub-headings
-
Two for text beneath it
-
Three for more details, and so on
-
-
Text Indent - Set the indent you require. This is usually in 10s. The higher the number the more to the right the line displays.
If the previous line is highlighted, then the new line goes in at the same level.
You can quickly adjust the levels and indents of any line, select it and press the right or left arrow keys to move it and all its lower-level lines at the same time.
-
Otherwise, use the right mouse and select Properties. Adjust the levels and text indents. You can only select a level one lower than its parent line.
 a warning displays if there are inappropriate levels next to each other, you can select to allow the lines to be adjusted automatically or to abandon saving the plan and making the adjustment manually.
A collapsed report shows only level one, the parent line, usually the main sub-headings. You can expand each level in turn, by selecting them, while the subsequent lower levels remain hidden.
Outside of Design Mode, a line which is underlined indicates there are further levels to be revealed. Eventually you can view all the lines. These underlined lines usually apply to Last consultation and Problem lines.
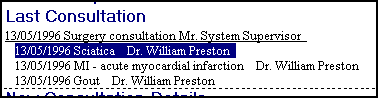
For example, in the figure below:
-
Level One - (blue) Last Consultation line.
-
Level Two - 13/05/1996 Surgery consultation Mr System Supervisor.
-
Level Three - (highlighted) the details of the consultation (13/05/1996 Sciatica Dr William Preston):