Printer Profiles
Printer Profiles enable you to define separate printer profiles for the following groups:
- Prescription Printers
- Nurse/Supplemental Prescribers (particularly in Scotland where there is different prescription stationery)
- Specimen Label Printer
- Drug Label PrinterNote - If you are a dispensing practice and are printing your drug labels from your Pharmacy Management System (PMS), you can switch this facility off in Vision 3, see Dispensing Drug Labels in the Front Screen Help Centre for details.
- Bag Label Printer
Once set up, printer profiles:
- Allow you to set up a separate printer destination for each therapy print function (for example, Drug Labels and Specimen Labels).
- Allow you to configure new and existing printers, eliminating the need to manage and test all printers centrally. This function is simple and easy to use, but a wide variety of settings can be adjusted, such as orientation and paper source.
You can access Printer Profiles from:
- Vision 3 front screen - Options - Setup - Printers.
- Consultation Manager, by selecting Setup from the Therapy - Add or Prescription Manager screens.
- Consultation - Options - Prescription Setup (see Consultation Options - Prescription Setup) then select Print Profile.
To convert from Classic Printing to Printer Profiles:
- From the Vision 3 front screen, select Options - Use Print Profiles.
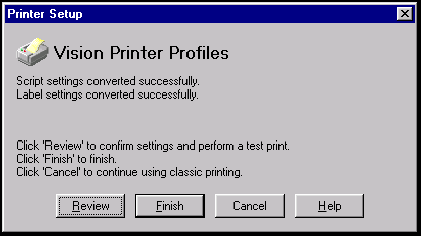
If Vision 3 detects that no profiles have been created for this workstation and there is at least one printer set up for classic printing, then the conversion process is triggered:
If Automatic is selected, then the current settings are used to generate up to two new profiles, which are then automatically assigned to the relevant print functions. After conversion:
- If successful, a message reads:
- Script settings converted successfully
- Label settings converted successfully:

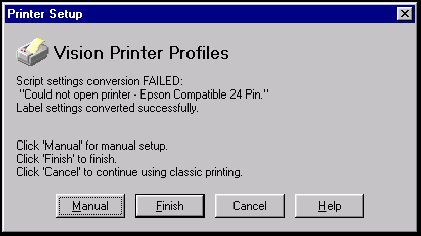
- If unsuccessful, the message reads similar to the following example:
- Script settings conversion FAILED:
- "Could not open printer - [name of printer, for example, Epson Compatible 24 Pin]"
- Label settings converted successfully
In this case, do a manual conversion for the prescription printer. Check the label settings as well:

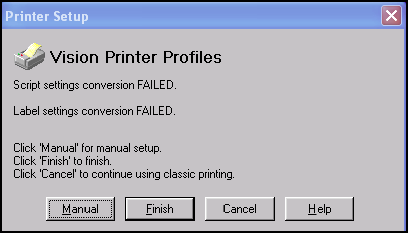
- If conversion of both Script and Label settings failed, the following message displays:
- "Script settings conversion FAILED:
- Label settings converted FAILED"
In this case you should do a manual conversion:

- Select
- Manual - To follow a manual setup of the Printer Profiles.
- Finish - To exit the screen without Printer Profiles being set up for either Script or Label settings, whichever failed.
- Cancel - To return to Classic Printing.
If Manual is selected, then the Profile Setup screen displays. If unconverted settings remain, then Convert Existing Settings displays which enables you to use the automatic conversion for a particular printer type (Script or Label).
To set up Printer Profiles:
- From the Vision 3 front screen, select Options - Setup - Use Print Profiles.
-
Print Function - This list contains all print functions that are supported by Printer Profiles. Each of these functions has an associated printer type, currently Script or Label:
- Prescriptions
- Nurse/SP Prescriptions (in Scotland)
- Drug Labels
- Bag Labels
- Specimen Labels
Select one of these, for example, Prescription, if you want to set up a prescription profile.
Printer Profile - This picklist contains all profiles that have been created on this workstation that correspond to the selected print function, for example, My Prescription Settings.
Thus, if Prescriptions is selected, then the picklist is filled with all script profiles, whereas if any of the three label functions are selected, then it is filled with all label profiles. The selected item is the profile assigned to the currently selected print function.
- Add and Edit - These buttons on the Vision Printer Profiles screen let you add or edit a printer profile (described below).
- Remove - This deletes the currently selected configuration after a warning has been given.
- Apply - This is enabled when the profile assignment has changed. When pressed, all function-profile assignments are saved and the button is disabled. The OK button also saves any unsaved assignments in addition to closing the screen.
Add or Edit a profile - Make sure the correct function is selected in Printer Function, then select Add (or Edit) for the Add (or Edit) Printer Profile settings screen.
Profile Name - Type in a name, or keep the simple default, e.g My Prescription Settings, My Drug Label Settings. This is the name that appears under the Printer Profile on the main screen, and also on the import screen. It is the primary identifier of a profile, and must be unique for a given workstation. The default is a unique value
Printer Type - Select either Script or Label. This is used to filter profiles by printer type. It is disabled in Edit mode. The default is the printer type of the print function currently selected in the main screen.
Available Printers - Select a printer from the list of installed printers. There is no default selection. This is the way to select different printers for different labels.
Stationery - If you are setting up a Nurse/Supplementary Prescriber in Scotland, then choose GP10NSS. If GP in Scotland, choose GP10SS. Under the Advanced option, you can specify the tray for loading each type of script in Paper Source. In England, there is a choice of FP10SS0105, FP10SS0406 and FP10SS0901.
Print a test page. This prints a dummy script/label to the printer. Note that both English and Scottish scripts will print a barcode, even if the practice is not enabled for ETP (Electronic Transmission of Prescriptions, part of the NPfIT project)
Script test prints a dummy script on the left hand side with the profile settings and other details on the right-hand side:
Label test prints differ from the test print available via label design. A border of characters is printed to make it easy to align the output on the label. Selected profile settings are also printed.
Margins - If the alignment is incorrect, then adjust the left or top margins to fine tune the printing alignment. Print another test page. The measurement is in mm and can be negative.
Advanced Settings - see below. You will need to select the correct Form, for example, FP10 (HL-1250 script) ES, though if you do not, the default form setup is used for that printer on your workstation. Label settings, however, may need Advanced adjustments; or if you need to select landscape.
Press Save when correct.
Repeat for Drug Labels, Bag Labels and Specimen Labels.
Click on either OK at the front Profiles screen if you are adding, or Apply if you are editing a profile.
Sometimes it is necessary to adjust other parameters. These are available by selecting Advanced from the Add/Edit Printer Profile Settings screen.
- Page Height - Form feed. Only visible under Windows 95 (1/10 ths of a mm). The default is 2169 for scripts, 381 for labels.
- Reverse Feed - Reverse feed - (1/216 inch). The default is 0.
- Paper Source - Printer Bin to use. The default is the current printer bin, for example, <default>. For Scotland where there is separate GP and nurse prescription stationery, you can specify the bin as you add or edit each.
- Orientation - Portrait or Landscape - a landscape option permits the use of some printers that cannot otherwise be used because of printer tray limitations. The default is Portrait.
The following options are not available when editing prescriptions if you are enabled for electronic transfer of prescriptions (ETP), for example, you are not able to change the font and font size if ETP messaging. The following options are available if you are editing labels:
- Font - Select from Roman and Courier, Scottish scripts require Courier 11 on the left-hand side of the prescription. The default is Courier.
- Font Size - Select from a range of 6 - 11, Scottish scripts require 11, else 9. 7 for labels.
- Line Height - Labels only, this must be equal to or greater than the Font Size, the default is the Font Size.
- Bold - Labels only, the default is normal.
These are some of the options available:
|
Prescription Printers - England, Wales and Scotland (ES) |
Prescription Printers - Northern Ireland (NI) |
Label printers |
|---|---|---|
|
FP10 (EPSON LQ850) ES FP10 (EPSON SQ850) ES FP10 (EPSON FX-100+) ES ES FP10 (FUJITSU DL1100) ES FP10 (FUJITSU DL1150) ES FP10 (CITIZEN S90) ES FP10 (MT-150) ES FP10 (MT-2030) ES FP10 (HP Deskjet 930C) ES FP10 (HP Deskjet 540) ES FP10 (HL-1030 script) ES FP10 (HL-1230 script) ES FP10 (HL-1240 script) ES FP10 (HL-1250 script) ES FP10 (Canon BJ-300) ES FP10 (Citizen 300) ES FP10 (EPSON SQ870) ES FP10 (HL-1260 script) ES |
FP10 (EPSON LQ850) NI FP10 (EPSON SQ850) NI FP10 (EPSON FX-100+) NI NI FP10 (FUJITSU DL1100) NI FP10 (FUJITSU DL1150) NI FP10 (CITIZEN 590) NI FP10 (MT-150) NI FP10 (MT-2030) NI FP10 (HP Deskjet 930C) NI FP10 (HP Deskjet 540) NI FP10 (HL-1030 script) NI FP10 (HL-1230 script) NI FP10 (HL-1240 script) NI FP10 (HL-1250 script) NI FP10 (HL-1260 script) NI FP10 (Canon BJ-300) NI FP10 (Citizen 300) NI |
Fanfold 8.5 x 12 in Label (STAR LC-200) Label (MT-150) Label (CITIZEN 590) Label (4.00 X 1.50) Label (Brother M1409) Label (Brother M1709) Appointments form Label (2.80 x 1.40) |
To share Printer Profiles between users, or to implement a widescale change that can then be available for all Vision users:
- From the Vision 3 front screen, select Options - Setup - Printers and then select Profile Name - Add or Edit; or Advanced - Import.
- The Import screen displays.
- Complete as required:
- Work Station - The name of the workstation that owns the profile
- Platform - The operating system of the workstation that owns the profile
- Profile - The name of the profile
- Modified - The date/time that the entry was last modified
- Printer - The name of the local windows printer
- Driver - The driver assigned to the local windows printer
- When a configuration is selected for import, control returns to the Advanced Settings screen, the following fields are completed using the imported configuration:
- Margins
- Page Height / Form
- Reverse Feed
- Font
- Font Size
- Line Height
- Bold
- Paper Source
- Orientation
All listed profiles are filtered on the printer type, script or label, currently selected in the Profile Setup screen. In addition to this, the following filters can be applied.
- Source - This filters the list based on one of two options:
- Practice - Profiles that have been created on other workstations in the practice.
- System - Vision defined settings, the Profile Name and Driver display.
- Platform
- Only show profiles with a matching printer driver - Select to list only settings with a driver that matches the driver for the Windows printer currently selected in the Profile Setup screen. If this filter is not enabled, then non-matching drivers are shown in grey text. This is important because, as with the platform, if the driver differs, then it is unlikely that the settings provide the correct layout.
- Group By Workstation - If the source is set to Practice, then this option groups the settings by workstation.
- Save Options - This saves the current options as the default for the next time this screen is launched on this workstation. This does not include the Platform filter.
A Print Profile can be updated from either:
- Options - Setup - Printers, or
- from within Consultation Manager on Prescription Manager - Setup.
Select Save.
Private CD Prescription is available for private Controlled Drugs if required. This is an optional setting, but does allow you to specify a separate printer or printer bin. The standard prescription function is used if Private CD Prescription is not selected.
- From Print Function, select Private CD Prescriptionand then select Add.
- Select as appropriate:
- Available Printer
- Stationary - Select FP10PCDSS for private CD stationery.
- Advanced - Paper Source - Select a separate printer or printer bin for this stationery.