Guidelines - Using Age/Sex Filters
If you want a particular section of a Report or Guideline to only display for a particular age or sex, for example, a contraception line for female and not male patients, then you need to insert an Age/Sex Filter line before that section.
Once applied an Age/Sex Filter effect all subsequent lines, until another filter line is encountered. Any lines following the Age/Sex Filter are hidden when a patient is selected whose age or sex does not fall into the specified criteria. This is particularly useful for Patient Reports where lifestyle information such as BP measurements are not relevant for children.
Adding an Age/Sex Filter line of Both sexes, All ages after the filtered patient data line cancels all filters.
For example:
-
Insert - Age/Sex Filter - Female/All ages
-
Insert - Patient Data - Cervical Cytology
-
Insert - Patient Data - Rubella Test
-
Insert - Age/Sex Filter - Both sexes/All ages
Displays Cytology and Rubella information if you have selected a female patient, but not a male patient. The next section of the Guideline or Report applies regardless of the sex of the patient selected.
 and do not display on the Guideline or Report itself.
To apply a Age/Sex Filter line:
- From the Guideline or Report you require, select Design to display the floating toolbar.
- Select the line above where you want to apply the filter and select Age/Sex Filter
 .
. - The Age/Sex Filter Selection screen displays. Any pre-defined age/sex filters are listed and can be selected. To create a new filter:
- Select New.
- The Sex/Age Range Filter - Add screen displays, complete as required:
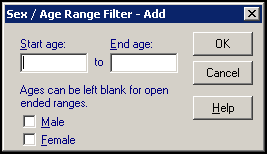
- Start age - Enter the age you want to start the filter, for example, 18y for over 18 years old.
- End age - Enter the age you want to stop this filter, for example, 55y for under 55 years.
- Male - Tick to include those patients registered as male.
- Female - Tick to include those patients registered as female.
Select OK to save.
-
Select OK to save.
Training Tip - We recommend Age/Sex Filters are placed at Line Level 1 so they do not affect the layout of the following content, see Line Levels and Text Indents for details if required. -
To cancel out the age/sex filter, select the last line of the Guideline or Report which relates to the age/sex filter and select Age/Sex Filter
. From the Age/Sex Filter Selectio screen, select Both Sexes All Ages and select OK.