eMessages details
The eMessages tab provides access to much detail related to each barcoded prescription message
On a day to day basis it is unlikely that you will depend on this detail to carry out routine tasks. A significant benefit might arise when you are trying to resolve a query, either by yourself or under direction from Service Desk.
-
Highlight the prescription you wish to investigate and click the Details button. Alternatively, press
 &
&  .
.
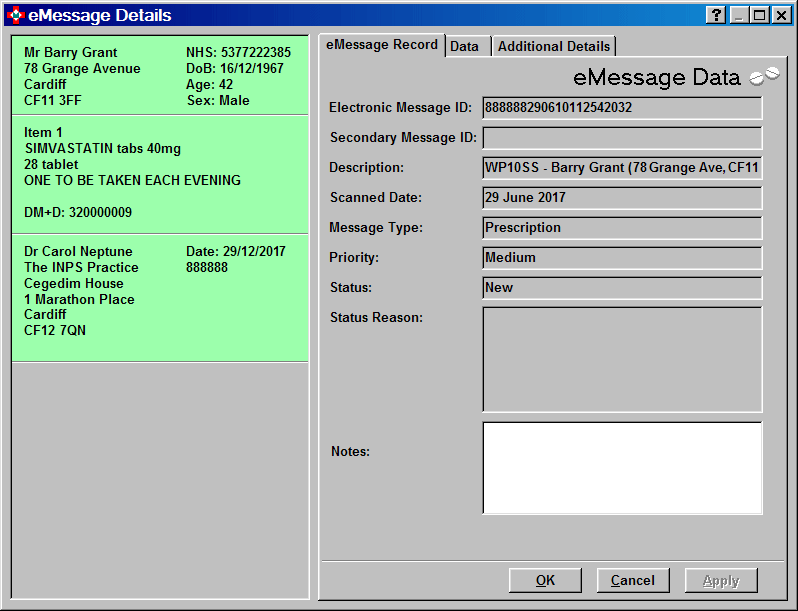
The eMessage record tab appears. A representation of the electronic prescription including all the patient, prescriber and medication item details that you would normally see on the printed prescription. This representation is similar to what you will see during prescription processing through the patient selection wizard and onward.

eMessage record tab
Simple detail about the prescription's current status.
Message IDs
A unique alpha-numeric code that is included in the encoded barcoded detail.
Description
Whatever appears in the eMessages tab description column. Typically, the prescription type and patient's name.
Scanned date
The date the prescription barcode was scanned.
Message type
Typically, this will be Prescription.
Priority
This does not serve any purpose in this version of Pharmacy Manager.
Status
Displays the status that is seen on the eMessages tab e.g. New.
Status reason
Additional explanation. For example, if a scan fails, the status reason should indicate why it has failed.
There is not always a reason given as the other information on the screen is adequate.
Space for you to include any notes about the patient/prescription. If a note is attached to a prescription it will appear as a pop-up if you hover over the prescription on the eMessages tab.
Data tab
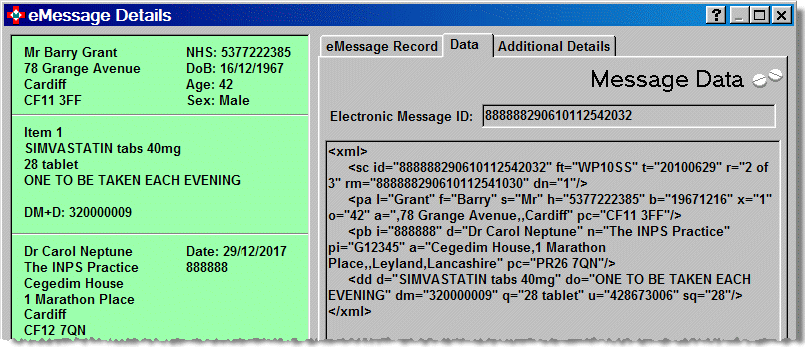
The Data tab displays data extracted from the decoded barcode as a technical message.

This view is intended for technical support use rather than of being of any direct day-to-day benefit to you.
The Dispensed items tab is only present when the prescription status is Complete. This tab displays a time stamped list of the items dispensed. If an item on a prescription is not dispensed, this will also be indicated here.

-
Click the Details button to open up the Prescription item details for the item.

Endorsements
You can amend an endorsement or print a claim.
-
Click the Endorsements button to open up the Dispensary supplyitems tab.
Details
You view other details associated with this line item.
-
Click the Details button to open up the Prescription items details.
Not dispensed reason
If an item has been marked as Not dispensed, but a claim has not been submitted, it is possible to change the reason.
-
With the Not dispensed box populated and the Edit button enabled, click the Edit button.
![]() Patient exemptions
Patient exemptions
Not applicable in Wales, although data may appear if it has previously been entered in the patient record.
Repeat details tab
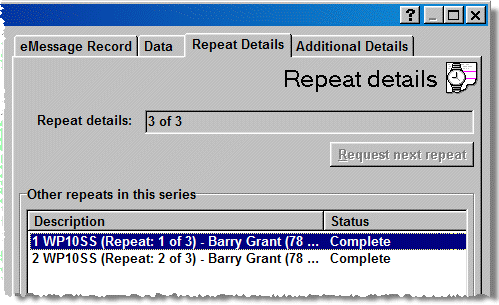
The Repeat detailstab displays any previously processed iterations that are related to the selected repeat dispense prescription.

-
Click the Details button to display the repeat dispense iteration content. See Dispensed item details tab above.
Additional details tab
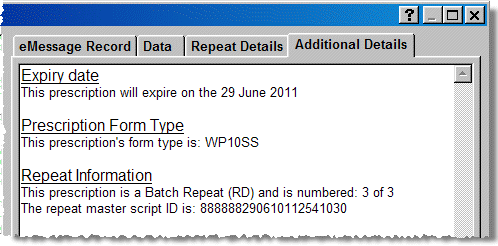
The Additional details tab displays some extra useful information about the prescription message.

Automatic patient matching for electronic prescriptions
Pharmacy Manager
can recognise when a patient record matches with the patient details for
in an incoming prescription. On the eMessages
tab, this is indicated by the ![]() image.
image.
In the eMessages details area, such a match is indicated by the presence of an additional tab - Local patient- which displays the patient's information.

Additionally, the ![]() indicates
the patient is either MDS or MDS - Community, with the specific
type indicated underneath the icon.
indicates
the patient is either MDS or MDS - Community, with the specific
type indicated underneath the icon.
See also Automatic patient matching.
When a full is partial match is not returned, there is the option to override the listed patients.
Display adjustments
![]() If
you operate at a screen resolution greater than 800 x 600, it possible
to adjust the display. Hover over the right hand edge of the window and
a resize
If
you operate at a screen resolution greater than 800 x 600, it possible
to adjust the display. Hover over the right hand edge of the window and
a resize ![]() arrow will appear. Drag to the right to widen the window or to the left
to shrink the width.
arrow will appear. Drag to the right to widen the window or to the left
to shrink the width.
Additionally, hover over the border between the virtual
prescription and the right hand tabs. A splitter ![]() arrow will appear. Drag to the right to widen the amount of space allocated
to the virtual prescription. Alternatively, drag to the left to increase
the amount of space given to the tab, noting that when one side is increased,
the opposite side is decreased.
arrow will appear. Drag to the right to widen the amount of space allocated
to the virtual prescription. Alternatively, drag to the left to increase
the amount of space given to the tab, noting that when one side is increased,
the opposite side is decreased.
Updated 30th June 2010