FP10DT dispensing token printer
One requirement of the Electronic Prescription Service is the need, in certain scenarios, to print dispensing tokens.
A dispensing token is the paper copy of the details contained within the electronic prescription which has been printed by the dispensing contractor.
The electronic transfer of the electronic prescription from surgery to pharmacy will lead to the occasional situation where there is no prescription form for the patient to make their signed declaration and they have no prescription token.
A second situation may arise where you receive an electronic prescription as the nominated pharmacy. However, you may not have stock of the prescribed item which could be required urgently. The patient requests a copy of the prescription so they can take it to another pharmacy.
Printer setup
This guidance is specific to the Brother HL5250-DN printer. Although it should be easy to apply the process to other printers, there may be differences.
It is possible to specify an alternate paper tray for the FP10DT forms. The printer has one tray by default, but it can accommodate a second tray. This would be advisable as it would allow prescription forms and plain A4 paper to co-exist in the printer.
If you intend using the printer with two trays, we recommend that you load your FP10DT forms into Tray 1 (the bottom tray).
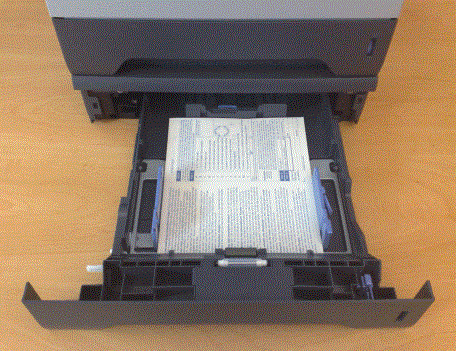
You should load the FP10DT forms so that the side showing the exemption codes is facing upwards. The printed half of that side should be innermost when placed in the tray (see image below).

To select a paper tray, follow Tools > Printer Configuration > Pharmacy Manager
-
Ensure your Prescription printer is assigned.
-
Click the Workstations tab
-
Click once to highlight the Prescription printer print job and then click the Details button.
-
Click the Prescriptions tab
On the Prescriptions Printing Set-up tab:
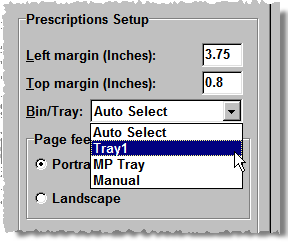
Left Margin - this setting should be set to 3.75 to ensure correct horizontal alignment when the FP10DT form is printed
Top Margin - this setting should be set to 0.8 to ensure correct vertical alignment.

For the Bin/Tray drop down menu, Auto Select enables the printer itself to choose from which tray the paper should load. The printer will work from the top tray downwards.
MP Tray selects the Manual Paper Tray. This tray is located at the top and must be dropped carefully into position. There are some sliders in the tray which should be adjusted so the paper fits correctly. This tray can only accept one piece of paper at a time.
Tray1 selects the first bin. Again there are sliders within the tray which should be adjusted so that the paper fits correctly. This tray can be loaded with multiple sheets.
![]() Tray1 has a hole at the front. This
will allow any paper in Tray2
to flow upwards.
Tray1 has a hole at the front. This
will allow any paper in Tray2
to flow upwards.
Tray2 will select the second bin at the bottom of the printer (which is the bin Cegedim Rx recommends for FP10DT forms). This tray can also be loaded with multiple sheets of paper and has sliders which should be adjusted so the prescription forms can fit correctly.
Page Feed Orientation -This setting should be set toportraitto ensure correct printing.The default orientation is portrait.
You should load the FP10DT forms so that the side showing the exemption codes is facing upwards. The printed half of that side should be innermost when placed in the tray (see photograph above).
In some cases Tray2 may not appear listed for this printer in Pharmacy Manager. If this occurs you should install Tray2 from Windows for the Brother HL-5250 printer.
The settings outline above may not apply to all printers and could become outdated if the layout of the CP2 form changes. Please contact the Service Desk, see Contacting us for support for more information.
Installing Tray2 in Windows
Follow the steps below to install the driver for the Tray 2.
-
On the Windows desktop screen, click Start
-
Click Control Panel
-
Double click Printers & Faxes
-
Right click on the icon for the Brother HL5250-DN Printer
-
Click on Properties
-
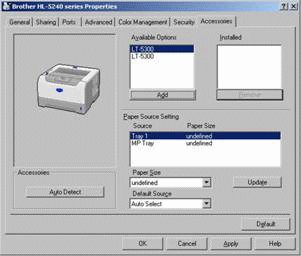
Click on the Accessories tab

-
Click Autodetect. This should install the second tray.
-
Click Apply
-
Ensure the second tray is highlighted as an available option and click Add so that it appears under Installed.
-
Tray 2 should now be added to the Paper Source Settings
-
Click Apply then click OK and close the Printers & Faxes window
You may wish to call Service Desk if these steps are not successful or you are uncertain on any point, see Contacting us for support for more information.
![]() This
printer cannot be used at the same time as a Zebra LP2844 on a Pharmacy Manager computer when both printers are connected by USB.
This
printer cannot be used at the same time as a Zebra LP2844 on a Pharmacy Manager computer when both printers are connected by USB.
![]() Remember -
Remember - ![]() often steps you back
to the previous screen.
often steps you back
to the previous screen.
Updated 29th January 2009