Appointments Backup - Vision 3 Practices
 must be open for the automatic back up to take place.
To provide access to your appointment list in the case of a network problem, Vision 3Appointments has an automatic text file backup available. We recommended you run the back up on two workstations, usually a front office workstation and a back office workstation. It is important that the back ups do not run at the same time.
Hosted Server
If you are on a hosted server, for example AEROS, to enable the back up of Appointments to a local drive you must first configure your remote desktop connection to allow access. You can then configure Vision 3 Appointments to back up to a local workstation.
To configure the remote desktop to access the local drive:
- From the main Windows screen, right click on the Remote Desktop icon and select Edit.
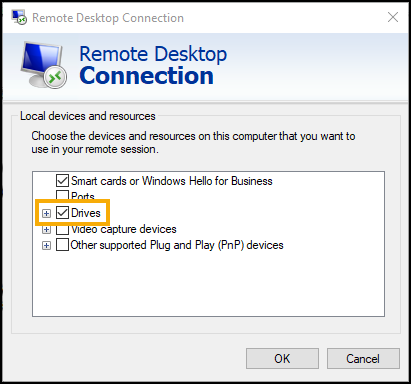
- The Remote Desktop Connection screen displays, select the Local Resources tab:

- Select More and then tick Disk drives:

-
Select OK to save.
- Now, select the General tab.
- Select Save As and the file name Remote Vision.rdp displays, select Save.
- You are prompted to replace the existing file, select Yes.
Create a new folder on your drive C:
-
From the Windows menu select File explorer.
-
Right click on Local Disk (C) and select New - Folder.
-
Enter a name in New Folder, for example, BackUp.
-
Press Return on your keyboard and the new directory saves under the C Drive.
Once you have configured the remote desktop on the computer and created a new folder, you can activate the Appointments back up on both workstations:
- From the Vision 3 front screen, select Appointments – Maintenance – System Constants.
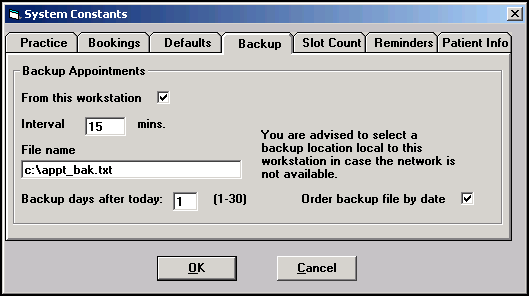
- Select the Backup tab:

- Complete as follows:
- From this workstation – Tick.
- Interval – Set to 15 minutes on the front office workstation and 59 minutes on the back office workstation.
- File name – Change to \\tsclient\c\BackUp\appt_bak.txt.
- Backup days after today – Select how many days ahead you wish to backup, this ranges from 1-10 days, the recommendation being one day on the front office workstation and three days on the back office workstation.
- Order backup file by date - Tick to list appointments in date order.
- Select OK to save.
Local Server
To set up an Appointments backup on a workstation:
-
From the Windows menu select File explorer.
-
Right click on Local Disk (C) and select New - Folder.
-
Enter a name in New Folder, for example, BackUp.
-
Press Return on your keyboard and the new directory saves under the C Drive.
- Now, from the Vision 3 front screen, select Appointments – Maintenance – System Constants.
- Select the Backup tab:

- Complete as follows:
- From this workstation – Tick.
- Interval – Set to 15 minutes on the front office workstation and 59 minutes on the back office workstation.
- File name – Change to \\tsclient\c\BackUp\appt_bak.txt.
- Backup days after today – Select how many days ahead you wish to backup, this ranges from 1-10 days, the recommendation being one day on the front office workstation and three days on the back office workstation.
- Order backup file by date - Tick to list appointments in date order.
- Select OK to save.