Warfarin/INR Diagnosis
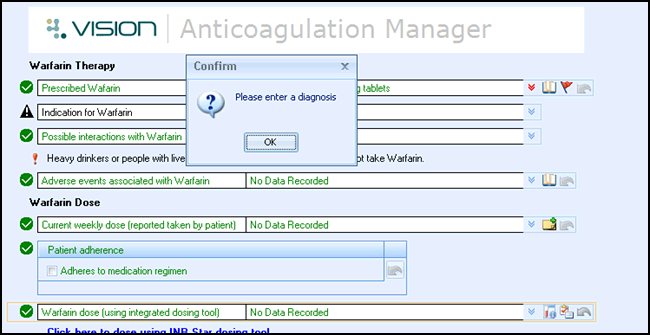
Before patients can have their INR monitored and Warfarin dose adjustment calculated, they must first have a current Diagnosis Indication. This is done on the INR/Warfarin Diagnosis screen. If you have not already recorded the Warfarin/INR Diagnosis Indication a prompt displays when you select the Warfarin dose icon.

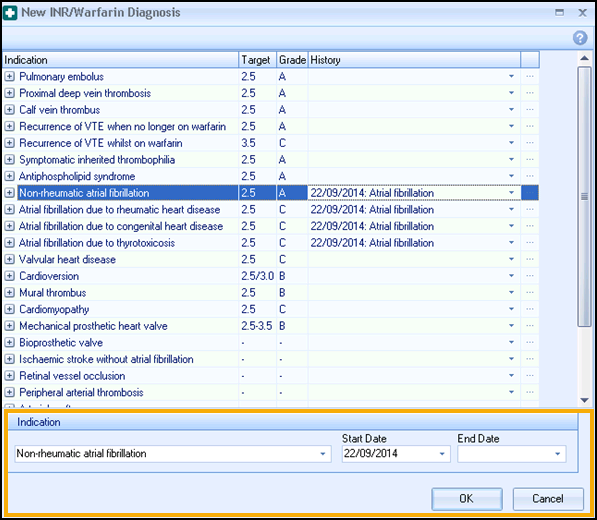
Any diagnosis clinical terms on the patient's record display in the History column on the line of the relevant Indication. The clinical terms displayed can be selected and used as the Diagnosis Indication. If a Diagnosis clinical term does not exist in the patient's clinical record then this column will be empty, and a Diagnosis clinical term can be added very easily.
To add a new Diagnosis Indication from an existing Diagnosis Clinical term
- Select History
 alongside the chosen Diagnosis clinical term you wish to use.
 - Double click on the relevant clinical term in the box that is presented.Note - You can only select one clinical term.
- The corresponding indicator displays in the Indication section at the bottom of the screen with the Start Date set to that of the Diagnosis clinical term. Note - The Diagnosis Indication must be the date of the diagnosis.

- Where the treatment period is known, an end date can be entered onto the End Date box by clicking on the down arrow and selecting it from the calendar. If there is no End Date then it should be left blank (this will be the case for the majority of patients).Note - If you record an End Date against a Diagnosis Indication you cannot dose after this date. To continue dosing the patient you need to record a new Diagnosis Indication. Patients with an End Date are also removed from the Anticoagulation Reports.
- Select OK.
If a Diagnosis clinical term does not exist in the patients clinical record the History column will be empty. However, a new Diagnosis clinical term can be added at this point to allow a Diagnosis Indication to be used.
To add a New Diagnosis Clinical term and related Diagnosis Indication
- Double click on the line of the relevant Indication or select Codeset
 . The Codeset Codes data entry screen displays.
- Place a tick in the Apply column. If necessary change the Priority, Episode Type and Date Recorded.
- Select OK to save.
- The relevant Indication is placed in the Indication area which is at the base of the screen.
- The Start Date will default to the date of the clinical term entered but can be backdated if necessary by clicking in the down arrow and selecting it from the calendar or by typing a date.
- Where the treatment period is known, an end date can be entered onto the End Date box by clicking the down arrow and selecting it from the calendar. If there is no End Date then it should be left blank (this will be the case for the majority of patients).
- Select OK.Note - Left click on the expand
 icon to view the description and details of each indication.