Adding a Printer Profile
To add a printer profile:
- From the Vision 3 Front Screen, select Options - Use Advanced Printing.
- Now select Options - Setup - Printers to display the Vision Printer Profiles screen.
- In Print Functions, select the appropriate print function.
- Select Add (or Edit) and the Add (or Edit) Printer Profile screen displays:
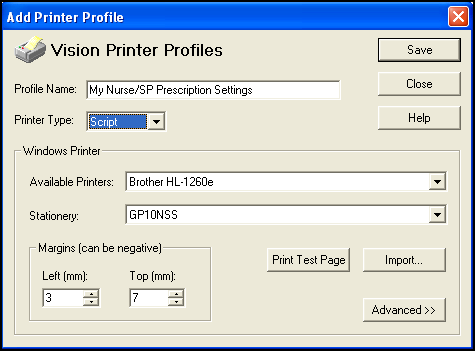
- Complete as required:
- Profile Name - Enter a name, or keep the simple default, for example, My Prescription Settings, My Drug Label Settings. This is the name that appears under Printer Profile on the main screen, and also on the import screen. It is the primary identifier of a profile, and must be unique for a given workstation. The default is a unique value.
- Printer Type - Select either Script or Label. This is used to filter profiles by printer type. The default is the printer type of the print function currently selected in the main screen. Printer Type is not available when editing a Printer Profile.
- Available Printers - Select a printer from the list of installed printers. There is no default selection. This is the way to select different printers for different labels.
- Stationery - If you are setting up a Nurse/Supplementary Prescriber in Scotland, then choose GP10NSS. If GP in Scotland, choose GP10SS. Under the Advanced option, you can specify the tray for loading each type of script in Paper Source.
- Print Test Page - This prints a dummy script/label to the selected printer. When you print a test page from either an English or Scottish practice, the barcode prints on the prescription, so that the print settings can be validated. This occurs even if the practice is not enabled for ETP (electronic transmission of prescriptions).
- Script test prints a dummy script on the left-hand side with the profile settings and other details on the right-hand side.
- Label test prints differ from the test print available via label design. A border of characters is printed to make it easy to align the output on the label. Selected profile settings are also printed.
- Margins - If the alignment is incorrect, then adjust the margins to fine tune the printing alignment. Print another test page. The measurement is in mm and can be negative. Left is the X-axis (horizontal) and Right is the Y-axis (vertical).
- Advanced Settings - You need to select the correct Form, for example, FP10 (HL-1250 script) ES, though if you do not, the default form setup is used for that printer on your workstation. Label settings, however, may need Advanced adjustments; or if you need to select landscape.
- Select Save.
- Repeat for all printer types.
- Click on either OK at the front Profiles screen if you are adding, or Apply if you are editing a profile.
Note - To print this topic select Print  in the top right corner and follow the on-screen prompts.