Specimen Labels
Specimen labels can be printed within Consultation Manager to accompany pathology specimens.
To design your specimen labels:
-
From the Vision 3 Front Screen, select Modules - Label Design and then the Specimen Label tab:
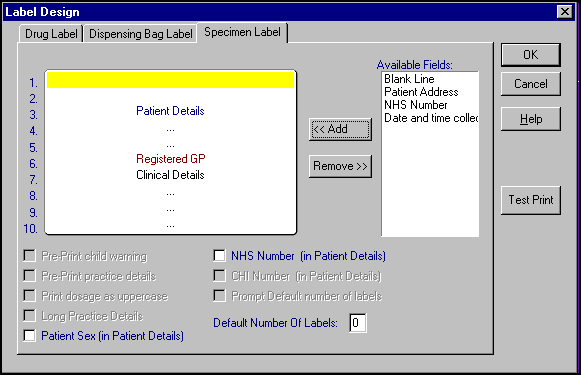
- Complete as follows:
- Drag and drop items from Available Fields on to the left-hand side in the order required, click within the left-hand design window and position the yellow line with up/down arrows where you want the item to be inserted and then highlight an item in Available Fields and select Add, or double click on an Available Fields item.Training Tip - You do not need to keep to the default order of lines, but can move items around on the design window as required. The Blank Line and the NHS Number are the two optional items not used in the default design.
- Patient Details - Is mandatory and cannot be removed though it can be moved. It includes the surname, forename and date of birth.
- Patient Sex (in Patient Details) - Tick to display Male or Female as part of Patient Details.
- NHS Number (in Patient Details) - Tick to display the NHS No (England and Wales)/CHI No (Scotland and Northern Ireland) within the Patient Details line. You can also drag and drop NHS Number from Available Fields so it has a line of its own.
- Patient Address
- Requesting GP - Displays the clinician adding this therapy item.
- Prompt Default number of labels - Tick to display a message asking how many labels to print.
- Default Number of Labels - Set the number of labels to print by default, this must be at least 1.Note - There is a maximum of ten lines available.
- Drag and drop items from Available Fields on to the left-hand side in the order required, click within the left-hand design window and position the yellow line with up/down arrows where you want the item to be inserted and then highlight an item in Available Fields and select Add, or double click on an Available Fields item.
- Select Print Test, check the labels produced and update any settings required.
- Once you are happy with the test labels, select OK to finish.
Printing Specimen Labels
Specimen Labels can be printed from within Consultation Manager:
-
From Consultation Manager, select the patient required.
-
Select either:
- Requests - Add, and then Label
 , to print the label and record the request to the patient record.
 - Referrals - Add, and then Label , to print the label and record the request to the patient record.
- Select Add - Request - Print Specimen Labels, to print the label without recording a request.
- Requests - Add, and then Label
Note - To print this topic select Print  in the top right corner and follow the on-screen prompts.