Guidelines - Creating a Patient Report
This topic demonstrates how to create a Report Guideline by example.
This Admissions Summary example report has the following features:
- Medical History
- Repeat Therapy
- Therapy Issues
- Allergy and Intolerances
- Immunisations
- Prevention
- Test Results
Designing a Report
To design a Report Guideline:
- From Consultation Manager, select Guidelines - Select Guideline.
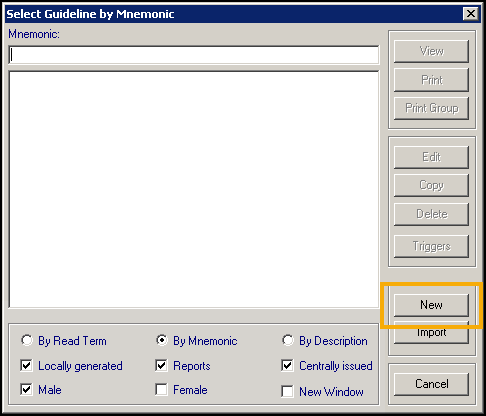
- The Select Guideline by Mnemonic screen displays. Now, either:
- Select New, which we are doing in this example, or
- Copy or edit an existing report. Display all Guidelines by removing the tick in Centrally Issued and pressing Enter on your keyboard to display a list of all Guidelines. Highlight the one required and select either Copy or Edit:
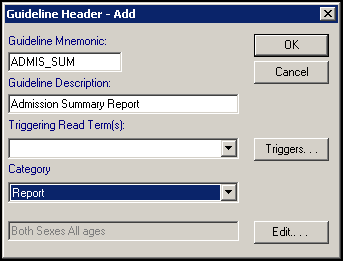
- The Guideline Header - Add screen displays and should be completed as follows:
- Guideline Mnemonic - Enter a shorthand title, up to 10 characters, to identify the report, for example, ADMIS_SUM, the mnemonic must not contain spaces.
- Guideline Description - Enter a full title for this report, for example, Admission Summary Report.
- Triggering Read Term - Not usually used for reports, leave blank.
- Category - Select Report to ensure this report:
- Lists when you select Reports from the Select Guideline screen, and
- When you double click on this in an Index, it prints without an on-screen view. If you want an on-screen view of the merged data before printing, then select Local Guideline instead.
- Sex Filter - Select Edit if required to set Age/Sex filters, in our example we are leaving it as Both Sexes All ages:
 See Guideline and Report Header for full details if required.
- Select OK.
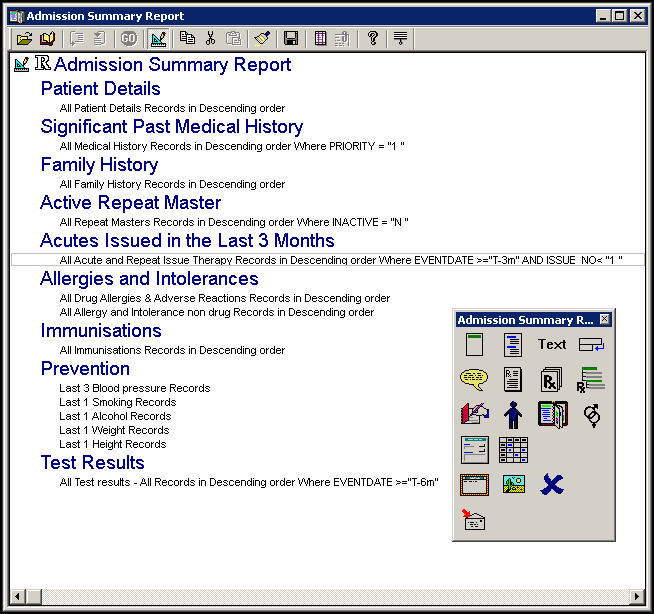
- The report screen displays, ready to be populated. The Guideline Design floating toolbar displays and the title of the report is preceded by the Maintenance symbol
 , indicating you are in maintenance mode and a large letter R indicating this is a report. Use the floating toolbar to create your report using any of the following options in the order required:
 - Patient Details - Select Add Subheading
 and enter a subheading as required, for our example, 'Patient Details' and select OK.See Guidelines - Adding a SubHeading for full details if required.
 -
Patient Data - Select Patient Data
 and double click the yellow folder next to Additional Patient Data to open it, highlight Address, select Add and then OK, your selection displays in the Selected Items section.Training Tip - Avoid selecting OK, until you have made all of your selections. This is a common mistake, selecting OK closes the Patient Data screen.
 -
Significant Past Medical History - Select Add Subheading
again and enter the next subheading as required, for our example, 'Significant Past Medical History' and select OK -
Significant Past Medical History Data - Select Patient Data
 , double click the yellow folder next to All Other Clinical Data, then double click the yellow folder next to Medical and Family History and finally the red Medical History file. To filter the records returned, in our example, by Priority, highlight the line under Selected Items and select Filter. The Criteria Select screen displays, double click Priority and with Equals selected enter '1' into From. Select OK and then OK again:
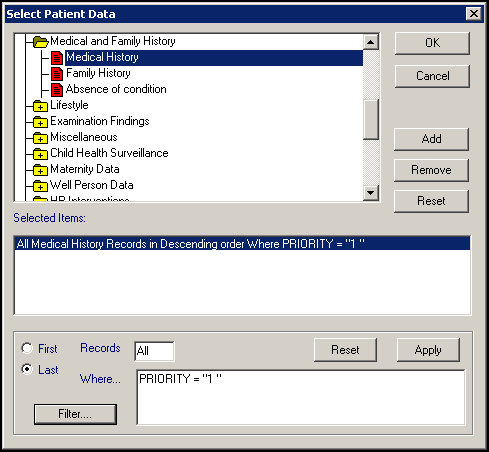
-
Family History - Select Add Subheading
again and enter the next subheading as required, for our example, 'Family History' and select OK -
Family History Data - Select Patient Data
, double click the yellow folder next to All Other Clinical Data, then double click the yellow folder next to Medical and Family History and finally the red Family History file. Select OK and then OK again. -
Active Repeat Masters - Select Add Subheading
again and enter the next subheading as required, for our example, 'Active Repeat Masters' and select OK -
Therapy Data - Select Patient Data
, double click the yellow folder next to Therapy and then the red folder, Repeat Masters. To filter the records returned, in our example we are looking for active repeats only, highlight the line under Selected Items and select Filter. The Criteria Select screen displays, double click Inactive, highlight No and select OK and then OK again: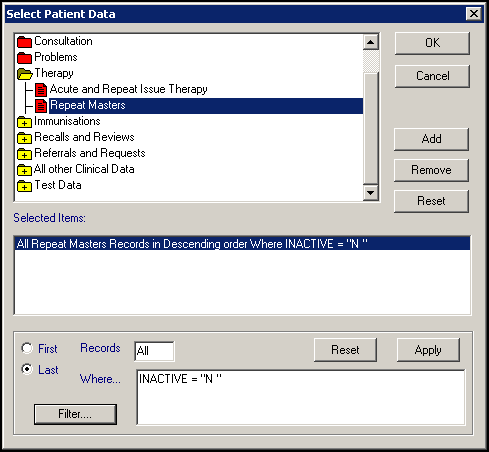
-
Acutes Issued in the last 3 Months - Select Add Subheading
again and enter the next subheading as required, for our example, 'Acutes Issued in the last 3 Months' and select OK -
Therapy Data - Select Patient Data
, double click the yellow folder next to Therapy and then the red folder, Acute and Repeat Issue Therapy. To filter the records returned, in our example we are looking for issues in the last 3 months only, highlight the line under Selected Items and select Filter. The Criteria Select screen displays, double click Date prescribed, select After and enter 't-3m' into After, leave the tick in Inclusive. Now double click Sequence number of issues, select Less and enter '1' into From. Select OK and then OK again. -
Allergies and Intolerances - Select Add Subheading
again and enter the next subheading as required, for our example, 'Allergies and Intolerances' and select OK -
Allergies and Intolerances - Select Patient Data
, double click the yellow folder next to All Other Clinical Data, then double click the yellow folder next to Drug Allergies & Adverse Reactions, finally the red Drug Allergies & Adverse Reactions file. Select Add. Now select the red Allergy and Intolerance non drug file. Select OK and then OK again. -
Immunisations - Select Add Subheading
again and enter the next subheading as required, for our example, 'Immunisations' and select OK -
Immunisation Data - Select Patient Data
, double click the yellow folder next to Immunisations, and then the red Immunisations file. Select Filter to fine tune the records if required and apply the filters you require as in previous Patient Data selections. Select OK and then OK again. -
Prevention - Select Add Subheading
again and enter the next subheading as required, for our example, 'Prevention' and select OK -
Prevention Data - Select Patient Data
, double click the yellow folder next to All Other Clinical Data, then double click the Lifestyle, finally the red Smoking file. In the lower part of the Select Patient Data screen, select Last and in Records type '1', this returns the last entry of the sort selected. Without selecting OK, double click the red Alcohol file and again select the last one. You can now double click on the yellow folder next to Examination Findings, and repeat the process to add the latest Weight and Height and the latest 3 Blood Pressure readings. Finally select OK and then OK again: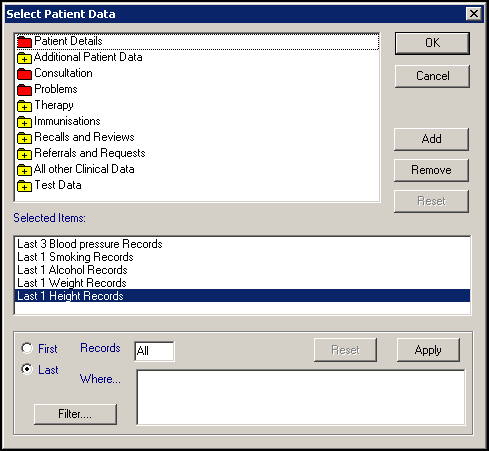 Remember - It does not matter if the order you add things is not the order you require, you can drag and drop them into the order you require after adding them and selecting OK.
 -
Test - Select Add Subheading
again and enter the next subheading as required, for our example, 'Latest Test Results' and select OK -
Test Results - Select Patient Data
, double click the yellow folder next to Test Data and then the red Test results - All file. To filter the records returned, in our example we are looking for tests in the last 6 months only, highlight the line under Selected Items and select Filter. The Criteria Select screen displays, double click Date that test reported, select After and enter 't-6m' into After. Select OK and then OK again. - Finally, select Save
 :
:
If you have made any obvious inaccuracies, such as headings at the wrong level, a message displays reminding you of this detailing any adjustments.
- Select Maintenance
 to view the Report. If you have forgotten to save, you are reminded if appropriate.
 - Select Close
 .
.
Merging Patient Details with a Report
To merge patient details on to the report:
-
From Consultation Manager, select the patient required and then select Guidelines - Select Guideline.
-
The Select Guideline by Mnemonic screen displays. In Mnemonic enter the mnemonic of the report required, in our example, 'admis' and press Enter on your keyboard.
-
Highlight the report required and select View. You can select:
-
Expand
 to view all lines, or
-
Collapse
 to hide lines below level one.Training Tip - You can right click and select Add, Edit or Graph to add to, update or graph the data that displays.
-
-
Select Go
 to print the report.
Adding a Report to the Local Reports Index
Adding your new report to the Local Reports Index screen allows you to select it from the index and double click to send it straight to the printer.
To add a report to the Local Reports Index:
- From Consultation Manager, select Guidelines - Select Guideline. The Select Guideline by Mnemonic screen displays.
- In Mnemonic, enter U_REPORTS and press Enter on your keyboard.
- Highlight U_REPORTS and select View.
- Select Maintain .
- If it is still there, right mouse click on the text line that starts 'This guideline should be edited to create your own practice specific index…' and select Delete.
- Select Embed a Guideline
 and select the local report you want to include on the Reports Index. You can simply enter the mnemonic and press Enter on your keyboard.
 - Repeat step 6 until you have built up a list of local reports to create your index. You can now drag and drop the report lines to display in the order you required.
- Select Save .
- Finally select Close to close the Local Report Index.