Guidelines - Creating a Guideline
This topic demonstrates how to create a Guideline by example.
The example used here is the creation of a practice defined Acute myocardial infarction Guideline.
To design or update a Guideline:
- From Consultation Manager, select Guidelines - Select Guideline.
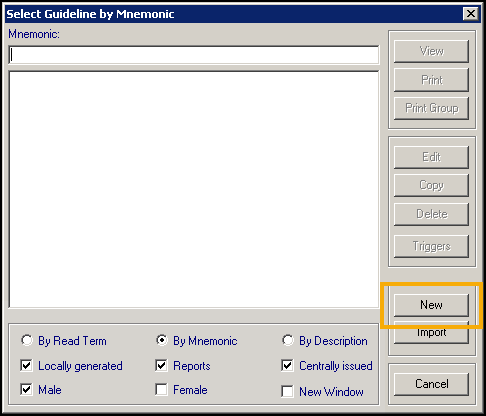
- The Select Guideline by Mnemonic screen displays. Now, either:
- Select New, which we are doing in this example, or
- Copy or edit an existing report. Display all Guidelines by removing the tick in Centrally Issued and pressing Enter on your keyboard to display a list of all Guidelines. Highlight the one required and select either Copy or Edit:
- The Guideline Header - Add screen displays and should be completed as follows:
- Guideline Mnemonic - Enter a shorthand title, up to 10 characters, to identify the Guideline, for example, ACUTEMI, the mnemonic must not contain spaces.
- Guideline Description - Enter a full title for this report, for example, 'Acute myocardial infarction'.
- Triggering Read Term - Select Triggers. The Edit Guideline Read Trigger(s) screen displays, select Practice settings so this is available to all and then in Read Triggers for enter an appropriate clinical term. In this example, an acute MI description, #G30, ensure Include children is ticked to include clinical terms under the term selected in the hierarchy are included:
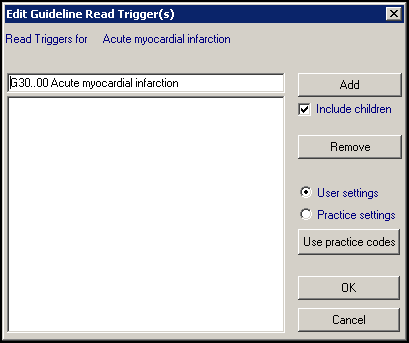
Select Add and then repeat if appropriate. Select OK to save.
- Category - Select Local Guideline to ensure this Guideline:
- Displays when you select Locally Generated from the Select Guideline screen, and
- Displays on screen when you select it.Remember - Reports go straight to your printer.
- Sex Filter - Select Edit if required to set Age/Sex filters, in our example we are leaving it as Both Sexes All ages.See Guideline and Report Header for full details if required.
-
Select OK to save.
- The Guideline screen displays, ready to be populated. The Guideline Design floating toolbar displays and the title of the report is preceded by the Maintenance symbol
 , indicating you are in maintenance mode. Use the floating toolbar to create your Guideline using any of the following options in the order required:
- Subheading - Select Add Subheading
 and enter a subheading as required, for our example, 'Reference' and select OK.See Guidelines - Adding a SubHeading for full details if required.
 Text - Select Text
 and either:
Enter information or references to support this Guideline, or
Use Import to bring the text from elsewhere.
See Guidelines - Text for full details if required.Select OK to save. - Subheading - Select Add Subheading
- Select Sub-heading and enter 'Aim'. Select OK to save.
- Select Text and enter the aim of this Guideline, in our example, 'To reduce morbidity and mortality due to heart attack'. Select OK to save.
- Select Sub-heading and enter 'Supportive Text'. Select OK to save.
- Select Text and enter any supportive text for the Guideline. Select OK to save.Training Tip - Remember to select Save
 at regular intervals during the design and creation process.
 - Select Sub-heading and enter 'Analgesia'. Select OK to save.
- Select Sub-heading again and enter 'Prescribing message'. Select OK to save. Indent this by pressing the right cursor arrow once.
- Select Text and enter any prescribing message for analgesia. Select OK to save.
- Now you can enter the drug regime, see for details. If you have no pre-defined drug regimes, you need to set them up:
- Select Drug Regime
 .
. - Select New and complete as follows:
- Mnemonic - DIAMORPHINE
- Description - Diamorphine
- Select OK to save.
- Select Add Drug to Regime.
- The Select Drug screen displays, select DIAMORPHINE INJ 5mg in the usual way
- Select New and add the drug defaults.
- Ensuring the drug default is highlighted, select OK.See Guidelines - Adding a Drug Regime for full details if required.
- Select Drug Regime
- Repeat Step 13 for a drug regime of CYCLIMORPH 10 INJ.
- Now repeat Steps 11, 12 and 13 with the following options:
- Sub-heading - 'Antiemetics'
- Sub-heading - 'Prescribing message'
- Text - Enter any prescribing message
- Drug Regime - METAMORPHOSED and PROCHLORPERAZINE.
- Sub-heading
- Now repeat Steps 11, 12 and 13 with the following options:
- Sub-heading - 'Antiplatelet therapy / nitrates'
- Sub-heading - 'Prescribing message'
- Text - Enter any prescribing message
- Drug Regime - ASPIRIN and GLYCERYL TRINITRATE (GTN).
- Sub-heading
- Under 'Glyceryl Trinitrate spr 400 mcg spray when required 1 or 2 puffs under the tongue, then close the mouth', add a further Sub-heading and enter 'Drug Information for Patient'.
- Select Drug information for patients
 and enter or import, information about GTN which you can print out for a patient.See Guidelines - Adding Drug Information for full details if required.Training Tip - Remember to select Save at regular intervals during the design and creation process.
 - For our example, we are going to add a reminder to make an entry under Heart Examination in the CV/BP Management screen:
- Select Clinical Data Hotspot
 .
. - Select Add.
- In Caption, enter 'Heart Exam'.
- Select Clinical Entities - CV and BP Search Group - Heart Examination, the default Read term should be 24... Exam of cardiovascular system.
- Select OK to save and a Heart Exam
 hotspot displays.See Clinical Data Hotspot for full details if required.
- Select Clinical Data Hotspot
- Other options you may want to include in your Guideline are:
- Images - Select Image
 , see Guidelines - Adding an Image for details.See Guidelines - Adding an Image for full details if required.
 - The ability to launch an external application - For example a word processor, select Launch an External Application
 , see Guidelines - External Applications for details.See Guidelines - External Applications for full details if required.
- Images - Select Image
- Select Save to save your Guideline.
- Select Close
 .
.
You should now add your new Guideline to your Local Guideline Index.
See Creating Local Guideline Indexes for full details if required.
Note - To print this topic select Print  in the top right corner and follow the on-screen prompts.