Session Types
Session Types (0:40)
Before creating a new session, you need to define a list of session types. For example:
- Morning Surgery
- Afternoon Surgery
- Evening Surgery
- Morning Visits
- Afternoon Visits
- Non-Clinical
The exact setup of session types is down to the individual practice. Session types have the following characteristics:
- They are searchable, for example, you can search for all morning visits.
- They are not time specific.
-
They are either:
-
Clinical - With slots where patient names can be entered, or
-
Non-clinical - Without slots.
-
At this stage, no other details are assigned to a session type, for example no GP, time, appointment slots or days of week. These are defined when you set up the actual session.
To create a session type:
-
From the , select Session types
 and the existing session types display:
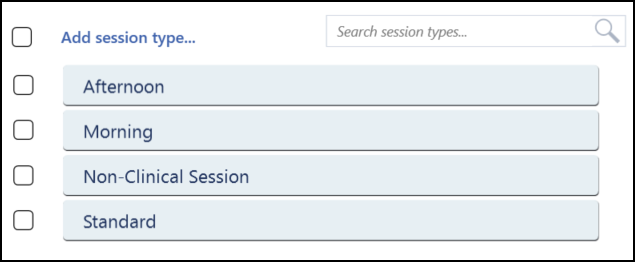 See Appointments Setup Menu for details.
 - Select Add session type
 . The Create Session Type screen displays.
 -
Enter a name for the new session type:
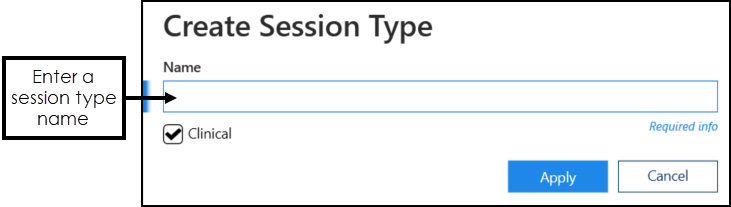
This could be as simple as:
- Clinical
- Non-clinical
or more comprehensive:
- Morning surgery
- Afternoon surgery
- Morning surgery - Branch
- Afternoon surgery - Branch
- Ante-natal clinic
- Flu clinic
- Home visits
- If appropriate tick Clinical. A clinical session type means that patients can be selected from the patient list and booked into this session, for example, morning surgery. If Clinical is not selected, then the session type is Non-clinical, for example a practice meeting or a training session.
- Select Apply
 to create the new session type. The session type view displays, including the new session type.
 -
Optional, drag the new session type to the position in the list you require.
Note - When creating sessions, the session type at the top of the list is the default session type. -
Select Save to save your changes, Reset to cancel any changes or Sort (A-Z) to reorder the list.

Editing Session Types
To amend a session type description or clinical status:
-
Select the session type name. The Edit and Delete options display:
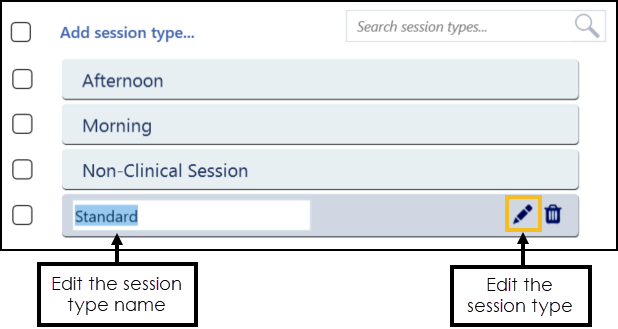
-
Select Edit
 .
. - Update the session type as required.
-
Select Save to save your changes, Reset to cancel any changes or Sort (A-Z) to reorder the list.
Deleting Session Types
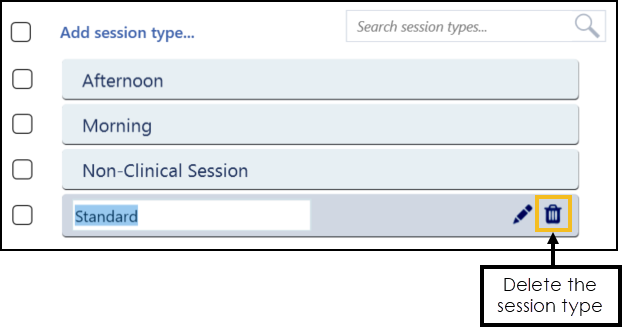
To delete a single session type:
-
Select the session type name. The Edit and Delete options display:
-
Select Delete
 .
. -
Select Save to save your changes, Reset to cancel any changes or Sort (A-Z) to reorder the list.
Deleting Multiple Session Types
To delete multiple session types:
-
Tick the session types that you want to delete, and the additional toolbar displays above the list:
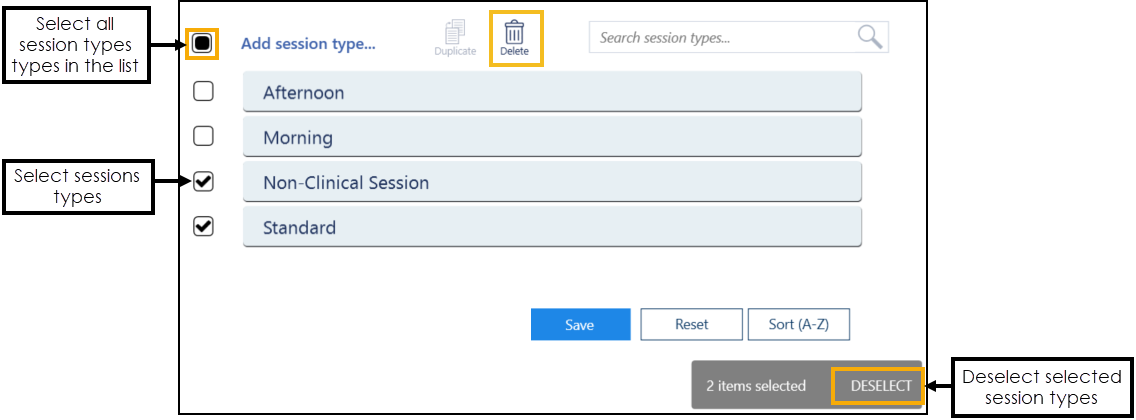 Training Tip - You can select multiple session types or tick the top option to select all the session types in the list.
 -
Select Delete
 to remove the session types. If any of the session types are in use in an active session a warning displays:
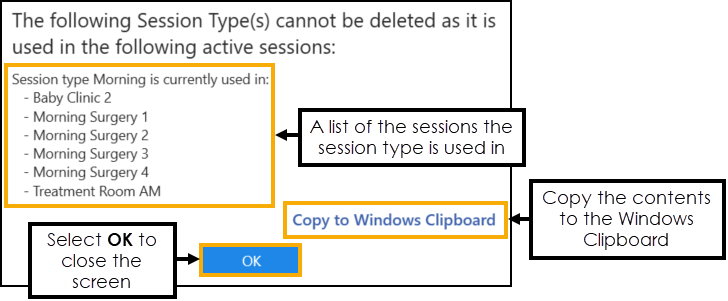
The session types must be removed from the session(s) before you can delete them.
Training Tip - Select Copy to Windows Clipboard to copy the details to the Windows Clipboard and paste elsewhere if required.
Select
 to return to the Session Types screen.
 -
Select Save to save your changes, Reset to cancel any changes or Sort (A-Z) to reorder the list.
Updating Rows
The following notifications display on the screen when additions, modifications and deletions are made:
-
 Addition - Adding a new row.
 -
 Modification - Modifying an existing row.
 -
 Deletion - Deleting rows.
 if the change cannot be made, for example, if the name you are using is already in use.