Scandisk
ScanDisk is a Windows utility which detects and corrects errors.
You should run ScanDisk whenever you notice a hard drive is not performing well and also on a regular basis to fix errors as soon as they happen.
Find the icon for the hard drive you want to run ScanDisk on. You can run ScanDisk on the system's primary hard drive and also on any secondary hard drives or external hard drives.
-
Right click on the C Drive in Windows Explorer.

-
Select Properties
-
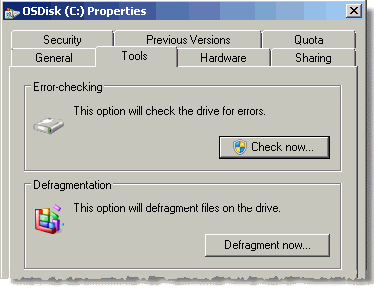
Choose the Tools tab from the hard drive properties window.
The ScanDisk utility can be activated from the Error-checking box at the top of the Tools tab.
-
To begin, click the Check Now button.
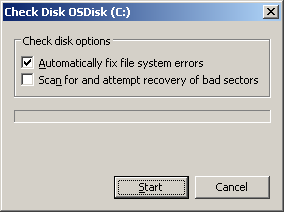
Two check boxes are displayed.
-
Select
 Automatically Fix File System Errors
box. This will perform a basic fast scan of the drive, which will
take only a few minutes.
Automatically Fix File System Errors
box. This will perform a basic fast scan of the drive, which will
take only a few minutes.
-
Alternatively, check
Scan for and Attempt Recovery of
Bad Sectors box for a more thorough scan.
With this checked, Windows will take 10 hours or longer to run ScanDisk depending on the size of your hard drive. Run this if you have noticed a problem with the hard drive's performance. For regular checks, run the basic check most of the time and the longer check only occasionally. However, do note that you cannot use the computer for any other purpose whilst undertaking a ScanDisk.
-
Click the Start button to start ScanDisk.
Wait for Windows to finish running ScanDisk and view the report. ScanDisk will tell you what errors it found and fixed. Click the Close button when you are finished.
![]()
You are advised to attempt this procedure immediately after switching on. You may not be able to start ScanDisk if your computer has been operational as exclusive access to some Windows files may not be available.
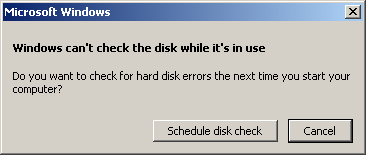
If this alert appears, you have the option of starting the ScanDisk when you next restart your computer. Click the Schedule disk check button if required, otherwise select Cancel.
For further guidance, please contact Service Desk.
Updated 26th January 2015