Adding and Maintaining a Nursing Home
To add a Nursing Home to Pharmacy Manager:
- From the MDS
 screen, select Options - New Home:
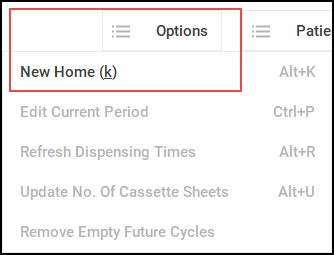
To Maintain a Nursing Home:
- From the MDS - Care home, highlight the nursing home required and select Information
 .
.
- The Monitored Dose System - (Nursing Home) screen displays:

- Complete or update as required:
 Address tab
- Name - Enter the name of the nursing home.
- Ward - Enter ward details if appropriate.
- Address - Enter the nursing home address.
- Phone - Enter the nursing home contact number.
- Fax - Enter the nursing home fax number where appropriate.
- Postcode - Enter the nursing home postcode.
- Dosage system - Select as required.
- Print MAR - Select the stationery system for the new home. Numerous stationery layouts are available to reflect the chosen dosage system. Selecting the Cegedim Rx Own enables you to print A4 Portrait or Landscape stationery to a laser printer, this can be more economical than buying pre-printed stationery. Some layouts are compatible with enhanced layout options that you may wish to use. If you select an enhanced MAR chart layout, you will be able to apply further configuration options.
See Enhanced options for more details of printed output variations.- Weeks to supply - Completes depending on your selection in Print MAR, update as required. This number tells the system how many weeks' worth of medications are on the prescription and produces the correct amount of stationery.
- MARs - Completes depending on your selection in Print MAR, update as required, for example, if a Nursing Home requires two copies.
- Cassette sheets - Nomad and Cegedim only, the sheet fits into the back of the cassette. If you recycle cassettes on a weekly basis, you might decide to leave the old cassette sheet in the cassette if there are no changes, so you would only need to print 2 cassette sheets for this dispensing.
- Print not in cassette items - Certain items are unsuitable for cassettes for example such as creams, liquids and bandages, these would not normally print on the cassette sheet. Tick Print not in cassette items to print these items on the cassette list.
- Repeat prescription request sheets - These are duplicate lists of the medication items that appear on each patient's MAR chart. They provide the care home with a request sheet for future medication. The default is zero, but you can select the number of copies as required. The format printed reflects your MAR chart selection.
See CPS MAR chart - Scotland for more details of MAR charts that can be used for care in the community in Scotland.- Times - Displays the default Dose Codes. These can be updated as follows:
- Clear - Highlight a dosage time and select Clear
 , you can now enter new directions for that time frame or leave blank to remove it.
 - Change - Highlight a dosage time and select Change
 to update the time.
- Clear - Highlight a dosage time and select Clear
Options tab
- Mar Printing
Omit admin times on MAR forms - Tick to suppress administration times on the MAR form, useful for pre-printed MAR forms that have times pre-printed.
- Print admin times where only dose exists - Tick to only print a time is a dose exists for that time.
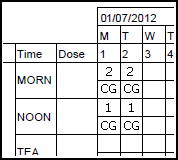
- Print day numbers of MAR form - Tick to print the dates across the top of the MAR sheet. These dates are the days of the month, for example, if the first day of the current period is August 28, then the first date to be printed is 28, followed by 29,30,31 and so on.
- Address at bottom of MAR form - Only available if the MAR form selected is Manrex Standard (4 weeks), tick to print the pharmacy name and address at the bottom of the MAR form rather than the top. Suitable for pre-printed Manrex forms where the logo is printed at the top of the sheet.
- Print mid-cycle items separately - Tick to print only mid-cycle items, this avoids a clinical safety issue that may arise when providing a home with duplicated sheets.
- MDS labels
Only available if the Manrex dosage system is selected.
- Print all labels together - Tick to print all labels at one time using Print - Labels.
- Split label quantities by number
of doses - Tick to print split labels, for example, a prescription for 84
tablets with dosage and directions of ONE to be taken THREE times a day
will produce three labels for the three cassettes, with each showing a
split quantity in this case 28.
- Split label directions to match medication times - Tick to print a label for the time of day the medication is to be taken, each label shows a quantity dispensed, which is equal to the quantity prescribed, divided by the number of times daily that the medication will be taken.
- Print 'total quantity dispensed' on labels - Tick to apply normal labelling rules.
- Print extra 'total quantity dispensed label' - Tick to produce one extra label showing the total quantity dispensed for each item.
- Administration Periods
- Prompt for start date on next
period creation - Tick to display the Start Date screen to confirm when you select Next Period and one does not exist.See Sorry about that for further details.
- Prompt for start date on next
period creation - Tick to display the Start Date screen to confirm when you select Next Period and one does not exist.
- Mid Cycle
- Disable mid-cycle carry over - Tick to enable synchronisation with new prescriptions for the next period.
Enhanced tab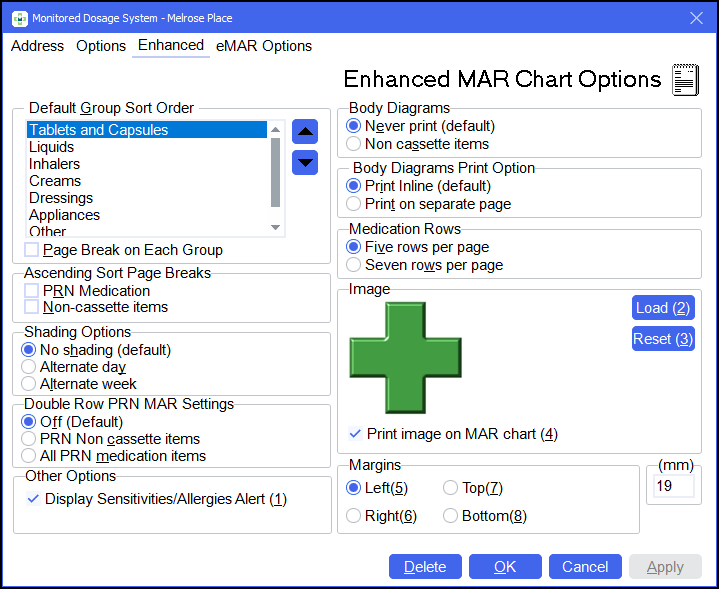
If you select one of the Cegedim Rx Own Enhanced options from Print MAR on the Address tab, the Enhanced tab displays.
- Default
Group Sort Order - This enables you to order how the groups of medication display:
- Highlight a group and then using the up and down arrows
 to move them into the order required.
 - Page Break on Each Group - Tick to print separate sheets for separate groups.
- Ascending Sort Page Breaks - By default, there are no page breaks, PRN medicines
are mixed together with non-PRN item in whatever sort sequence is
in operation. To address this:
- PRN medication - Tick to force a page break after the non-PRN items to print PRN medication on a new page.
- Non-cassette items - Tick to force a page break before the non-cassette items so they are starting on a new page.
Note - These options are only applicable to sorting in ascending alphabetical order.- Shading Options - This makes it easier to select
the correct column to record medication has been given. Select from
- No shading - Selected by default.
- Alternate day - Select to shade every other day.
- Alternate week - Select to shade every other week.

- Double row PRN MAR settings - To ensure satisfactory recording of the provision of non-cassette
and PRN items, a second row for the administrator's initials can print:
- Off - Selected by default.
- PRN non-cassette items - Select to print additional rows for appropriate items.
- All PRN medication items - Select to print additional rows for all items.
- Other options
- Display allergies & sensitivities alert - Tick to trigger a reminder when producing the MAR chart that allergy & sensitivity information is printed on MAR charts when applied to MDS patients so you can take the necessary steps to ensure the text is correctly presented.
- Body
diagrams - You can include body diagrams in an enhanced MAR chart:
- Never print - Selected by default, no body diagrams are produced.
- Non-cassette items - Select to print for creams, dressings and other external preparations.
Each body diagram has the dispensed medication assigned.
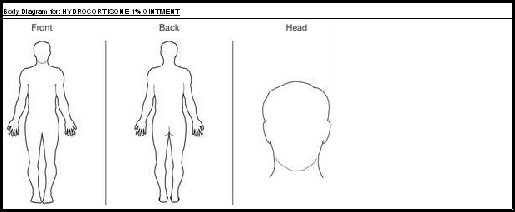
Body diagrams are generated in the same sequence as the medication on the MAR chart, they are clearly identified as belonging to each other with a border encapsulating the medication item and the body diagram.
It is the responsibility of the nursing home staff to shade the areas where application is required, body diagrams are printed unmarked.
- Body diagram print options - You can print each body diagram immediately
after the medication to which it applies:
- Print in line - Selected by default.
- Print on separate page - Select to print separately.
- Medication
rows - For A4 sized portrait MAR charts, you can select to print either:
- Five rows per page, or
- Seven rows per page
- Image - You can display a small image, such as a
care home logo, in the top right corner of a MAR chart:
As a default example, a pharmacy cross is supplied

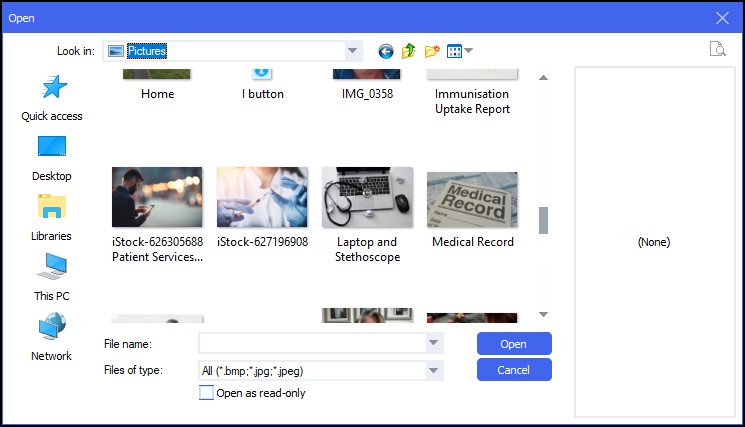
To add an image:
- From the Monitored Dosage System - (Nursing Home) screen, select Enhanced.
- From the Image section, select Load
 .
. - Navigate to the image you require, highlight it and select Open
 .
.
- You are returned to the Enhanced tab with your selected image in the Image section, if you are not happy with the image, select Reset
 and the previous image restores.
 - Tick Print image on MAR chart to use the image
Important - The image you select must not be bigger than 117 pixels high by 196 pixels wide. You cannot change the size within Pharmacy Manager, this must be done before you import the image.- Margins - If MAR charts are kept in a folder at the home, you can ensure that hole punches do not obscure important data. Simply increas or decrease the margins as required:
- Select the margin:
- Left
- Right
- Top
- Bottom
- In (mm) set the number of millimetres for the margin. The allowable range is 6 - 25mm
Note - Print preview is not really adequate to gauge a margin update, you are better to print one MAR chart to check the change you have made. - Select the margin:
eMAR Options tab
If you are configured to generate eMAR output for one or more care homes, eMAR Options tab displays.
eMAR Configuration - If this care home requires eMAR output:
- Enable eMAR - Tick to enable eMAR.
- Enable printed MAR chart - Tick to print the standard MAR charts.
- Enable cassette sheet - Tick to print cassette sheets.
- Enable blister labels - Tick to print blister labels.
- eMAR FTP configuration - These configuration settings apply to the delivery location
of the eMAR output. Different delivery locations are necessary for
each care home or MDSC patient configured for eMAR output.
- Location - Enter the File Transfer Protocol (FTP) location provided.
- User Name - Enter your eMAR user name.
- Password - Enter your eMAR password.
Note - Whilst each care home has its own FTP location, user name and password, you are able to use the same user name and password for administrative ease. - Print barcodes on dispensing labels - Tick to print barcodes on dispensing labels to ensure the right person is given the right drug at the right time.
- Print barcodes on dispensing labels for transfer of care items - Tick to print barcodes on dispensing labels for transfer of care items.
- Select OK to save the new nursing home and the Start Date screen displays:

- In Start date, enter a date for the first medication period. The default is for tomorrows date and reflects the weekly/four weekly cycle from Weeks to supply.
- Select OK.
To delete a Nursing Home, simply select the home and then select Delete.