Adding a New Security Group
As a practice, you might want to define your own Security Group to which you can then assign common security rights. For example, the group could consist of practice nurses, or receptionists.
To create a new Security Group:
- From the Vision 3 front screen, select Management Tools - Control Panel - Security.
- Select either:
- Group
 from the toolbar, or
 - From Groups of Users in the bottom left pane, right click on one of the existing groups and select Add Group.
- Group
- The New Security Group screen displays:
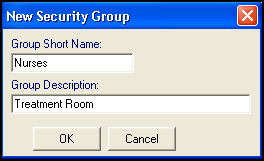
Complete as follows:
- Group Short Name - Enter a short name for the group, 17 characters maximum, 3 characters minimum, for example, Nurses.
- Group Description - Enter a description which must be at least four characters in length.
- Select OK to save.
Your new group now displays under Groups of Users ready to be allocated to the appropriate Vision Functions.
See Adding and Removing Users and Groups from Vision Functions for details.
To update the name or description of a group, simply right click on the group and select Edit Group.
Note – To print this topic select Print  in the top right corner and follow the on-screen prompts.