Setting Up ZeDOC
To scan items into Vision 3 using ZeDOC you must first create:
-
A Repository - This is the main file you are scanning into and where you set up your metadata options, see Creating a Repository for details.
Training Tip - 'Metadata' is a set of data that describes and gives information about other data, in this case, about your document. -
Baskets - These are the sub-folders you scan your documents into and from where you process them, see Creating Baskets for details.
-
Electronic Document Folder - To create a consistent approach to all document management, you can import electronic documents to attach to your patient records, for example, TIF (Tagged Image Format) files and PDF documents. You can use the same Basket as you use for physical documents, or you can set up a separate one, for example, a Basket named Electronic Documents, see Creating Baskets for details.
Creating a Repository
A repository is the main file you are scanning documents into. To create a repository:
-
From ZeDOC, select Create a repository
 .
. -
The Repository creation screen displays, select Next.
-
The Step 1 screen displays, in Name enter a name for your repository.
-
From Export type select Image and metadata
 and then select Next.
 -
The Step 2 screen displays, from Exported document type, highlight Export PDF.
-
Now, select Browse
 .
. -
In Browse for Folder, select Make New Folder. A new folder displays, give it a recognisable name, for example, Scanned Documents and select OK.
-
The Repository configuration screen displays, you must now set up the types of metadata you wish to record for your documents:
Important - ZeDOC selects DAT as the Format of the export file of the fields. This must not be changed.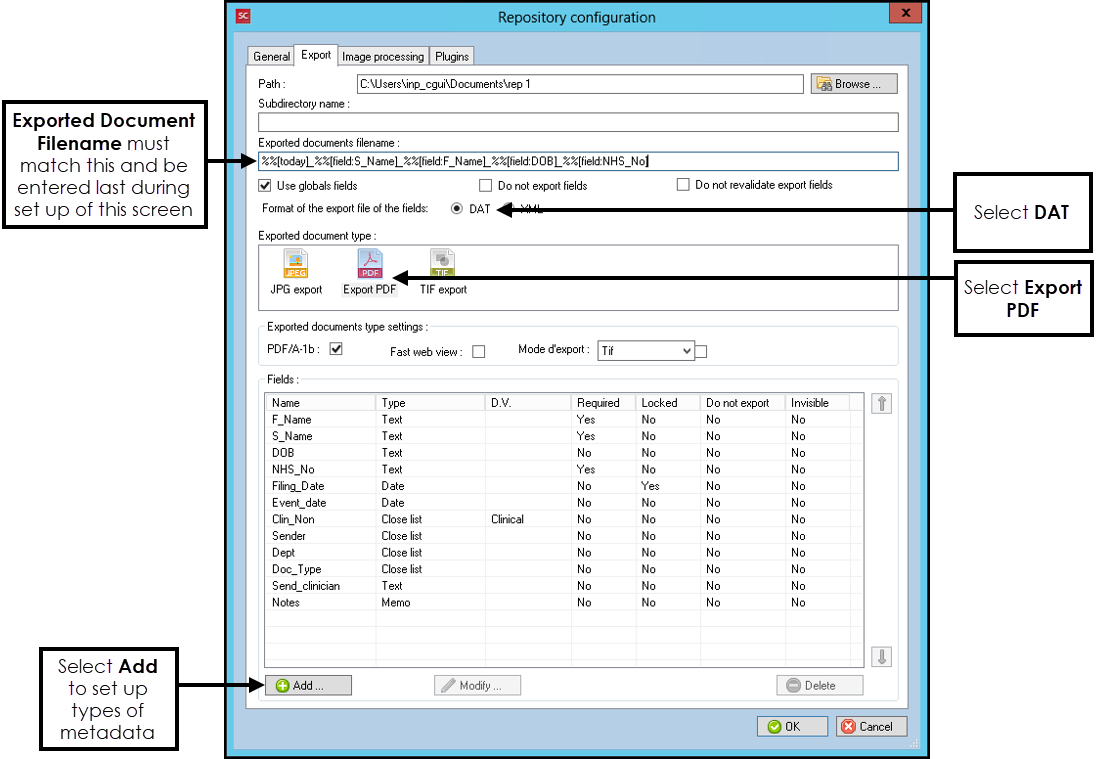
-
From Exported document type, select Export PDF.
-
Select Add
 and the Field creation screen displays:
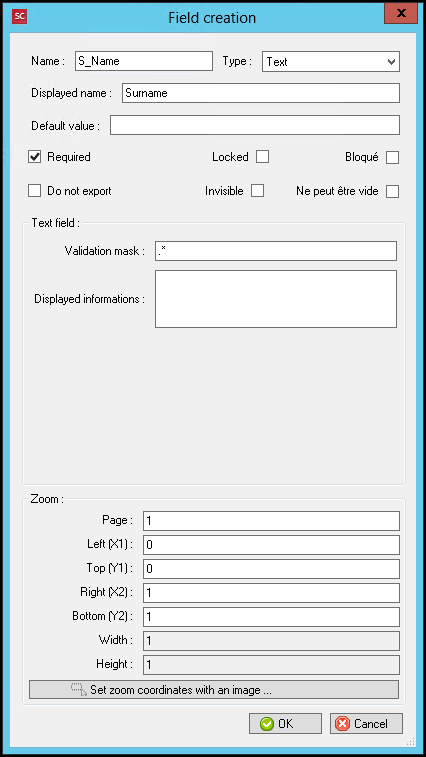
-
Complete as appropriate:
-
Name - Enter a short name for the type of metadata, for example, S_Name.
-
Type - Select from the available options:
-
Text - Select to allow a short description for this metadata type.
-
Date - Select to specify this metadata as a date, defaults to DD/MM/YYYY format, enter a different format in Date field - Format to update the format if required.
-
Open list - Select to create a list that the scanner can add to.
-
Close list - Select to create a list to choose from for this metadata type:
-
Available types displays, select Internal list.
-
Select Choose
 and the List editor screen displays.
 -
In New value enter the list items, for example, your local hospitals.
-
Select Add
in between each one once they are all added, select OK  to save.
-
-
Multi list - Select to create a list to choose multiple items from for this metadata type:
-
Available types displays, select Internal list.
-
Select Choose
and the List editor screen displays. -
In New value enter the list items, for example, a list of key diagnosis.
-
Select Add
in between each one once they are all added, select OK to save.
-
-
Check box - Select to create a tick box, complete the Checkbox field options, for example, Yes and No
-
Counter - Displays how many documents you have processed today. This number resets each day.
-
Memo - Select to allow longer free text for this metadata type. Maximum number of characters 2048.
-
Extract text - Not currently in use.
-
Barcode - Not currently in use.
-
Dividing line - Not currently in use.
-
-
Displayed name - Enter the full name of this type of metadata, for example, Patient Surname.
-
Default value - Enter a default value if appropriate depending on the Type selected above, for example, if you select Check box, you can enter Checked or Unchecked as the default.
-
Required - Tick to mark this type of metadata as mandatory.
-
Locked - Select for information that is not going to change, for example, your practice name.
-
Bloque - Select for information that is not likely to change, but has a tick option to update if required.
-
Do not export - Select to exclude this information from the metadata.
-
Invisible - Select to hide the line.
-
Ne peut etre vide - Select to mark a line as must be completed.
-
Text field:
-
Validation mask - Select to add ....
-
Displayed informations - Select to add an I symbol to the line, for example,
 .
.
-
-
Zoom - Select and define if you want to zoom in on particular part of the document every time, for example, if the patient surname is always on the top left hand side of a document then you can set it to always zoom in on that part. Define the details using:
-
Page
-
Left (X1)
-
Top (Y1)
-
Right (X2)
-
Bottom (Y2)
-
Width
-
Height
-
Set zoom coordinates with an image - Select to define the zoom in area using an example page (recommended).
-
-
-
Select OK to save.
-
Repeat from Step 4 until all expected metadata types are set up. For the import process to Vision 3 you must set up at least the following in this format:
Name Description Type Required
S_Name Patient Surname Text Yes F_Name Patients First Name Text Yes DOB Date of Birth Date No NHS_No NHS Number Text Yes File_Date Filing Date Date Yes Event_Date Event Date Date No Clin_Non Clinical/Non-Clinical Letter Closed list Yes Sender Organisation Closed List Yes Dept Department Closed list No Doc_Type Document Type Closed list No Send_Clinician Sending Clinician Text No Note Filing Notes Memo No -
You must now tell the system which types of metadata are which, in the Exported documents filename, enter '%%[today]_%%[field:S_Name]_%%[field:F_Name]_%%[field:DOB]_%%[field:NHS_No]'.
-
Select Next and then Next again.
-
Finally, select End.
Creating Baskets
To create new Baskets:
-
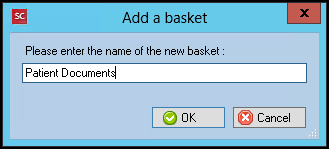
From ZeDOC, right click in the Basket pane and select Create.
-
The Add a basket screen displays, enter a name for your Basket, for example, Patient Documents:
-
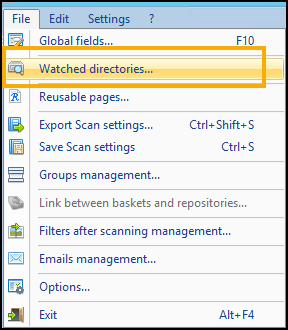
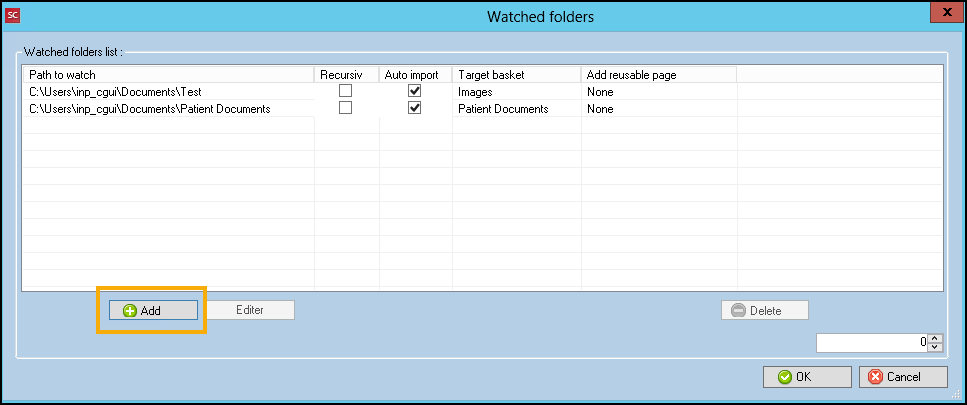
You must then set up the folder, from File, select Watched directories:
-
The Watched folders screen displays, select Add
:
-
The Add a new watched folder screen displays, select Browse
 :
: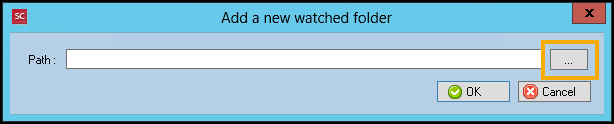
-
Select Make a New Folder, and give it the same name as the basket.
-
Select OK to save.
-
Now, from the Watched folders screen, select the target basket and check Auto Import is ticked.
-
Select OK to save.