Recording Subject Access Requests (SARs)
The UK General Data Protection Regulation (UK GDPR), implemented in the UK through the Data Protection Act 2018, gives your patients the access rights to their personal data from any health and care organisation that holds records on them, a Subject Access Request (SAR) is the formal procedure of applying for information.
You may receive SARs from:
-
Competent patients.
-
Third-parties that are authorised by a competent patient.
-
Children or young persons over 12 years of age that are considered the capacity to consent.
-
Parents of children or young persons as long as it is not in contradiction to the wishes of the competent child.
SARs Overview
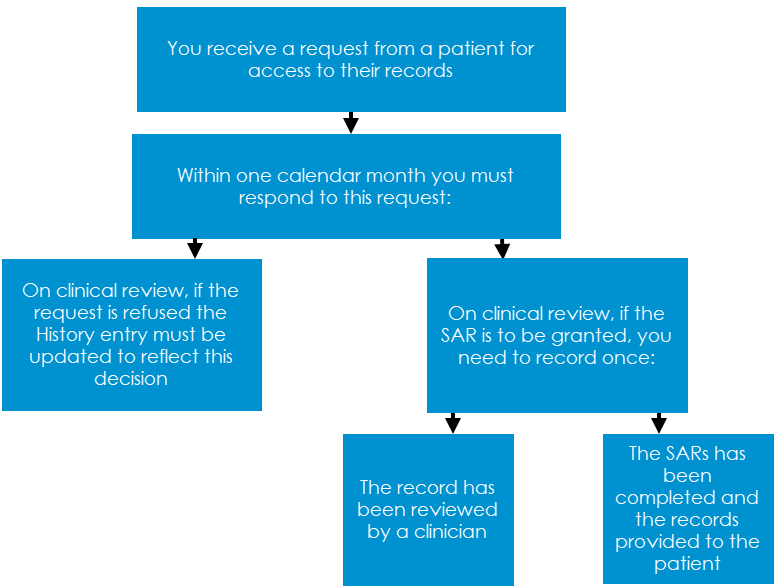
The following diagram demonstrates the actions that must take place when you receive a SARs:
What should we do when a request is received?
When you receive a request from a patient for a copy of their medical record, you must action and respond to the request within one calendar month of receiving the request. To record the request, we strongly recommend the following:
-
From Consultation Manager , select the appropriate patient and open an Administration consultation.
-
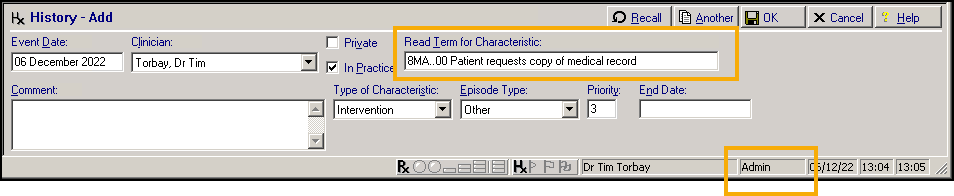
In Read Term - Add, enter '#8MA' and press Return on your keyboard twice.
-
The History - Add screen displays, in Comment enter any additional information regarding the request if required:
-
Select OK to save.
If the request is to be refused...
A SAR request can be refused, under the Data Protection Act 2018 where:
-
The information released is likely to cause serious physical or mental harm to the individual or another person.
-
The record contains information relating to a third party.
In addition, you do not have to provide a person with a copy of their health and care records if you believe their subject access request is 'manifestly unfounded or excessive'. Should you choose to respond you may charge a reasonable fee for doing so. SARs that fall into this category are likely to be repetitive, for example, regular requests for copies of records especially where there has been little or no change to the record since the previous request, aimed at disrupting your organisation or targeted against an individual. Decisions about whether a SAR falls into this category must be taken on a case-by-case basis and you should be able to justify your decision with evidence.
(Reference - https://transform.england.nhs.uk/information-governance/guidance/subject-access-requests/#healthcare_worker)
To record a request has been refused:
-
From Consultation Manager, locate the request record.
-
Right click on the record and select Edit.
-
Enter 'SAR refused' and the reason why in Comment:

-
Select OK to save.
If the request is to be granted...
If a SAR is to be granted, you need to record once:
-
The records have been reviewed by a clinician, see Recording Records are Reviewed for details.
-
The SAR has been completed and the records provided to the patient, see Recording SAR is Complete for details.
Recording Records are Reviewed
SARs should be reviewed by an appropriate healthcare professional, to ensure the information being provided does not have the potential to cause serious harm to the mental or physical health of the patient or any other person.
To record that the records have been reviewed:
-
From Consultation Manager, select the appropriate patient and open an Administration consultation.
-
In Read Term - Add, enter '#9Ej' and press Return on your keyboard twice.
-
The History - Add screen displays. Select the appropriate Clinician and enter 'SARs review' in Comment:

-
Update Priority if your practice protocols require it.
-
Select OK to save.
Recording SAR is Complete
Once you have complied with the request, as per your practice protocol, you need to record that the process is complete. To record the request is complete:
-
From Consultation Manager, select the appropriate patient.
-
Locate the original request, right click on it and select Edit.
-
The History - Update screen displays, enter 'SAR request completed nn/nn/nn' (where nn/nn/nn is the date) in Comment:

-
Select OK to save.
Fulfilling a Subject Access Request
Printing a full patient record is done in two parts:
-
Using the Full Report or the Smart Tag report from Consultation Manager, see Printing a Full Record or Using the Smart Tag Report from Consultation Manager for details.
-
From the Clinical Document Viewer, see Printing Multiple Clinical Documents for details.
Printing a Full Record
To print the full patient record report:
-
From the Vision 3 front screen, select Reporting - Search and Reports.
-
Select New Patient Report
 and the Patient Report screen displays:
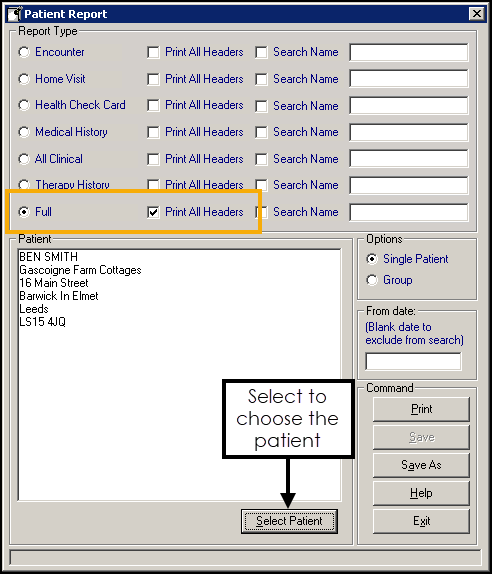
-
Complete as required:
-
Report Type - Select Full, and tick Print All Headers for a clearer result.
-
Select Patient - Select to choose the patient you require the report for in the usual way.
-
-
Select Print.
-
Select the method of output you require:
-
Window - To view the output before printing.
-
Printer - Select the correct printer and send the report straight to a printer.
-
File - To save the result to your computer.
-
Using the Smart Tag Report from Consultation Manager
To use the predefined Smart Tag report:
-
From Consultation Manager, select the appropriate patient and open an Administration consultation.
-
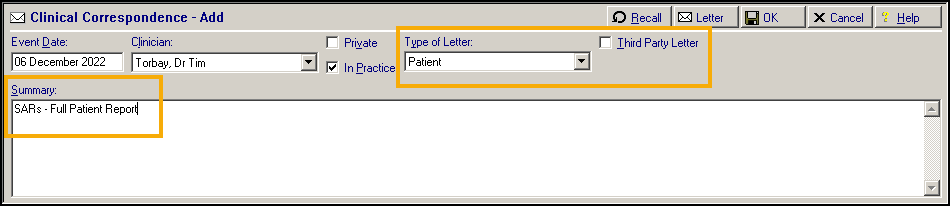
Select Add - Correspondence and the Clinical Correspondence - Add screen displays:
Complete as follows:
-
Event Date - Defaults to consultation date, update as required.
-
Clinician - Defaults to clinician logged on or Usual GP, update as required.
-
Private - Leave unticked.
-
In Practice - Ticked by default.
-
Type of Letter - Select Patient.
-
Third Party Letter - Remove tick.
-
Summary - Enter details as required, for example, 'SAR's - Full Patient Report'.
-
-
Select Letter
 .
. -
The Select Patient Template to Open screen displays, select Full Patient Record.doc and select Open.
-
Review the report that displays and redact any third party information as appropriate, for example the names of next of kin or carers.
-
Select Print
 .
. -
Now close the report. It automatically saves to Vision 3 and Letter displays with a red tick
 .
. -
Select OK to save.
Printing Multiple Clinical Documents
The Clinical Document Viewer allows access to all patient attachments, including those held in Docman, from a single location. This enables you to view and print one or more attachments for a selected patient.
To print multiple clinical documents:
-
From either Consultation Manager - Apps or Apps Controller
 , select Clinical Document Viewer
  .
. -
Select the patient required in the usual way.
-
The Clinical Document Viewer screen displays.
-
Highlight an item to display a preview on the right hand side if one is available.
Remember - To change the order the documents display in, select the appropriate column header. -
Select the items you want to print by either:
-
Ticking the individual items, or
-
Right clicking and selecting Select All.
-
-
Now select either:
-
Print selected documents - The 'Printing Page n of Document' message displays during the printing process, or
-
Save selected documents - Browse for Folder displays, select where you want to save the file to and then OK. If you use Vision 3 through a managed server, remember to save to a local drive.
-