Print Local Guidelines
You can print a guideline to a printer (see below), or save as a .gif file (see Save guideline as an attachment). The latter lets you then add the attachment to a referral.
To print a local guideline with the currently selected patient's data, first display the guideline. Then click on  from the Guideline toolbar. This displays the Print Plan screen.
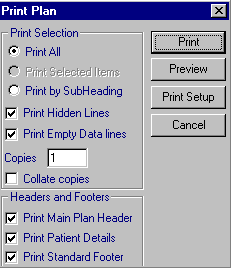
- Print All will print the whole plan. You can do a PrintPreview before printing.
- Print Hidden Lines - With this checked, everything will be printed - as it effectively expands the guideline before it prints it. If this is unchecked, then all lines that are currently visible will be printed.
- Print empty data lines - On a Patient Report or guideline, if this option is ticked, then lines merged with patient data which say No data available will appear on printouts of these. If Print empty data lines is unchecked, printouts will omit the No data available lines, retain their heading, and only print lines where there is data.
- Print by SubHeading - If you select this, a list of the guideline's headings displays and you can select some or all of these. Either hold the control key and click to select non-consecutive headings, or Shift key down and click to highlight a block of headings.
- Print Selected Items is greyed out until you have first selected lines, by clicking on them to highlight them.
- Copies - you may choose more than one copy. If Collate copies is selected, then page 1 then page 2 will print, followed by page 1 and page 2 of the second copy, and so on.
- Print Main Plan Header - when checked, the guideline title is included
- Print Patient Details - when checked the top line of the guideline report is included, with the patient's name and date of birth;
- Print Standard Footer - when checked, the footer line showing the date and time of printing, and the operator is included.
- Print or Print Preview - Once you have made the selection, click on either Preview to view the printed version on screen, or Print. Collapsed lines will be expanded automatically as they are printed out. All other lines not selected on the report are omitted from the printout.
- To print any Leaflets within the guideline, double click on the blue heading Leaflet: [name] to expand it. If you want to make no alterations, then click on
 then Print. If instead you want to add your own notes, double click within the leaflet text so it is highlighted then displays the Edit Text to be Printed screen. Type your own free text in the bottom pane and click OK.
For how to print other sections, see Print advice for non-drug therapy items on prescriptions and Print Drug Information for Patient.
Note - If the Category (in the Guideline Header) is Local Guideline, then when double clicked from an index, an on-screen view is shown with the currently selected patient's merged data. If the Category is Report, it goes straight to printing without the on-screen view.
Note - To print this topic select Print  in the top right corner and follow the on-screen prompts.