Change Select Patient Browse List
In Control Panel - Security - Add/Edit user (right click on Current User), if Enable Browse config window is checked, then on Select Patient browse lists in Consultation Manager, you can double (left) click on the small square to the left of the column headers to add or remove details to be included in the browse lists.
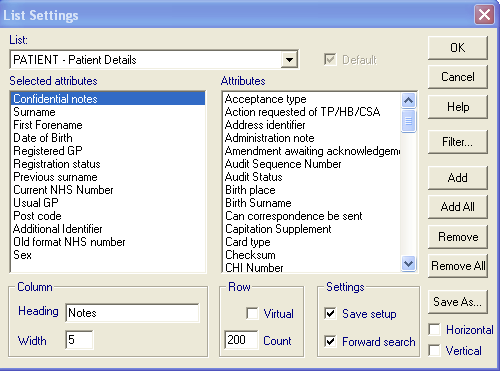
On a Select Patient screen, enter Search Details and press Enter for the list of patients. Point to the small square to the left of Notes or Surname column header, and double click.
A List Settings screen displays. Under Attributes, there is a large selection of registration details you can add to the browse list, within the restriction of the row limit.
If, for instance, you want to include the Second Forename in the list, find this under Attributes in the right-hand pane, and highlight it, then click on Add. It is then placed in the left-hand Selected Attributes pane. Click OK. This then becomes an additional column on the right of the Select Patient browse list.
Do not save it with a new name. After making your amendments, just click OK to change the current list.
Two examples: A practice wants to see "Known As" on the Patient Select list. They enter this information on the Admin Notes fields available within Registration, which they have added to the Patient Select Browse list and renamed as AKA.
Another practice wants to visually alert staff about certain patients at the point of selection - but without any explicit text. They have a short list of 3 sensitive reasons for alert and enter **** or ---> or !!!! into the Admin Notes field, which they have positioned next to Surname on the Patient Select Browse List.