|
|
|
|
|
Test Tab
Electronic test results that have been filed from Mail Manager, and those added manually from within Consultation Manager, can be viewed within the Patient Records' Tests tab.
The Vision 3 Framework views (eg Initial View 5) can include a Test (List) tab. On some Vision 3 Framework views, there is an alternative Test Summary Tab, where the results are arranged by category in a tree format where you can click on + to expand lines and - to collapse.
Sorting the List
The results are listed chronologically, latest at the top. You can resort the list by clicking on a column header such as Description which then sort the results by category.
Graph, Edit, View
You can right click on any line and select Graph, Edit or Item View.
Icons
Icons are displayed by each result line:
![]() Haematology;
Haematology; ![]() X-ray ;
X-ray ; ![]() Biochemistry ;
Biochemistry ; ![]() Serology and Immunology ;
Serology and Immunology ; ![]() Other diagnostic tests ;
Other diagnostic tests ; ![]() Microbiology ;
Microbiology ; ![]() Other pathology tests ; There are also other icons such as
Other pathology tests ; There are also other icons such as ![]() for respiratory diagnostic tests
for respiratory diagnostic tests
Manually Add Test Results
You can enter tests results manually by using the appropriate pathology or X-ray category under Test Results on the navigation column, eg Diagnostic Imaging, right mouse click and select either Summary Form or Management Plan. See Entering Results manually and Test Results lists - which forms they appear on.
Right click - Add on an existing test result line for the corresponding data entry form to be shown in the bottom pane. Double clicking on a line shows the Display form. Press the + key or Esc key to hide or re-display the data entry form. Press Close/Cancel on the data entry form to hide the data entry form.
Full Text with Result
Only nine lines are shown per entry on the Tests (and Journals) tab view, however wide or narrow you make the column. For example, there might be long text in Comments on a test result. The word ...More appears besides the lines and clicking on this displays the whole text.
View Results
If you right click on a test result line, the Source/Action option shows the individual message with the Actions tab selected to enable you to process and, if appropriate, complete the action quickly and effectively without changing screens, but only if the result was filed from Mail Manager.
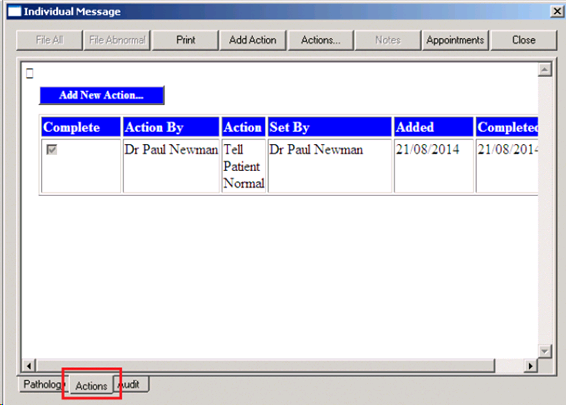
Right Click Source/Action
This is the same screen reached when you click on your mailbox icon ![]() to view current mail, then click on View Results (see Mailbox icon - View Mail Manager results). It has options for File All, File Abnormal, Print, Add Action, Actions, Notes, Close.
to view current mail, then click on View Results (see Mailbox icon - View Mail Manager results). It has options for File All, File Abnormal, Print, Add Action, Actions, Notes, Close.
If the result has been entered manually, only an Additional Entity Information screen is shown, showing when the result was created.
Audit Trail
The right mouse menu also has an Audit Trail option, showing the provider details of the specimen, and an audit trail of the users viewing, filing, actioning, and completing the result.
At the bottom of the screen, click on the down arrow to display the dates the record was written, then updated.
If you then click on a Changed date, the main screen displays green fields where the field has changed on the date and time, and operator shown; it now shows the current entry. Click Close. Click on the double arrow >> at the bottom right and scroll down for further details.
Date of Filing
The date used for filing a test result is the date of collection of the specimen, and if this is unavailable, then the date of each individual result line, or the date from the laboratory.
The Test tab displays the same interaction with the timeline but drag and drop is not enabled.
Abnormal Results
Any abnormal results are shown in red. This is a flag from the path lab indicating the result is outside the normal range.
Result Range
The test result range, whether entered manually or if received electronically via Mail Manager are displayed on the Test and Journal view.
Tab View Options
If you are on the Tests tab of Patient Record, you can change the view options by right clicking on the Test tab header, and selecting View Options. See Journal List Properties.