Header – Guidelines and Reports
The header of a plan (report) or guideline is its title, description and whether a report or guideline.
Remember that one of the essential differences between a Report or Guideline is that if categorised as a report, it will go straight to printing when selected from a guideline/reports index. If a local guideline, it will first display on-screen from which you can then print. You can change existing reports into guidelines or guidelines into report from the Header screen by altering what is selected in Category. Guidelines tend to be used for data display and data entry, while reports tend to be display only.
- The Plan Header for reports, or Guideline Header screen, will be displayed in several ways:
- To edit the header when you are viewing a report or guideline, go into Design mode/ Maintenance and click on
 from the floating toolbar.
 - If either New, Edit or Copy is selected from the Select Guideline screen (reached from Guidelines - Select Guideline). Display the index, highlight a report or guideline, and click on Copy or Edit. Alternatively you can click on New to create a completely new report or guideline.
- If you click with the right mouse within a report or guideline in Design mode/Maintenance on
 and select Plan Header / Guideline Header.
- To edit the header when you are viewing a report or guideline, go into Design mode/ Maintenance and click on
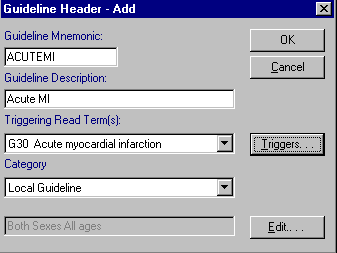
- Guideline Mnemonic - Make up your own mnemonic for this copy or new guideline or report (up to 10 characters) but first switch on upper case, eg ACUTEMI for an acute myocardial infarction guideline. The mnemonic is a unique shorthand name by which the guideline or report can be identified. You must avoid either a space or & in the title.
- For example, enter ENCCOPY for a copy of the Encounter Report, or REPEAT for Current Repeat Medication, or COPASTHMA for a copy of an asthma guideline.
- Guideline Description - Enter a description of the guideline or report, which becomes Title Line 1 of the Guideline or Report, for example, Acute myocardial infarction or Summary Report.
- This is case sensitive, so you may want to put the Caps Lock on first, or use upper and lower case as for titles.
- This description will also appear alongside the mnemonic in the report or guideline list, eg ACUTEMI: Acute Myocardial Infarction. It also appears at the top of the printed report or guideline (unless deliberately suppressed with Print Main Header Plan de-selected)
- Triggering Read Term - Click on the Triggers button if you want to have a Triggering Read Term, ie every time that Read term is used, you will be prompted to run this report or trigger display of this guideline. For a full explanation, see Edit Guideline Triggers in the Guideline section.
- First select Practice Settings if this is to apply to the whole practice; or User Settings if only to yourself.Then select the Read Term(s) which, whenever entered during a consultation, will trigger this current guideline for display. Click on OK
- For example, the Triggering Read Term might be G30..00 Acute myocardial infarction
Note - If three or more guidelines are available, then a list will be displayed for the user to choose. The default is the most recently produced local guideline.
- If there is no guideline for the Triggering Read term, then the parent for that Read code will be used as the trigger. For example, if this is G2155.01, then the Read code used as a trigger will be, in order, G2155.01, G2155.00, G215..00, G21...00, G2...00. An exact match on the Triggering Read term is required and siblings will not be returned. So, in the above example, a guideline triggered on G213..00 will never be returned.
- Category - Select either Report or LocalGuideline. Two effects: (1) Selecting Report means that when double clicked from a Guideline/Report index, it goes straight to printing; If Local Guideline is chosen, then it goes to an on-screen view of the merged data. (2) On the Select Guideline screen when listing reports and guidelines, checking Reports displays those with a category of Report, and checking Locally Generated includes those with a category of Local Guideline.
- Age/Sex Filter - The default is both sexes, all ages. Click on Edit if you want to enter an age range – you can leave the Start age or End age blank for all ages, or enter both ( an age range) or just one or the other (eg, up to the age of ..., or not younger than ....). Tick either Male or Female to filter by sex. Click OK.
Note - That these are age/sex filters for the entire guideline or plan. (Be aware that if you have a child selected, and you list guidelines, you will only see those related to the age of the child rather than the full list). Later you will be able to filter individual lines of a report with an Age/Sex Filter.
- Click OK. The copy will now be displayed in design mode. See Guidelines/Reports Design Mode.
