Creating a Medical Insurance Report
An Insurance Report template allows you to create a medical report for insurance purposes as a Word document. It automatically extracts data from your patient records to produce a report that can then be edited.
To create a medical insurance report:
- From Consultation Manager
 , select the patient and if required start a consultation.
 - Select Add - Correspondence.
- The Clinical Correspondence - Add screen displays:
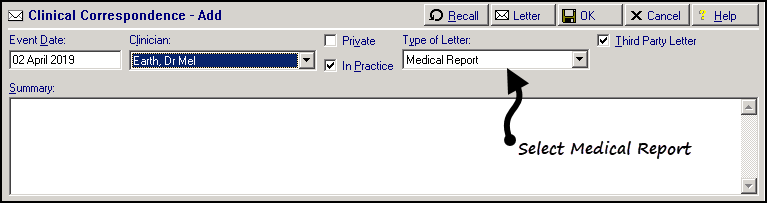
- Complete as follows:
- Event Date - Defaults to today's date, update as required.
- Clinician - Defaults to the staff member or GP signed on for the current session, update as required.
- Private - Defaults to unticked, tick if you are recording a private consultation.
- In Practice - Ticked by default, remove tick to record result was recorded out of the practice.
- Type of Letter - Select Medical Report.
- Summary - Enter for Insurance Purposes and the name of the insurance company requesting the report.
Important - Ensure you only have one instance of Consultation Manager open when generating a report, to prevent generating a report for the wrong patient.
- Select Letter
 and the Select Patient Template to Open screen displays.
 - Select Insurance_Report and then select Open.

- The insurance report opens, while the report compiles an hourglass displays. The cursor shape returns to normal once the report is ready, this can take a while for patients with a lot of data.
- The report is now ready for editing. Some of the sections in the report have Yes/No printed at the end, one of these needs deleting each time and then further comments added if necessary. The data that is imported from Vision 3 can be edited and deleted as required:
- To edit text - Highlight it and enter the required text.
- To delete text within a table - Right click on the line and then select Delete Cells and then Delete entire row. This then does not leave a blank line.
- To delete several rows - Highlight the rows, right click and select Delete Rows.
- To delete text - Highlight it and use the Delete key. See Medical Insurance Report Text and Criteria for details of the criteria of the report
- Select Print
 to print the report ready for sending.
 - Select Close
 .
. - The 'Do you want to save the changes to nnnnnnnn.CLI?' message displays, where nnnnnnnn is the automatically generated title, select Yes.
Remember - This saves the report for the selected patient, it does not update the template.
-
Finally, select OK.
See the Utilities Help Centre for details on updating your templates.
Editing a Medical Report for Insurance Purposes
To edit an existing medical report, in order to change something:
- From Consultation Manager, select the appropriate patient and locate the original entry.
- Right mouse click and select Edit, Clinical Correspondence – Update displays.
- Select Letter
 to open the report.
 - Update the report as required and select File - Print to print the new report.
- Select Close .
- Select Yes to the ‘Do you want to save changes’ message.
-
Select OK to save.
Note – To print this topic select Print  in the top right corner and follow the on-screen prompts.