Floating Toolbar in Design Mode
As soon as you go into Design mode/Maintenance by clicking on the icon  , the floating toolbar displays.
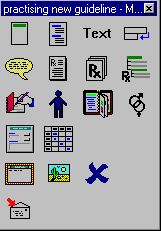
Hovering with the mouse over an icon pops up its function. The icons are as follows:
-
 Plan Header Update (see Header – Guidelines and Reports),
 -
 Add Subheading (see Sub-heading),
 -
 Add Text (see Text),
 -
 Go to New Line (see Guidelines/Reports Design - Insert new line).
 -
 Patient Advice (see Patient Advice),
 -
 Drug Information (see Drug Information for Patient),
 -
 Drug Regime (see Drug Regime)
 -
 Drug class (see Drug Drug class List)
 -
 READ term (see READ term and Record Diagnosis)
 -
 Patient Data (see Patient Data)
 -
 Embed Guideline (see Embed a Guideline)
 -
 Age/Sex Filter (see Age/Sex Filter)
 -
 Clinical Data Hotspot (see Clinical Data Hotspot)
 -
 Patient Data Grid (see Patient Data Grid and Management Plans)
 -
 Launch an external Application (see Application),
 -
 Image, bitmap (see Image),
 -
 Delete selected item (see Guidelines/Reports Design - Delete),
 -
 Export a guideline (see Export a guideline)
To move the whole toolbar to a new position, point to the blue header bar, hold the left mouse down and drag to a new position, and release the mouse.
If you click on an icon on the floating toolbar, this item will be added after the currently highlighted line (the one bordered with lines above and below).
You can also click on a floating toolbar icon and drag it across to the line in the report, in which case it will insert before that line that you released the mouse on.